Uncategorized
How to Get Rid of Tomato Hornworms (Without Chemicals or Losing Your Mind)
How to Get Rid of Tomato Hornworms (Without Chemicals or Losing Your Mind)
🗒️Rooted Field Note: 21
🧟♂️ The Great Green Tomato Terror
Ever gone out to admire your thriving tomato plants, only to spot a horror show of stripped leaves, chewed fruit, and little green droppings scattered like confetti after a tomato wedding?
Yeah. You’ve got hornworms.
These chunky green caterpillars are the tomato world’s version of demolition crews — quiet, hidden, and absolutely relentless. One minute everything’s lush, the next you’re squinting through the leaves trying to find what’s doing the damage.
Don’t worry, I’ve got you. This isn’t going to be a sterile pest-control manual. I’ll walk you through how I handle these beasts — no chemicals, no drama, just boots-on-the-ground homesteader methods that actually work (even with a kid tugging on your pant leg and chickens trying to “help”).
Let’s get into it.
🔍 What Even Is a Tomato Hornworm?
Hornworms are big, fat green caterpillars — like, the size of your pinky or bigger. They’re the larvae of the five-spotted hawk moth (which, ironically, is kinda cool-looking). Hornworms sport a curved “horn” on their back end, diagonal white stripes, and an attitude.
Technically, there are two types: the tomato hornworm and the tobacco hornworm. Both will chow down on your tomatoes like it’s a Vegas buffet, and both are handled the same way, so I don’t bother splitting hairs.
They’re stealthy. Their green color makes them hard to spot, and they’ll hang tight to stems, blending right in like little plant mercenaries. But the damage gives them away.
⚠️ Signs You’ve Got a Problem
If you’re reading this, chances are you already know something’s up. Still, here’s what I look for:
- Leaves stripped down to nubs
- Bite marks in unripe tomatoes
- Weirdly shaped poops (a.k.a. frass) on lower leaves or on the soil
- A hornworm the size of a pickle staring you down with zero remorse
If you’ve got any of these signs, time to suit up.
✋ My #1 Go-To: Handpicking
Before you roll your eyes, hear me out. I used to think handpicking was too “extra” — who has time to play hide-and-seek with caterpillars?
Turns out… it’s actually the most satisfying thing ever.
- Morning or evening is prime worm-hunting time.
- I bring a cup of soapy water and just pluck the suckers off.
- Gloves help, but they don’t bite or sting.
- Bonus: chickens LOVE them. Instant high-protein snack. Circle of life, baby. 🐔
Sometimes I go out with a UV flashlight (they GLOW under blacklight). Yep. Hornworm hunting turned into a fun little father-son game at our place. It’s like Pokémon, but with real consequences for your salsa garden.
🐛 Hornworm with Cocoons? DON’T SQUISH IT
If you see a hornworm covered in white rice-looking cocoons, leave it. That’s a parasitized worm — it’s been attacked by a tiny wasp (Cotesia congregata), and those cocoons are baby wasps that’ll hatch and go hunt other hornworms for you.
It’s creepy, it’s amazing, and it’s FREE biological pest control.
🧙♂️ Nature’s Helpers: Let the Bugs Do the Work
Here’s who you want to roll out the welcome mat for:
- Parasitic wasps: Tiny, hard-working, and incredibly metal.
- Ladybugs and lacewings: These guys go after hornworm eggs and baby caterpillars.
- Paper wasps: Not cuddly, but brutal hornworm hunters.
- Birds and chickens: I’ve seen sparrows pick hornworms off the plants mid-morning.
Want to invite these guests to your garden party? Plant stuff like:
- Dill 🌿
- Fennel
- Yarrow
- Sweet alyssum
- Cosmos
- Borage
- Let a few herbs flower — that nectar draws in the heroes.
Think of it like throwing a BBQ for bugs that don’t like hornworms either.
🧴 Neem Oil: The Natural Repellent
Neem oil is pressed from neem seeds and works as an anti-feedant. Basically, hornworms take a bite and say “Ugh, gross” — and move on (or stop feeding and die).
My tips:
- Use in the early morning or evening to avoid burning leaves.
- Mix properly and follow label directions.
- Don’t spray willy-nilly — it can still affect beneficials if overused.
This is my backup plan when handpicking alone isn’t cutting it.
🧪 I like to keep a small bottle of cold-pressed neem oil on hand — it works for all kinds of garden drama, not just hornworms.
💀 Bt: Bacteria That’s Basically a Hornworm Sniper
Bt (Bacillus thuringiensis var. kurstaki) is a natural bacteria that only harms caterpillars. You spray it on the leaves, the hornworms eat it, and their guts shut down. It’s targeted and won’t hurt bees, birds, or me.
Things to remember:
- Use when hornworms are small for best results.
- Reapply after rain.
- Don’t spray just to spray — this is a scalpel, not a sledgehammer.
Bt is sold as a powder or concentrate. Look for OMRI-listed options if you’re serious about staying organic.
🌿 Companion Plants That Confuse and Repel
Think of this as garden judo — using scent and plant buddies to make life hard for hornworms.
Here’s what I plant near my tomatoes:
- Basil: It might repel moths — plus, pesto.
- Marigolds: Good old-fashioned bug deterrents.
- Dill: Double agent — attracts wasps, also works as a trap crop.
- Borage: Pretty, pollinator-friendly, and rumored to confuse pests.
It’s not a guarantee, but it helps. And even if it doesn’t, your garden will look fantastic.
🌶️ DIY Garlic & Pepper Spray
This is the “angry grandma” method — cheap, homemade, and spicy.
My mix:
- 3 garlic cloves
- 1 tsp cayenne
- 1 drop dish soap
- 1 qt water
Blend, strain, spray. Works as a deterrent. Just don’t spray during high sun hours — it can burn leaves. Also… label that bottle. Ask me how I know. 😬
🧠 Final Thoughts from the Tomato Trenches
Hornworms are frustrating. But they’re also part of gardening. With a little vigilance and a few good habits, they go from “garden apocalypse” to “mild inconvenience.”
Start by handpicking. Encourage the good bugs. Spray only when you need to. Rotate your crops. And keep a sense of humor.
These big green guys don’t stand a chance against The Rooted. 🌱
💬 Dig Deeper: Join the conversation in our Sprouting Homestead Forum — share your hornworm battle stories, ask questions, or just show off your worm-hunting trophies.
🪴 Coming Soon: Rooted Field Note No. 22 – How to Protect Tomatoes Organically: From Blight to Blossom Drop → [placeholder link here]
🧰 Rooted Field Note Disclaimer
-
 The Day Fungus Gnats Started Seasoning My Dinner (And How I Kicked Them Out)
- Nightshade Assassins: Organic Pest Control by Family
- Tomato Pruning for Bigger Yields (With Pics)
How to Get Rid of Aphids (and Reclaim Your Plants Without Chemicals)
🪴 How to Get Rid of Aphids (and Reclaim Your Plants Without Chemicals)
🗒️Rooted Field Note: 20
Let’s get one thing straight: I don’t have time to babysit bugs. I’ve got veggies to grow, a kid to raise, and dirt to play in. So when I noticed sticky leaves and tiny green invaders setting up camp on my kale? It was war. 😤
This Rooted Field Note is for you if you’ve ever squinted at your plants and thought,
“Why does my tomato look like it’s been through a breakup?”
You might be dealing with… aphids.
Let’s fix that — naturally, organically, and with a little grit.
What Are Aphids? (And Why Do They Always Pick MY Plants?)
These little garden gremlins are soft-bodied insects that cluster on new growth like it’s a salad bar. They suck the sap out of your plant’s veins — literally — and leave behind honeydew, a sticky mess that attracts ants and grows black mold.
You’ll usually find them on:
- Undersides of leaves 🥬
- Tender stems 🌿
- Flower buds 🌸
And they come in more colors than your seed packet: green, black, yellow, white, even pink. Yeah… cute from far away, chaos up close.
Left alone, they can curl leaves, stunt growth, and wreck entire harvests. So let’s learn how to get rid of aphids on plants without nuking your soil.
Step One: Hose Down the Freeloaders 🚿
If you catch them early, a strong spray of water can knock aphids right off the plant. Think of it like evicting squatters — fast and satisfying.
🧰 I use this heavy-duty hose nozzle from Amazon that lets me adjust the pressure without damaging leaves.
⚠️ Do this in the morning so the leaves dry out before dusk (mildew is NOT invited to the party).
Step Two: Hand-to-Bug Combat ✋🐛
No shame in getting your fingers dirty. If the infestation is small, squish those suckers or wipe them off into a bucket of soapy water.
You can also prune infested leaves or tips, especially on herbs like basil or tender young tomatoes. Toss ‘em — don’t compost them unless you enjoy surprise guests.
Step Three: Soap ‘Em Down 🫧
Insecticidal soap is my go-to when I need backup.
🧪 It breaks down the protective layer on aphids and melts them on contact (but gently — think organic pest control, not garden war crimes).
DIY Version:
- 1 tsp pure castile soap (like Dr. Bronner’s)
- 1 quart water
- Spray bottle
Shake and spray directly on aphids. Repeat every few days. Get the undersides of leaves!
Or try a ready-made organic option like this one from Safer Brand.
Step Four: Neem Oil = Nature’s Deterrent 🛡️
Neem oil doesn’t just kill — it confuses. It messes with aphids’ hormones so they forget how to eat and reproduce. (Where was this when I was dating in my 20s?)
🧴 Mix according to the label (usually 1-2 tablespoons per quart of water), add a few drops of soap to emulsify, and spray every 7–10 days.
✅ I use this cold-pressed neem oil concentrate — be sure it’s 100% pure and labeled for garden use.
⚠️ Don’t spray in full sun or over 85°F. Your plants will thank you.
Step Five: Diatomaceous Earth – The Sneaky Assassin 🪶⚔️
Food-grade diatomaceous earth (DE) is like tiny glass shards to aphids — harmless to us, lethal to them.
How to use:
- Dust it on dry leaves
- Reapply after rain
- Avoid flowers (we want to save the bees, not slice them)
🧂 This food-grade DE works on slugs, ants, and even fleas too. A little goes a long way.
Step Six: Enlist the Good Guys 🐞💪
Your garden isn’t a solo show — it’s an ecosystem. And ladybugs, lacewings, and hoverfly larvae are your pest-control SWAT team.
They don’t just visit — they devour aphids by the dozens.
Here’s how to roll out the welcome mat:
🌼 Plant these companion flowers:
- Dill
- Yarrow
- Alyssum
- Calendula
- Fennel
These attract beneficial insects and look great doing it.
Want to buy backup? You can order live ladybugs or lacewing eggs. Just release them in the evening after misting the plants.
✅ Buy beneficial insects from Arbico Organics (affiliate link)
Step Seven: Companion Planting = Aphid Prevention Strategy 🌿🔁
Aphids hate strong smells — which makes garlic, chives, mint, and catnip your secret weapons.
🌱 Plant garlic near roses, mint near tomatoes, or interplant herbs with your veggies.
And get this: aphids love nasturtiums.
Plant them as trap crops nearby and the aphids will migrate there instead. Once infested, prune the nasturtiums and compost away.
Bonus Move: Fight the Ants 🐜❌
Ants protect aphids so they can “milk” them for honeydew.
Cut off the ants, and the aphids lose their backup.
Try:
- Sticky traps around stems
- Cinnamon barriers
- Homemade ant baits (if you’re feeling spicy)
Keep ‘Em Gone: Aphid Prevention Habits 🧹
🪴 Keep your plants healthy but not overfed (aphids LOVE nitrogen-rich tender growth)
🔍 Check leaf undersides weekly — the sooner you catch ’em, the easier the fix
🍂 Clean up plant debris where aphids might overwinter
🛢️ Apply dormant oil spray on fruit trees before spring to smother overwintering eggs
Real Talk from the Homestead 🤚
I’ve seen a single tomato plant go from lush to limp in a week because I didn’t check the undersides of the leaves. Now it’s part of my weekly rhythm — coffee in one hand, hose in the other, checking for aphids like I’m on patrol.
This isn’t just about bugs — it’s about keeping what we grow safe, knowing our hands built it, and raising our kids to respect what real food takes.
So next time you see a shiny leaf covered in sticky goo, don’t panic. You’ve got tools, grit, and maybe even a few ladybugs on your side. 💪🐞
🧰 Dig deeper into this Rooted Field Note and explore more tools from the homestead.
Coming soon:
📌 How to Grow Marigolds in Pots – Rooted Field Note: 21
📌 The Best Organic Fertilizer You Can Grow at Home
📌 The Tomato Assassin’s Guide: How to Spot & Stop Hornworms


🌿 Notify me when comfrey is available!
We’ll email you as soon as it’s back in stock. 🌿
➡️ Occasional homestead tips & early access to natural offers. No spam.
How to Grow Marigolds from Seeds (and Why Every New Gardener Should Start Here)
🪴 How to Grow Marigolds from Seeds (and Why Every New Gardener Should Start Here)
🗒️Rooted Field Note: 19
If you’ve never felt that electric little jolt of joy from watching something grow from seed to bloom, let me introduce you to marigolds. These bright, bold blooms are where I point every first-time gardener (and where I circled back after a year that kicked my tomatoes to the curb). They’re easy. They’re fast. And they ask almost nothing from you.
Heck, my 6-year-old once planted a few with the reckless abandon of a juice-box-fueled tornado and still managed to get a row of cheerful gold. That’s the magic of marigolds.
🌼 Why Marigolds Are the MVPs of Beginner Gardens
Marigolds aren’t just pretty faces. They’re hard-working companions, bug-fighting bloomers, and edible (yep — sprinkle those petals on a salad). Some varieties even help suppress soil nematodes. Whether you’re planting a pollinator garden or lining the edge of your veggie beds with bug defense, marigolds play nicely with just about everything.
And unlike those drama-queen ornamentals, marigolds don’t need coddling. They germinate fast, tolerate abuse (ask my kid), and bloom for months if you deadhead them now and then.
🌱 What You’ll Need
Here’s what I use to start marigolds from seed:
- Marigold seeds — I prefer French marigolds like ‘Bonanza Orange’ and African marigolds like ‘Crackerjack’, both super reliable.
- Seed-starting mix — Something light and well-draining like this organic mix.
- Seed trays or upcycled yogurt cups — Just poke a hole in the bottom for drainage.
- Humidity dome or plastic wrap (optional but helpful).
- Grow light or a sunny windowsill — They’ll need 12–16 hours of light once they sprout.
- Spray bottle for gentle misting.
If you’re direct-sowing outdoors, you can skip the lights and trays. Just make sure your soil has warmed up past 65°F.
🪴 Step-by-Step: How to Grow Marigolds from Seeds
Option A: Indoors (for a head start)
- Start 6–8 weeks before your last frost.
- Fill your trays with pre-moistened seed-starting mix.
- Plant seeds 1/4\” deep and cover lightly.
- Cover with a dome or plastic and keep warm (70–75°F).
- Mist daily keeping the soil evenly moist.
- When they sprout (usually within 5–7 days), remove the dome and place under lights.
- Thin seedlings to one per cell once they have true leaves.
- Harden off outdoors for 7–10 days before transplanting.
Option B: Outdoors (after frost)
- Pick a sunny, well-draining spot in your garden.
- Loosen the soil and rake smooth.
- Sow seeds 1/4\” deep and 8–12\” apart.
- Water gently and keep moist until germination.
- Thin seedlings as they grow.
🔥 Common Mistakes (I’ve Made Them All So You Don’t Have To)
- Sowing too early outdoors — Cold soil = no germination.
- Overwatering trays — Leads to damping-off (aka seedling sadness).
- Not enough light indoors — Leads to tall, wobbly sprouts.
- Skipping hardening off — Wind + unprepared seedlings = heartbreak.
🌸 Which Marigold Should You Grow?
- French marigolds (Tagetes patula) — Compact and bushy, great for borders and containers.
- African marigolds (Tagetes erecta) — Tall with big blooms, great for backdrops or cutting.
- Signet marigolds (Tagetes tenuifolia) — Edible, citrusy, and delicate. My personal favorite for salads and tea.
🧪 Bonus Benefits
- Natural pest control — Especially root-knot nematodes and aphids.
- Pollinator attractor — Bees love ‘em.
- Edible flowers — ‘Lemon Gem’ and ‘Tangerine Gem’ taste amazing.
- Seed saving — Let a few flowers dry and you’ll never buy marigold seeds again.
👨👦 Real Talk from the Raised Bed
We’ve had marigolds lining our quail pen, bordering the tomato beds, and sprouting out of little pots our son painted himself. They’ve taught him patience, and let’s be honest — they’ve rescued more than a few bare garden patches when nothing else wanted to grow.
So yeah, I think every beginner should grow marigolds. They’re the no-judgment friend of the flower world. They bounce back when you forget to water, smile even in rough soil, and keep showing up until the frost shuts them down.
➕ What’s Next?
Curious about growing marigolds in pots? You’re in luck. I’ll show you how to choose the right container, the best soil mix, and how to keep blooms going all summer long — even on a tiny porch.
👉 Field Note Coming Soon: How to Grow Marigolds in Pots
💬 Join the Forum
Got your own marigold story (or struggle)? Come tell us about it in the ➡️Sprouting Homestead Forum. We’re rooting for you. 🌱
Don’t Toss Those Garlic Curls! What to Do With Garlic Scapes After Cutting
Don’t Toss Those Garlic Curls! What to Do With Garlic Scapes After Cutting 🌿
……….🗒️Rooted Field Note: 18
Let me tell you about the first time I saw garlic scapes curling up like little green pig tails in my garden…
…I almost ignored them 😳
I thought, “Are these weeds? Are they gonna seed my garlic? Should I just snap them off and compost them?”
But friend, those curly green shoots are edible gold. And once you know what to do with garlic scapes after cutting, you’ll be waiting all year for scape season like it’s the Super Bowl of garden bonuses 🏆
Today, I’m walking you through exactly what garlic scapes are, when and how to harvest them, and — best part — what to actually DO with them in your kitchen so they don’t end up wilting in the fridge or worse… the compost.
🌱 First Off: What Are Garlic Scapes?
If you’re growing hardneck garlic (the kind that does best in colder climates — like here in my Zone 5 garden), garlic scapes are the flower stalks your plants send up in early summer. They look like long green stems with a single curl and a little bulge near the top — that’s the flower bud.
👉 You’ll want to cut them off or pull them out to direct the plant’s energy back into making big, juicy bulbs underground.
But here’s the kicker: those scapes taste like a sweet, mild garlic — kind of like if garlic and green onions had a baby. They’re tender when young and pack a solid garlicky punch when cooked.
✂️ When & How to Harvest Garlic Scapes
You’re looking for the curl. One full loop is your signal to snip. If you wait too long and they straighten out, they get woody. (No thanks.)
I use my trusty Fiskars Garden Snips (Amazon affiliate) to cut them cleanly where they meet the top leaves.
📸 This is what a garlic scape ready to harvest looks like: Alt Text: “Curled garlic scape ready to be harvested above the garlic leaves.” File Name: garlic-scape-ready-to-cut.png Image Title: What Garlic Scapes Look Like Before Harvest
🧄 What to Do With Garlic Scapes After Cutting
Here’s where the magic happens.
Garlic scapes are one of those “blink and you miss it” seasonal treats. But they’re incredibly flexible in the kitchen and — bonus — easy to preserve.
Here are the top things I actually do with mine:
🧑🍳 1. Make Garlic Scape Pesto
This is the OG. Toss chopped scapes in the blender with:
- Olive oil
- Walnuts or sunflower seeds
- Parmesan (or nutritional yeast for dairy-free)
- Lemon juice
- Salt
👉 Freeze them in some ice cube trays and enjoy the taste of June in your pasta all winter long.
🍳 2. Sauté or Stir-Fry Them
Chop like green beans and fry in butter or oil for a couple minutes. Great with eggs, rice bowls, or as a side with roasted veggies.
Bonus: they caramelize beautifully if you slow-fry them with onions 🍳🔥
🔥 3. Grill or Roast
Toss in olive oil, salt, pepper. Grill until charred. Finish with lemon juice or flaky salt.
Kinda like asparagus but with garlicky swagger 😎
🥒 4. Quick Pickle for Crunch
Chop into jars and pour hot vinegar brine over them (apple cider vinegar + garlic + mustard seed = chef’s kiss).
Store in the fridge and snack on them for weeks. Also makes an amazing Bloody Mary garnish 😉
🧈 5. Garlic Scape Butter
Mince a handful of scapes and mix with a pinch of salt and softened butter, then a squeeze of lemon. Store in the fridge or roll and freeze in wax paper.
👉 Spread it on toast, melt it on grilled corn, or toss with steamed veggies.
❄️ How to Store or Preserve Garlic Scapes
Fridge:
Stick them in a produce bag in the crisper drawer. They’ll stay fresh for 2–3 weeks.
Or stand them upright in a glass of water like a bouquet — change water daily.
Freezer:
Chop, toss in a freezer bag, done. No blanching needed. Use for soups, stir-fry, or pesto.
Dehydrate:
Slice thin, dry until brittle, grind into garlic powder or seasoning salt.
📋Dig deeper into this Rooted Field Note and explore more tools from the homestead.
Want to swap ideas with other growers about garlic scapes, compost recipes, and more?
👉 Join The Rooted Community Forum
📫 Coming Soon:
We’re working on a full Garlic Growing & Harvest Guide + Garlic Scape Printable Recipes — be sure to bookmark this Field Note and check back for updates.
📬 Grab the Homestead Starter Pack + Freebies
💬 Tell Me Below:
What’s your favorite garlic scape recipe? Or do you just grill ‘em and call it good?
Let me know in the forum, or share a photo of your scapes and tag @SproutingHomestead 🌿
I Waited 9 Months for This Moment: How to Harvest Garlic Without Screwing It Up
🧄 I Waited 9 Months for This Moment: How to Harvest Garlic Without Screwing It Up 😅
Let’s be honest — growing garlic feels a bit like a long-term relationship. You plant in the fall, protect it through the winter, get excited in spring, and then… you wait. 🕰️
And just when your patience is hanging by a thread, the tops start yellowing, and you wonder: Is it time?
That’s exactly what happened to me the first year I grew hardneck garlic in Zone 5.
If you’re like I was, staring down a row of browning garlic tops with no clue whether it’s go time or “wait a week,” this Rooted Field Note is for you.
🔍 How to Know When Garlic is Ready to Harvest (Zone 5 Friendly)
In our northern Zone 5 climate, hardneck garlic is typically ready to harvest in mid-to-late July — give or take a week depending on your season.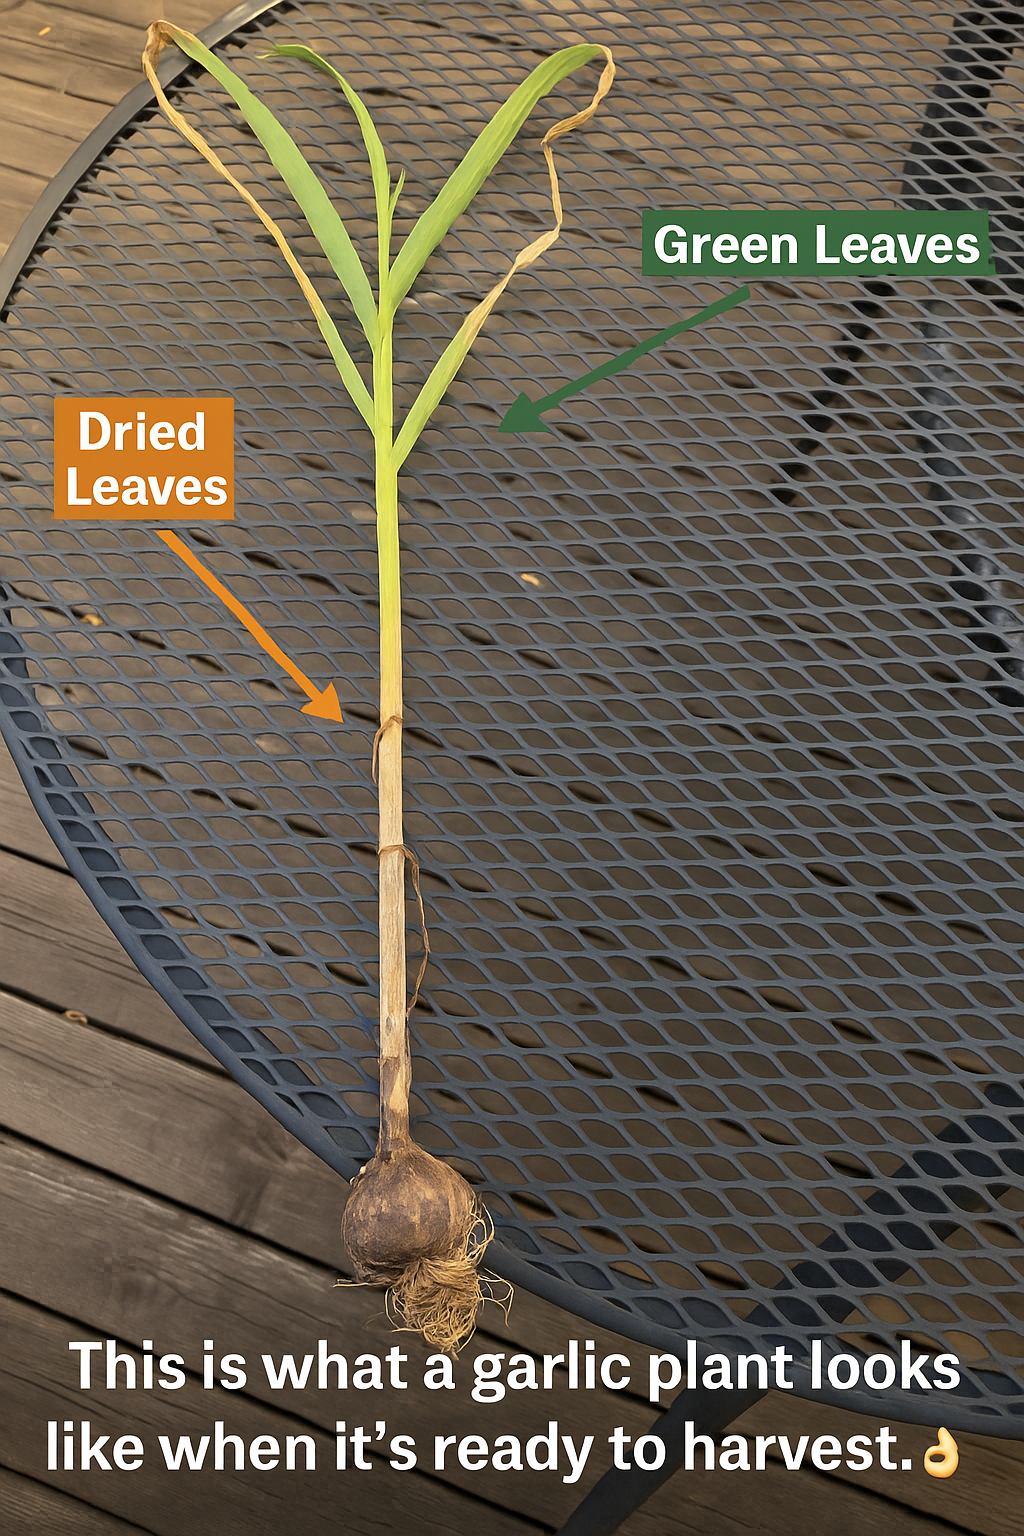
👉 When ⅓ to ½ of the leaves have turned brown, it’s time to harvest.
That’s not a random number. Garlic leaves represent the layers of protective skin around each bulb. If too many leaves die off, your garlic ends up with fewer papery wrappers — which means less protection and a shorter shelf life.
💡 Pro Tip: Don’t pull early! You want the cloves to fill their skins but not bust through them like a balloon animal in a heatwave.
🧰 What You’ll Need to Harvest Garlic Like a Pro
| Tool | What It’s For |
|---|---|
| 🪓 Radius Garden Broadfork | Loosens deep soil without slicing bulbs (this fork changed my soil game). |
| 🧤 Gardening Gloves | Keeps your hands clean and saves your knuckles from angry dirt clumps. |
| 🧺 Harvest Basket or Crate | Keeps bulbs dry and safe after pulling. Avoid buckets or plastic bags. |
| 🧵 Twine or Garden String | For tying bunches together during the curing phase. |
| ✂️ Garden Scissors | To trim roots and stalks after curing. |
I used the Radius Garden fork to gently loosen the soil before planting the bulbs — game changer. 👌
🪓 Step-by-Step: How to Harvest Garlic (Without Wrecking It)
1. Pick a Dry Day
Garlic pulls cleanest and stores longest if you harvest when the soil’s dry. I usually stop watering 7–10 days before harvest to help bulbs cure naturally in-ground.
2. Loosen the Soil
This is where your fork shines. Push the broadfork 6–8 inches from the plant’s base and lean it back gently to loosen the soil. Work around the bulb, don’t stab directly under it like a vampire hunter.
🎯 Goal:
Loosen, don’t lift yet.
3. Pull Gently by the Stalk
Once the soil’s loosened, grab the garlic by the base of the stem and gently work it up. If it resists, loosen more. If it breaks, well… time to dig carefully with your fingers.
💬 Been there. Learn from me: don’t yank.
4. Shake, Don’t Wash
After lifting, shake off loose dirt — do this carefully by hand, not by hitting the bulbs on the ground. Avoid washing them at this stage; extra moisture can invite mold. If any bulbs got nicked or bruised during digging, set those aside to use soon, as damaged garlic won’t store well.
🌬️ Curing Garlic: The Make or Break Step
Once you’ve got your bulbs out, the work’s not done. Garlic requires a few weeks to dry out properly, during which it develops the distinctive papery skins that are familiar to many. To cure my garlic, I follow a specific process that ensures optimal flavor and preservation. Here’s a step-by-step guide on how I cure mine for the best results:
✅ Where:
Dry, dark, airy spot. I use our shed, but a covered porch or garage works too. Just avoid sunlight — it can cook or bleach the bulbs.
✅ How:
Tie garlic in bundles of 6–10 with twine and hang them upside-down like little garlic chandeliers, or lay bulbs flat on a screen or raised surface. Good airflow is the goal.
✅ How Long:
3–4 weeks in a cool (60–70°F), dry area. The bulbs will feel firm, and the outer skins will look papery when they’re done.
✂️ After Curing: Trimming, Cleaning & Storing
- Trim the tops to about ½ inch above the bulb
- Trim the long roots off to a small nub
- Peel one or two outer layers if they’re dirty — leave the tight wrappers
- Store in a cool, dark, dry place with good airflow — NOT the fridge
🤦♂️ Rookie Mistakes to Avoid
- Too Early? Cloves are tiny and soft. They won’t store.
- Too Late? Bulbs split and start rotting in storage.
- Bruising the Bulbs? They spoil faster. Treat the bulbs like eggs.
- Washing Garlic? Nope. Just don’t.
🌱 Ready to Try It Yourself?
Harvesting garlic is one of the most satisfying moments on the homestead. There’s just something about pulling your own homegrown bulbs from the earth that hits different. You feel like a dang pioneer with your own pantry stash. 🧄🔥
If you’ve got questions or want to share your harvest pics, jump into The Rooted Forum — it’s new, and we’re building it together. Ask, share, laugh, learn. We’re rooting for you in more ways than one.
👀 Coming Soon: What to Do With Garlic Scapes + How to Grow Bigger Bulbs Next Year
Bookmark this Rooted Field Note or save it to your garden journal for next season.
🛒 Tools I Actually Use (Affiliate Picks)
I Don’t Till — Here’s How I Prep My Soil for a Garden That Thrives
🪓 I Don’t Till — Here’s How I Prep My Soil for a Garden That Thrives 🌱
Ever stared at a patch of dirt and thought, “How the heck do I turn this into a garden?” 😅 Yeah, me too. I’m a dad, a homesteader, and a guy on a mission to raise food, not just for myself, but with my son — one bed at a time.
So if you’ve been Googling “how to prep soil for garden” and feel overwhelmed by rototillers, lab tests, and soil science rabbit holes, you’re in the right place. Because today I’m walking you through exactly how I prep garden soil — no fluff, no tiller, and no gatekeeping.
👉 Spoiler: I used a broadfork, organic fertilizer, compost, cardboard with planting holes, and topped it all with local bark mulch — and it worked like a charm.
🧪 Step 1: Know Your Soil Like You Know Your Coffee Order
Before you do anything else, get a feel for what you’re working with. You don’t need a PhD in soil science — just grab a handful and squeeze.
- If it falls apart like sand, it is sand.
- If it clumps up like playdough, you’ve got clay.
- If it crumbles like chocolate cake, congrats — you’ve won the dirt lottery (loam!).
And if you want to go a little deeper, a $10 home soil pH test kit or sending a sample to your local extension office is worth it.
👉 Pro Tip: Most garden plants like a pH between 6.0–7.0. Compost does a lot of balancing naturally if you’re close.
🛠️ Step 2: Broadforking Changed the Game for Me
Forget gas-guzzling tillers. I prep my garden beds with one of my favorite tools: the Radius Garden broadfork.
This tool lets me break up the soil without flipping it over — keeping all those beneficial worms, fungi, and microbes alive and well.
- Stab the broadfork into the soil every 6 inches.
- Rock it back gently to lift and aerate the soil.
- Repeat until the whole bed is loosened.
No compaction. No fossil fuels. Just you, your fork, and some satisfying dirt therapy. 🧘♂️
💩 Step 3: Add Organic Fertilizer & Compost Like a Pro
After broadforking, I sprinkle on a dry organic fertilizer.
Next comes the black gold: compost. I spread a solid 2–3 inches over the top. If you’ve got your own, great. If not, go for OMRI-listed bagged compost or call a local provider.
This combo builds soil health, boosts microbial life, and keeps plants nourished for months.
📦 Step 4: The Cardboard Trick (Yes, Really)
Here’s where I do things a bit differently…
Instead of digging in the compost, I lay cardboard directly over the bed.
- It smothers weeds without disturbing soil layers.
- It holds moisture like a sponge.
- It breaks down over time and feeds soil microbes.
I cut planting holes right where I want to sow or transplant. The roots go into that rich, composted zone underneath — the rest stays clean and weed-free. 🌱✂️
🌲 Step 5: Top It Off with Mulch (and Local Wins Again)
My final layer? Bark mulch from a local landscape supply yard. Nothing fancy, just honest mulch that:
- Locks in moisture 💧
- Moderates soil temperature 🌡️
- Suppresses weeds 🙅♂️
- Breaks down slowly to feed soil 🐛
Mulch is essential if you want low-maintenance garden beds that look good and grow better.
🌍 Why I Don’t Till (Anymore)
I used to think tilling was the way to go. Then I learned:
- It destroys soil structure
- It wakes up weed seeds
- It harms fungal networks
Now I use the broadfork for air flow and build layers above the soil line — compost, cardboard, mulch. Like nature does it.
Over time, this no-till, layer-up method turns garden beds into spongey, worm-filled paradises. 🪱🌿
🧠 TL;DR – My Lazy-But-Effective Soil Prep Formula:
- Assess soil texture and pH
- Broadfork the bed
- Sprinkle fertilizer
- Layer compost
- Cover with cardboard & cut planting holes
- Top with mulch from a local source
- Let worms do the work
You don’t need a tiller. You just need a little trust in the soil process and a willingness to layer like lasagna. 🍝
🫶 Want to Learn More? Join the SproutingHomestead Forum
This isn’t just my story — it’s ours. I’m building a space where homesteaders and backyard growers can swap tips, share garden fails, and get inspired.
👉 Click here to join the forum
I’ll also be posting my follow-up guide soon on what I plant after prepping this way and how to keep the soil thriving all season.
✍️ Final Thought: It Starts in the Soil
I don’t have a fancy tractor. Just a fork, some mulch, and a 6-year-old who thinks worms are treasure. 🐛❤️
Prepping your soil doesn’t have to be complicated. It just has to be intentional.
So the next time someone asks how to prep soil for garden — send them here. Or better yet, tell them what worked in your backyard.
Coming Soon:
-
- 🧑🌾 How I Choose Which Plants Go Where in My Beds
- 🐛 The “No Panic” Guide to Garden Pests
- ⛄How to Prepare Your Garden for Winter (Without Losing Your Soil or Sanity)
Rooted Field Note: Some links in this Field Note are affiliate links to tools, seeds, or gear we actually use. If you click and buy, we may earn a small commission — no extra cost to you, just a little help for the homestead. 🌻
How to Dry Basil Leaves the Old-Fashioned Way (and Why I Still Do It That Way)
🌿 How to Dry Basil Leaves the Old-Fashioned Way (and Why I Still Do It That Way)
Let me tell you a little secret most homesteaders don’t admit upfront…
We grow basil like it’s going out of style, but then we blink—and it bolts, flops, or explodes into an unruly mess of green. 🌱💚
If you’re wondering how to dry basil or looking for simple, real-life tips on how to dry basil leaves, this is for you.
No fancy dehydrators required (though, yes, I drool over them like some folks eye KitchenAid mixers). This post is all about real, DIY-friendly, budget-loving ways to keep your basil useful long after summer fades.
So pull up a crate, friend. I’ll share the exact methods I’ve used to preserve my basil—without a big wallet or a big appliance—plus a few that I hope to try when my homestead wishlist gets a little shorter. 😉
Why Drying Basil Matters (Especially on a Budget)
Fresh basil is incredible… for about 5 seconds. Then it wilts, blackens, and vanishes faster than my son when chore time starts 🧒💨
By drying basil, I can:
- Add homegrown flavor to soups, sauces, and stews all winter 🌨️
- Avoid buying those sad $6 jars of supermarket “basil dust”
- Store something from our garden with zero refrigeration
And the best part? You can do this without a dehydrator, oven, or microwave.
✨ My Favorite Method: Hang Drying Basil (Cost-Effective & Kinda Romantic)
Look, if there’s one method I trust year after year, it’s hang drying basil. Not only is it simple, but it costs nothing. And that makes it my go-to. 💸🌿
I don’t own a dehydrator (yet), and a freeze dryer? That’s dreamland stuff. Someday maybe. Until then… we hang!
Here’s How I Hang Dry Basil:
- Harvest in the morning – Right after dew dries but before the sun gets spicy 🌞. Pick non-flowering stems for the best flavor.
- Rinse gently – Shake off bugs and dirt, then lay basil on a clean towel.
- Pat dry – Or use a salad spinner (worth it). Wet leaves = moldy sadness.
- Bundle up – Tie 4-6 stems together with twine or rubber bands. Small bundles dry faster and safer.
- Hang ‘em high – In a dry, dark space with good airflow. I use our pantry hooks, but you can use closet rods, rafters, curtain rods, etc.
- Wait 1–3 weeks – Depends on your climate. Dry basil should crumble easily.
- Strip & store – Gently pull leaves from stems, keep them whole (for max flavor), and store in airtight jars.
🔥 Pro Tip: Slip a paper bag over each bundle (with holes cut in it) to protect from dust and bugs while still letting air circulate.
🫙 Want your basil to last longer and stay more flavorful? Store the whole leaves, not crushed, until you’re ready to use them.
🏡 Other Ways to Dry Basil (Faster, but Not Always Better)
While I swear by air drying for budget and flavor, here are other methods you can use—especially if you’ve got a big harvest and a ticking clock.
🔥 Oven Drying Basil
Oven drying works in a pinch, but it comes with warnings. Most ovens don’t go low enough, so be gentle.
What you’ll need:
- Basil leaves
- Baking tray + parchment paper
- An oven that goes down to 170°F or less
Steps:
- Preheat to lowest temp (ideally under 200°F).
- Spread basil leaves in a single layer.
- Bake for 1–2 hours, checking every 30 mins.
- Prop oven door open a crack to release moisture.
- Remove when brittle, cool completely, and store.
🚫 Be careful: high heat can cook your basil, not dry it.
💡 Check out low-temp convection ovens on Amazon »
🌬️ Dehydrator Method (The Dream Tool)
If I had a dehydrator, this would be my second go-to. Super efficient, easy on the oils, and perfect for big batches. But like I said… it’s still on my someday list 😅
- Set dehydrator to 95–115°F (herb setting if it has one)
- Lay out leaves in single layer
- Dry for 2–4 hours, checking halfway
- Cool, crumble (if you want), and store
💡 Browse top-rated dehydrators »
⚡ Microwave Method (Fastest, Riskiest)
Okay, okay. I’ve done this once… and it was almost perfect. Keyword: almost. The microwave dries basil fast, but it’s tricky to avoid burning or browning.
- Place leaves between paper towels on a plate
- Microwave in 15–30 sec bursts
- Flip or rotate leaves between rounds
- Stop when leaves are crisp but not toasted
- Let cool fully before storing
⚠️ Only good for small batches. Like “I forgot the fresh basil and it’s 7 PM” batches.
🫙 How to Store Dried Basil (So It Actually Stays Good)
You’ve worked hard to dry those leaves—now don’t ruin them with moisture, sun, or lazy lids.
- ✅ Use a mason jar, spice jar, or resealable tin
- ✅ Keep the jar in a cool, dark place (not next to the stove!)
- ✅ Label it with the harvest date
- ✅ Leave the leaves whole until you use them
- ✅ For bonus shelf life, tuck in a food-safe desiccant packet
Dried basil is best used within 6–12 months. If it doesn’t smell like basil anymore, it’s time to refresh next season’s stash.
🌱 Final Thoughts from a Basil-Loving Homesteader
I may not have a dehydrator yet, and my basil doesn’t always look Pinterest-perfect, but hanging those fragrant bundles in my pantry makes me feel like I’m doing something real—something connected to the land.
It’s simple. It’s scrappy. And it works.
If you’re trying to figure out how to dry basil leaves on a tight budget, this is it. You don’t need gadgets. Just some twine, patience, and a shady spot.
And if you ever do get a dehydrator or freeze dryer, bless you. Use it well and report back. I’ll be hanging my little bundles in the meantime, dreaming of that sweet, space-age herb drawer.
🛠️ Coming Soon:
- Best Ways to Store Fresh Basil (Without a Fridge)
- How to Make Pesto with Dried Basil (Yes, it works!)
- DIY Herb Drying Rack Plans (No Power Tools Needed)
🌿 Join the Sprouting Homestead Forum
Got a favorite basil drying trick I didn’t mention? Or want to show off your hanging basil bundles? Come hang with us (pun totally intended 😉) in the Sprouting Homestead Community Forum »
We swap stories, share photos, and troubleshoot pests, propagation, and pantry wins together.
🛒 Recommended Tools & Supplies:
How to Propagate Basil from a Cutting: Fast & Easy Cutting Method Using Sand
🌿 I Grew Endless Basil from a Single Plant (and You Can Too)
My Oddball Sand Trick That Actually Works
Let me paint the scene for you: It’s late spring, my basil is booming, and I’m standing in the garden thinking, “How do I make MORE of you without starting over from seed?” I didn’t want to baby seedlings again. I didn’t want to spend another $4.99 on a nursery plant that would bolt the moment I blinked. So I took a cutting, shoved it into a tray of sand, and topped it with a plastic dome. It felt like I was winging it… but guess what? That weird little setup exploded with roots. 🫢
This isn’t some textbook tutorial. It’s a peek into how I actually do it on my homestead—with all the wins and the “oops” moments included. If you’re ready to try something a little off the beaten garden path (but way more satisfying), keep reading.
🌟 Join our Sprouting Homestead Community Forum to swap stories, get help, or just geek out over garden hacks with the rest of us!
Why I Started Propagating Basil from Cuttings 🌱
It all started during a summer where I blinked and my basil took over the raised bed like a green, fragrant monster. I didn’t want to waste those cuttings—so I thought, “Can I root these?” 🤔
Turns out, basil is basically begging to be cloned. It roots like a dream with a little help, and the best part? It’s an exact copy of the parent plant. Same lush leaves. Same bold flavor.
Bonus: It’s totally FREE if you already have one plant. 👏
My Basil Propagation Setup: Why I Use Sand (Yes, Really)
Here’s what I use in my mini “basil cloning station”:
- Standard seedling tray (with drainage holes)
- Coarse sand – the cheap kind from the hardware store
- Clear humidity dome – even a leftover salad container lid works
- Heat mat (optional – helps during cooler weather)
- Grow light (optional – especially for indoor starts)
- Rooting hormone powder (Amazon affiliate)
Why sand? It’s sterile, drains well, and roots love it. No rot, just fast growth. Pair that with a humidity dome to keep the air moist, and your cuttings will think they’re on a spa retreat.
Step-by-Step: How to Propagate Basil from a Cutting
- Snip a 4–5 inch cutting just below a leaf node. Choose one that hasn’t flowered.
- Remove lower leaves, leaving 2–3 sets of leaves on top. Trim large ones.
- Optional: Dip the moistened stem in rooting hormone.
- Insert into moist sand about 1.5 inches deep. Gently firm around it.
- Mist the cuttings and surface (don’t soak it).
- Cover with the humidity dome to trap moisture.
- Place in bright, indirect light (ideal temp: 70–75°F).
- Vent daily by lifting the dome to prevent mold.
- Wait for roots—you’ll see new leaves or feel resistance when tugged.
- Acclimate by removing the dome more each day.
- Transplant into soil once roots are 1.5–2 inches long.
- Water gently and enjoy the fresh growth!
Other Methods I’ve Tried (And Why I Still Prefer Sand)
💧 Water Method: Place your basil in a glass of filtered water. Roots appear in 7–10 days. But they’re fragile and can break during transplant.
🪴 Soil Method: Stick the cutting into moist potting mix. Cover with a plastic bag. It works, but maintaining perfect humidity indoors can be tricky.
Honestly, the sand + dome combo gave me the best results. It’s forgiving and nearly foolproof—even when I forget to check for a day or two 🙃.
Why This Method Works for Me
- ✅ Cheap and easy to set up
- ✅ Sterile and rot-resistant
- ✅ Reusable and clean
- ✅ Works indoors or out
I reuse the same sand and tray for tons of cuttings—oregano, thyme, even tomato suckers. It’s become a standard tool in my homestead garden setup.
Final Thoughts + What to Do Next
Learning how to propagate basil from a cutting gave me way more food security and garden confidence. I don’t treat basil as seasonal anymore—it’s a staple. And honestly? Watching a cutting root feels like magic. ✨
If you give this a try, I’d love to hear about it. Even better—share your success (or your fails) in the forum. We all start somewhere, and your experiment might help the next person make pesto dreams come true.
Coming soon on the blog:
- How to Grow Basil from Seed (the right way for zone 5+)
- How to Preserve Basil Without Losing Flavor (freeze, dry, or oil?)
- Tomato Pruning Tips (so your basil has friends!)
🌿 More basil = more pesto = more joy. Happy propagating, friend.
Affiliate Disclosure: Some of the links above may contain affiliate links. That means I might earn a small commission—at no cost to you—if you decide to make a purchase. Thank you for supporting Sprouting Homestead 🛒💚
You’ll Never Buy Basil Again After Learning This: How to Grow Basil from Seed (Even If You’ve Killed It Before)
🌱 You’ll Never Buy Basil Again After Learning This: How to Grow Basil from Seed (Even If You’ve Killed It Before)
Have you ever picked up one of those little basil plants from the store… only to watch it wilt into mush within days? 😩 Yeah, same here. But I’ve got good news: you don’t need to be a garden wizard to grow lush, fragrant basil from seed — even if you live somewhere with a frost-filled spring and a short growing season (🙋♀️ hello, Wisconsin).
Once I started from seed, I never looked back. It’s cheaper, hardier, and you get way more plants. 🌿 And bonus: you can grow enough to harvest fresh for months — plus freeze, dry, or make pesto by the pint when you’ve got too much (and trust me, you will).
Let me walk you through exactly how to grow basil from seed, step by step — indoor or outdoor, on a budget, without the drama. 💁♀️
🥇 Why Bother Growing Basil From Seed?
- You control the whole life cycle 🌱
- Your plants are tougher and healthier 💪
- You get to try fun varieties like lemon basil, Thai basil, or even purple basil 💜
And if you’re like me and your area still gets random freezes into May, starting from seed indoors is the secret weapon.
🌿 Step 1: Start Basil Indoors the Right Way
I start my basil about 6–8 weeks before our last frost (look up yours by ZIP code if you’re not sure). Don’t start too early — leggy, sad basil isn’t better than no basil.
Here’s what I use:
- Seed starting tray with dome 🪴
- Seed starting mix (not potting soil)
- Heat mat for germination (optional but worth it)
- Cheap grow light (~$30)
🌱 How I Do It:
- Fill each cell with moist seed starting mix
- Drop 2–3 basil seeds per cell, sprinkle mix on top
- Mist with water, cover with dome
- Place on heat mat → germination in 5–8 days
Light is KEY once sprouted — I use a grow light for 14–16 hours/day.
☀️ Step 2: Grow Until They’re Strong Enough to Transplant
- Thin to the strongest seedling per cell
- Water when top soil feels dry
- Run a fan for air flow to prevent damping off
Once they’re 4–6 inches tall and the weather warms up… it’s transplant time ⬇️
🌤 Step 3: Hardening Off (aka, Don’t Shock Your Basil to Death)
If you live where it freezes, hardening off is non-negotiable.
- Start with 2 hours outside in shade
- Each day, increase sun exposure/time
- After 5–7 days, your basil’s ready to stay out!
Skip this and you’ll get droopy, sunburned basil. Ask me how I know. 😅
🪴 Step 4: Transplant into the Garden (or Big Pots)
Only transplant when nighttime temps stay above 50°F.
Basil loves:
- Full sun 🌞
- Rich, well-drained soil
- 8–12 inches of spacing
I grow mine in a mix of raised beds and containers like this one. Works beautifully!
🌡 What If You Don’t Have Outdoor Space?
You can grow basil indoors year-round! Here’s my setup:
- 6″ pot with drainage
- South-facing window or grow light
- Water when top 1″ of soil is dry
- Pinch flowers to keep leaf production going
Light is your biggest challenge indoors. Don’t skip the grow light!
🌿 Harvesting: The Best Part
You can start snipping once your plant is 6–8 inches tall. In fact, harvesting makes it bushier.
How to harvest:
- Snip above a pair of leaves (a “node”)
- Do it often to encourage side shoots
- Make pesto if you’re overrun!
Coming soon: How I harvest basil without killing the plant →
🚫 Mistakes I’ve Made (So You Don’t Have To)
- ❌ Planting too early outside
- ❌ Overwatering — root rot is real
- ❌ Not enough light indoors
- ❌ Letting basil flower — it stops producing
- ❌ Crowding — airflow matters!
🧡 Final Thoughts (and a Soft Push to Join Us)
Growing basil from seed has been one of the easiest and most rewarding steps in my journey toward growing more of my own food. I want that same success for you too.
If you’re just getting started — or if you’re a little obsessed like I am — come hang out in our free grower forum! 👇
👉 Join the Sprouting Homestead Community Forum
No judgment, just support and lots of dirt-loving people 🌱
🛒 Affiliate Tools I Use and Love:
- Seed Starting Kit
- Organic Basil Seeds
- LED Grow Light
- Fish Emulsion Fertilizer
- Self-Watering Grow Pots
Coming soon:
- How to Harvest Basil Without Killing It
- Best Pesto Recipe for Freezing
- How to Dry and Store Basil Like a Pro
📌 Bookmark or pin this post so you’ve got it when seed-starting season hits!
What Are Good Companion Plants for Tomatoes? A Practical, No-Magic Guide
🌿 What Are Good Companion Plants for Tomatoes? A Practical, No-Magic Guide
Struggling with your tomatoes? Want to know what are good companion plants for tomatoes that actually work—no folklore, no fluff, just results? Here’s the real deal: companion planting is smart gardening based on observation. It’s about choosing plants that repel pests, attract helpful bugs, improve soil use, and don’t fight your tomatoes for space or nutrients.
🍃 What Makes a “Good Companion”?
- Pest repellence via scent: Some plants mask tomato smell or repel insects.
- Beneficial insect attraction: Flowers and herbs draw pollinators and predators.
- Trap-cropping: Plants pests prefer—keeping them off your tomatoes.
- Efficient space use: Fast growers that fill soil, conserve moisture, and support structure.
This isn’t magical; it’s gardening with intention.
🌱 Top Tomato-Friendly Plants (And Why I Use Them)
1. Basil – Aroma Shield & Pollinator Draw
Basil’s scent masks tomatoes from thrips and hornworms, and its flowers attract bees—boosting pollination. Raised beds with basil and tomato together tend to *really* thrive.
2. Marigolds – Pest Confusion & Nematode Fighters
Plant French marigolds between tomato rows to repel whiteflies and nematodes, and to lure ladybugs and predators.
3. Garlic & Chives – Sulfur-Powered Defenders
Allium family plants emit sulfur that deters aphids and mites without competing for nutrients.
4. Nasturtiums – Colorful Pest Traps
Nasturtiums draw aphids away from your tomatoes and act as edible edging—simple and effective.
5. Borage – Hornworm Deterrent + Pollinator Booster
Blue blossoms fend off hornworms, feed bees, and slightly improve tomato health.
🚫 What Not to Plant Near Tomatoes
- Potatoes: Shared diseases and uprooting risk.
- Brassicas (broccoli, cabbage, cauliflower): Heavy feeders that stunt tomatoes.
- Corn: Shared pests like fruitworms make things worse.
- Fennel or mature dill: Release growth-inhibiting chemicals.
🛠 Garden Layout Tips That Make This Work
- Space tomato plants 18–24″ apart for airflow.
- Place tomato rows on the north side so companions get full sun.
- Plant one of each companion near each tomato—no overcrowding, just smart placement.
🧑🌾 Give It a Try & Share!
So if you’re asking what are good companion plants for tomatoes, here’s your tested lineup:
- Basil
- Marigolds
- Garlic & Chives
- Nasturtiums
- Borage
No magic. No fluff. Just plants that *actually* help. Try it for a season and watch your harvest flourish.
If you want to share your results or photos, ▶️ join the Sprouting Homestead Forum. I’d love to see what your garden grows!
🌟 Coming Soon: Tomato Bed Setup Guide
I’ll be posting about how I arrange beds, supports, and mulches to maximize airflow and yields—practical tips based on real outcomes. I’ll drop the link here when it’s live!