Uncategorized
Don’t Miss the Curl: When to Harvest Garlic Scapes for Bigger Bulbs & Bonus Flavor
🌱 Don’t Miss the Curl: When to Harvest Garlic Scapes for Bigger Bulbs & Bonus Flavor 🧄
So I’ll be real with you — the first time I saw a garlic scape twisting its way out of my garlic patch, I thought something had gone sideways. These curly green stalks shot up like little plant periscopes, and I had no idea if I was supposed to cut them, braid them, or leave them alone to do their alien thing 👽.
Now that I’ve gone a few garlic-growing seasons deep, I can tell you this: if you’re growing hardneck garlic, those curly shoots are garlic scapes — and harvesting them at the right time is the secret to getting bigger bulbs and a bonus harvest you can actually eat 🎯.
This post is for any home gardener who’s asked “when to harvest garlic scapes?” and walked away more confused than confident. We’re going to walk through what a garlic scape actually is, when to harvest it (and how), what happens if you don’t, how to store and cook them, and yep — I’ll even share the hilarious mess I made trying to yank a few out by hand.
And if this kind of garden experiment is your thing, don’t forget — you’re always welcome to ➡️join our community forum where we share wins, flops, garlic envy, and everything in between 🌿.
🧄 First Off: What Is a Garlic Scape Anyway?
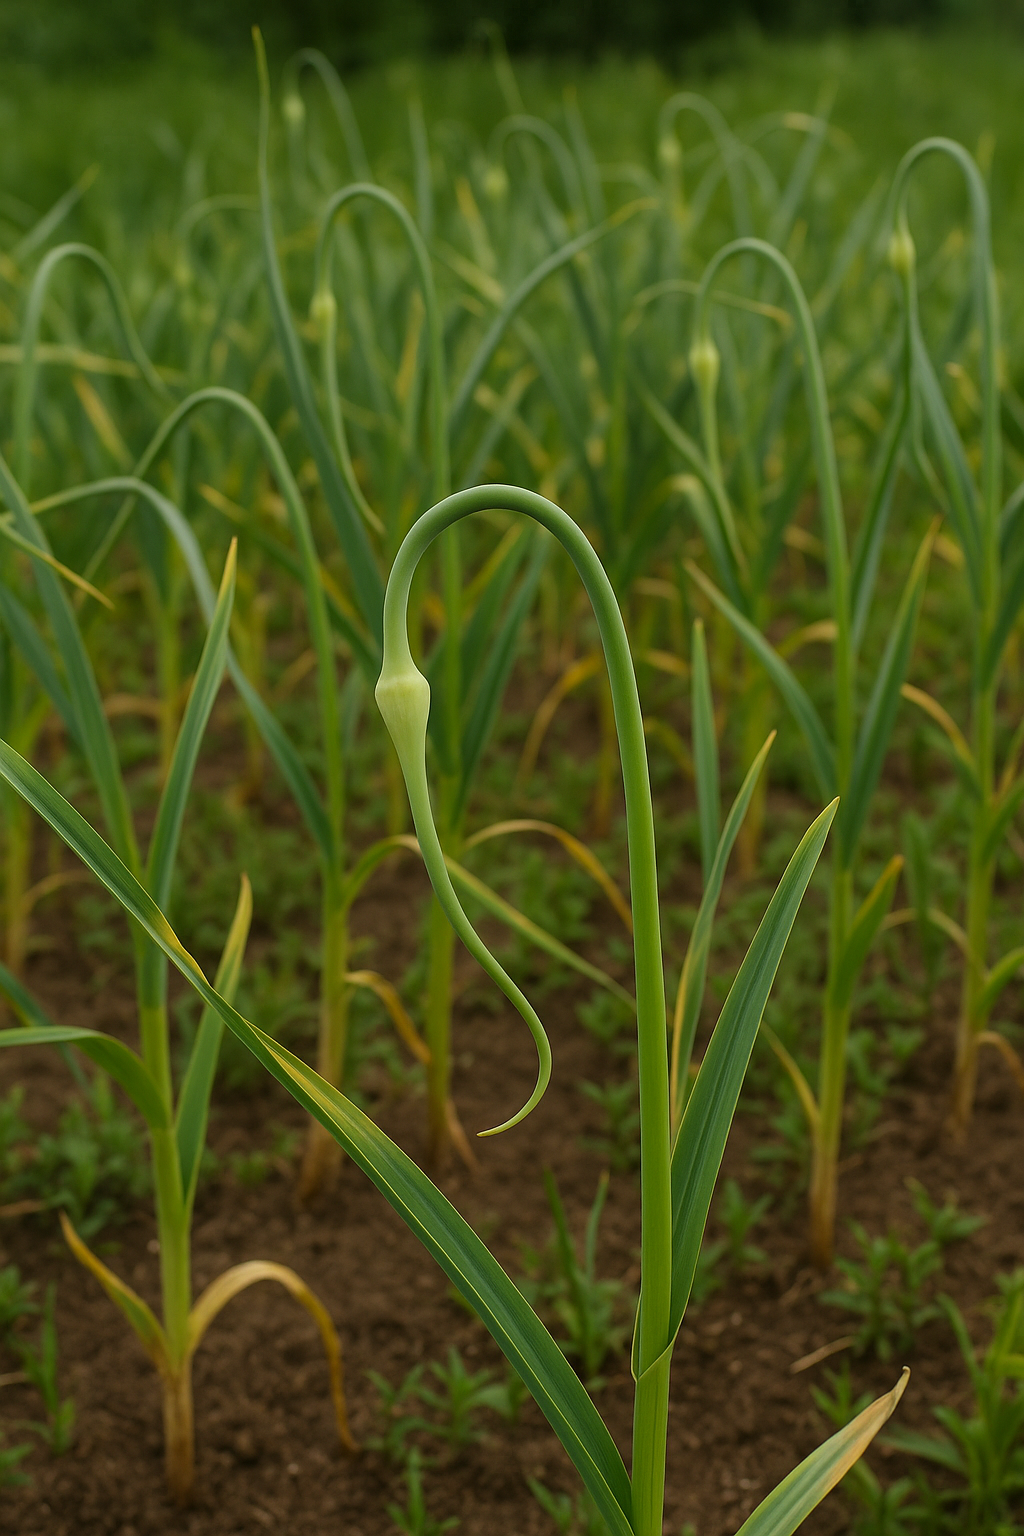 If you’ve never grown hardneck garlic before, you might be surprised that it gives you two harvests instead of one 🙌. The garlic scape is a long, round, green stalk that grows from the center of each plant in late spring to early summer. It’s actually the flower stalk — or at least the attempt at one — and it shows up only on hardneck varieties.
So if you’ve planted hardneck garlic (the kind that thrives in colder climates like Wisconsin or most of the northern U.S.), you’ll start to see these curly guys poke up from the center of the plant, standing taller than the flat garlic leaves. They form a loop, sometimes even a spiral 🌀, and at the tip is a little bulge that’s basically a flower pod (called a bulbil).
That entire stalk is the garlic scape. And while it’s tempting to leave it because it looks kind of cool, you definitely want to take it off — not just because it’s edible, but because if you don’t, your garlic bulb below might end up smaller and less developed. The plant starts sending its energy into flowering instead of finishing off the bulb underground.
We don’t want that. We want big, fat, juicy bulbs 💪. So let’s talk timing.
⏰ When to Harvest Garlic Scapes (Without Ruining the Bulbs)
Here’s the trick — the perfect time to harvest garlic scapes is after they’ve made one full curl but before they start straightening out 🔄. That window is magical ✨.
If you pick them too early (when they’re just poking up), you lose out on that nice long edible stalk. Wait too long, and they turn woody and start robbing energy from the bulb. Once the scape starts straightening out and that bulbil is thinking about flowering, you’ve missed the boat 🛳️.
So what I do is check my garlic every day or two starting in early to mid-June (I’m in Zone 5A). I look for that classic pig-tail curl 🐖. If it’s made a loop and is standing taller than the leaves, it’s game time.
💡 Pro Tip: If you live in a warmer zone (like 7 or 8), you’ll probably see scapes in late May to early June. Colder zones like 3 or 4? It might be late June or even early July. It’s less about the calendar and more about watching the plants 👀.
✂️ Cutting vs. Pulling Garlic Scapes (Spoiler: I Tried Both)
The “correct” way to harvest scapes is to cut them low on the stalk — right above the top leaf — using clean garden scissors or pruners. That’s what most growers do, and it works great 👍.
Of course, I had to get fancy 😅. I read somewhere that if you pull the scape slowly, you can sometimes get an extra inch or two of that tender white stem hidden down in the garlic stalk. So naturally, I thought: Challenge accepted. 🎯
Fast forward to me squatting over my garlic bed, slowly tugging on each scape like I was diffusing a bomb 🧨. Sometimes it popped right out — satisfying little snap, full length of scape intact. Other times? Not so much. I either broke it halfway up or accidentally pulled with too much force and nearly yanked the whole garlic plant out like a toddler grabbing a dandelion 😂.
I ended up with maybe 5 perfect pulls and a whole bunch of… let’s just call them “partial harvests.”
Moral of the story: cutting works. Pulling can work. But prepare for some comedy if you go the slow-pull route 🎭.
📉 Why You Should Take the Scapes Off (Even If You Don’t Eat Them)
Now here’s where it matters. If you leave the scape on, the garlic plant starts shifting its energy into producing bulbils (those little wannabe seeds at the top). And when that happens, the bulb underground usually ends up smaller 📉.
Some gardeners leave one or two scapes on if they want to experiment with replanting bulbils. But most of us just want the biggest bulbs we can grow — so snipping the scape is key. It’s like telling the plant, “Hey! Don’t waste your time on flowers — fatten up those cloves!” 🗣️
A few university extensions even say you can get 15% to 30% bigger bulbs just by removing the scapes at the right time.
Totally worth it for 10 minutes of snipping, right? ✂️🕒
🥶 How I Store My Scapes (and How Long They Last)
Once I’ve got a bundle of garlic scapes, I usually just toss them into a big zip-top bag with a paper towel and stick them in the fridge. They last at least 2–3 weeks that way, and I just grab one or two whenever I’m cooking 🍳.
You can also:
- 🥬 Chop and freeze them raw for soups, stir-fries, or stews later on
- 🌿 Make a huge batch of garlic scape pesto (my go-to freezer method!)
- 🥒 Pickle them — I haven’t tried this yet, but it’s on my homestead bucket list
- 🔥 Grill or sauté them with olive oil and salt (they’re like garlicky green beans)
I use this freezer-safe silicone tray set from Amazon (affiliate) to freeze pesto in cubes so I can pop one out whenever I want that kick of flavor. If you’re more of a fresh-herb cook, I also recommend a small mini food processor like this one (affiliate) — mine’s tiny but makes scape pesto in under a minute.
🍽️ Garlic Scapes in the Kitchen: My Favorite Ways to Use Them
I use garlic scapes anywhere I’d use garlic, chives, or green onions — but they’re especially fun because they’re seasonal and super flexible 🛠️.
Here’s how I’ve used mine:
- 🧄 Pesto: Garlic scape + olive oil + lemon juice + parmesan = 😍
- 🥚 Egg dishes: Chopped into scrambled eggs or frittatas
- 🔥 Grilled whole: Throw them on with your veggies — smoky and perfect
- 🍜 Stir-fries: Adds a mellow garlic flavor without overpowering
- 🧈 Mixed with butter: Blend into a compound butter for toast, steak, or corn
- 😋 Raw with miso: Seriously — slice them thin and dip in miso paste. Game changer.
They’ve got a mild garlicky flavor without the burn of raw cloves, and I always feel like I’m getting away with something when I harvest them. It’s like garlic’s bonus prize 🎁.
🎯 Final Thoughts: The Curl Is the Clue
So, when to harvest garlic scapes? Right when they curl. Not too early, not too late. Catch them when they’ve done their pig-tail twist but haven’t straightened out 🌀. If you’re pulling, pull slowly — and maybe have a laugh at how wrong it can go 😅.
Harvesting your scapes doesn’t just give you extra food — it helps your garlic bulbs grow bigger, stronger, and more flavorful. And when you’re living that homestead life, every little boost counts 🚜.
Have you tried harvesting garlic scapes yet? Got a favorite way to cook them? Want to show off your perfect curl or scape fails?➡️Come join the Sprouting Homestead community — we’ve got a whole section just for garlic growers and it’s way more fun with friends 👩🌾👨🌾.
👉 Up next: I’ll be posting about how to know when your garlic bulbs are ready to harvest — and how to cure and store them for long-term use. Make sure you’re subscribed to the newsletter so you don’t miss it! 🧺
Don’t Bury Your Garlic Dreams! Here’s Exactly How Deep to Plant Garlic This Fall
Don’t Bury Your Garlic Dreams! Here’s Exactly How Deep to Plant Garlic This Fall 🌱🧄
I almost lost my entire garlic bed the first year I planted it.
Not because I didn’t try… but because I didn’t know how deep to plant garlic.
I figured, “It’s just a clove, right? Toss it in and cover it up.”
Big mistake.
That winter, frost heaved half the cloves right out of the ground like they were being evicted. And by spring? The survivors were spindly, stunted, and sad.
If you’ve ever wondered how deep to plant garlic—especially how deep to plant garlic in the fall—this post is here to save your crop and your sanity. 💪🧄
🌾 Why Garlic Depth Really Matters
Garlic isn’t picky—but it does have one major request:
“Please plant me deep enough to survive the winter.”
- The cloves stay warm and stable through freeze-thaw cycles ❄️🌱
- Roots get a solid start before the ground locks up
- Bulbs form strong and full by next summer
But plant too shallow? You risk frost heave, rot, or a harvest that makes you want to cry into your compost pile.
🧄 So… How Deep Do I Plant My Garlic?
Here’s what works for me in Wisconsin—land of freezing winters and deep snow:
👉 I plant each clove so the tip is 2 inches below the soil line.
That means the total hole is about 3 inches deep. Drop in the clove (pointy end up!) and bury it.
Then I add mulch—a LOT of mulch—about 2– 3 inches of straw, shredded leaves, or wood chips right on top. That’s what really locks in warmth and keeps the soil from shifting around all winter.
If you’re in a warmer zone, you might only need 1–2 inches of soil over the clove, especially if you’re mulching. But in cold climates? Go a little deeper and don’t skip the mulch.
🔗 How I prep the soil, choose varieties, and grow garlic →
🍂 Special Tips for Fall Garlic Planting
Fall is hands-down the best time to plant garlic in most of the U.S.—but the rules shift slightly compared to spring planting.
Here’s the fall checklist I follow:
- ✔️ Plant 3–4 weeks before the ground freezes hard (for me, that’s mid-October)
- ✔️ Make sure the soil drains well—no garlic wants wet socks
- ✔️ Cover cloves with at least 2 inches of soil
- ✔️ Add mulch to prevent frost heaving and insulate roots
- ✔️ Water them in well, then leave them alone ’til spring
📍 What to do with garlic scapes →
🛠️ Gear I Use That’s Made It Easier
If you’re planting a lot of garlic like I do, here’s what I keep in my toolbelt:
- 🛒 Hori hori knife – for quick 3-inch planting holes [Amazon link]
💬 Real Talk: Garlic Can Feel Like a Gamble
Some years, I’ve planted 100+ cloves. And the first few seasons? I had no idea what I was doing.
I’ve planted too early, too shallow, too close together. I’ve skipped mulch.
I’ve even forgotten where I planted them (don’t be like me—label your rows 😅).
But every year, garlic teaches me patience.
And every spring, those green shoots push through the mulch and remind me: this life we’re growing is worth the effort.
So if you’re new to garlic or still trying to get your rhythm… you’re not alone.
💬 Come join the Sprouting Homestead Community Forum ⬇️
It’s where we dig into soil, swap tips, and grow stronger together.
Flip your mindset here—from “I’ll figure it out alone” to “I can grow with a community behind me.” That’s the real harvest. 💚
🧄 TL;DR — Garlic Planting Depth in Fall
- ✅ How deep to plant garlic? About 2 inches of soil over the clove
- ✅ How deep to plant garlic in fall? 2–3 inches deep, then mulch 2–3 inches on top
- ✅ Shallow planting = frost heave risk 🚫
- ✅ Deep planting = safer roots, stronger bulbs
- ✅ Add mulch. Seriously. Just do it. 🥶➡️🛏️
- ✅ Space cloves 6 inches apart, pointy end up
- ✅ Use tools that make it easy and repeatable
If you’ve got your garlic in hand and the ground’s not frozen yet, now’s the time to get planting. And hey—once spring rolls around and those scapes start popping up, we’ll be back here celebrating together. 🌱
Let’s grow something beautiful—one clove at a time.
Next Steps:
-
- 👉 Harvesting garlic scapes without damaging bulbs
- 👉 How to Grow Garlic
No Garden? No Problem. Here’s How to Grow Tomatoes in Pots Like a Pro
🪴 No Garden? No Problem. Here’s How to Grow Tomatoes in Pots Like a Pro
Ever wanted to grow your own tomatoes but felt like you didn’t have the space… or the budget?
Yeah, same.
When I first started learning how to grow tomatoes in pots, I didn’t have fancy raised beds or a huge homestead setup. I was working long shifts and chasing dreams on a tight budget. But I still wanted my family (especially my son) to taste homegrown tomatoes warm from the sun — the kind money just can’t buy.
So I made it work — and I’ve learned a few things I want to pass along. I’m not here to tell you how you should grow your tomatoes. I’ll just share what’s worked for me, and maybe it’ll help you too.
🪣 What I Use: 5-Gallon Pails and a Homemade Soil Mix
I grow indeterminate tomato varieties in cheap 5-gallon buckets. You can often grab them for free or cheap at hardware stores or bakeries. Just be sure you drill drainage holes in the bottom.
Here’s my secret soil mix:
50% compost + 50% shredded bark mulch (Just got a truckload of natural non-dyed material from the landscape supply.)
I mix that up myself — no store-bought potting soil — and I add a handful or two of organic fertilizer right into the mix. Something balanced like this one I use 👉 My Favorite Organic Tomato Fertilizer.
🌞 Location Is Everything
Tomatoes are sun lovers. I park my buckets in the sunniest part of the yard, or even line them up along the driveway. If your spot gets 6–8 hours of direct sunlight, you’re golden.
And the beauty of pots? You can move them if needed. Rain coming? I slide them under cover. Too much heat? I scoot them to afternoon shade.
🍅 Picking the Right Tomatoes for Pots
While a lot of people suggest compact or “determinate” types for container growing, I went a little rogue and planted indeterminate varieties. Why? I wanted continuous harvests — not one big flush.
Here’s what I’m growing this season:
- Sun Gold – sweet little cherry bombs
- Cherokee Purple – rich, meaty slicers
- San Marzano – perfect for sauce-making
These get big. But in the 5-gallon buckets, they’ve done surprisingly well — with a little support.
If you’re looking for smaller, bushier options, try:
- Tiny Tim
- Husky Cherry Red
- Patio Princess
I’ve written a whole post comparing tomato types if you’re curious 👉 Indeterminate vs Determinate Tomatoes
🌱 Planting Deep = Stronger Roots
I plant my tomatoes deep — burying them up to the first real set of leaves. Tomato stems grow roots wherever they touch soil, and this gives them a strong foundation.
I usually only plant one tomato per bucket. That way, they don’t fight over nutrients or water. I tried planting basil with them one year too — works great if your bucket is big enough. Just keep it near the edge.
💧 Watering Without Losing Your Mind
Here’s the thing about pots: they dry out fast. Like, real fast in the heat of summer.
I check mine daily. If the top inch is dry, I give it a deep soak. You want the water to run out the drainage holes. That tells you it reached the roots.
I mulch the top of the soil with straw or dried leaves to help hold moisture — and to keep dirt from splashing up onto the leaves.
🍽 Feeding the Hungry Beasts
Tomatoes are heavy feeders, especially in pots. All that watering? It leaches nutrients. So I feed them every couple weeks with liquid organic fertilizer (like nori, comfrey tea, or compost tea).
Here’s one I keep on hand: Liquid Organic Tomato Booster (affiliate link)
I also sprinkle in some worm castings mid-season — like a little power snack for the plants.
🪴 Support Is Not Optional
If you’re growing indeterminate types like me, you’ll need to give them some love and structure.
I use simple tomato cages, but I’ve also tied them to wooden stakes or even a garden trellis. The key is to start supporting them early.
Stay tuned — I’ll be posting a guide to pruning and training soon.
🐛 Pest Control the Organic Way
I don’t spray chemicals. Never have. Instead, I keep a close eye on my plants.
If I see aphids, I blast them with a hose or spray some diluted Castile soap.
If hornworms show up (and they will), I handpick them. My son loves hunting for them — turns it into a little adventure.
And I plant basil and marigolds near my buckets — not just for beauty, but because they help repel pests naturally.
👉 Want to see what these pests look like? Check out our Pest ID Gallery with photos of aphids, whiteflies, spider mites, and hornworms.
🌼 Companion Plants I Like Near My Tomato Buckets
- Basil – improves flavor and repels bugs
- Marigolds – keeps nematodes and aphids at bay
- Nasturtiums – trap crop for aphids
- Chives – repels mites and whiteflies
- Garlic – Slugs and Snails
If you’re container gardening, just pop these in their own small pots and cluster them around your tomato bucket garden.
🫛 Flip Into What Works for You
Look, I’m not saying you need to do everything the way I do. I’m just sharing what’s worked for me — on a budget, with limited time, and a deep desire to grow food that nourishes my family and teaches my son where his meals come from.
If you want to grow your tomatoes in a fancy cedar planter with perfectly blended potting soil — go for it. But if all you’ve got is a few buckets and a dream, don’t let that stop you. I started with just that, and I still do.
💬 Come Share What You’re Growing
Want to swap tomato-growing tips or get help ID’ing a weird spot on a leaf? We’ve got a growing community of gardeners who get it. No judgment, just encouragement.
🔗 Next Up
Want to learn more about pruning and training your tomato plants in containers? I’ll be posting a full step-by-step guide to sucker removal, single-stem training, and using twine soon. Keep an eye out, or sign up for updates.
Let me know if you want a version of this as a printable guide or want help setting up your own tomato pail garden! 🍅
Are Roma Tomatoes Determinate or Indeterminate? (Here’s the Surprising Truth Every Gardener Should Know)
🍅 Are Roma Tomatoes Determinate or Indeterminate? (Here’s the Surprising Truth Every Gardener Should Know)
If you’re here, you’re probably about to drop a pack of Roma seeds into the soil… or maybe you’ve already got a few leggy plants standing in your greenhouse like soldiers waiting for orders. But before you stick that tomato cage in the ground or plan your canning schedule, let’s tackle the question that could change everything:
👉 Are Roma tomatoes determinate or indeterminate?
Because the answer? It affects how much you harvest, when you harvest, and whether you’ll be chasing vines all summer or loading a canner in one glorious weekend.
🌿 What’s the Big Deal About Determinate vs. Indeterminate?
Here’s the dirt in plain terms:
- Determinate tomatoes = bush-type. They grow to a set size, ripen their fruit all at once, and then slow way down. Perfect for canning, sauce-making, and folks who like things tidy and predictable.
- Indeterminate tomatoes = wild vines. They just keep growing and producing until frost knocks ‘em out. You’ll need to prune, stake tall, and harvest in waves.
This isn’t just trivia. It completely changes how you garden 🧑🌾.
🍅 So… Are Roma Tomatoes Determinate?
Yes—most Roma tomato varieties are determinate.
That’s actually what makes them so dang popular for home canning. You get a wave of fruit that ripens around the same time, perfect for making big batches of sauce, paste, salsa, or roasted tomatoes to freeze for winter.
But—there’s a catch. Not all Romas follow that rule.
⚠️ There Are Indeterminate Roma Varieties Too
Let’s clear this up: “Roma” isn’t a single tomato. It’s a type—a class of plum tomatoes known for their meatiness and low moisture content. The classic Roma VF is a determinate hybrid… but there are indeterminate Roma-style varieties out there, including heirloom crosses and open-pollinated types like:
- Italian Roma (sometimes listed as indeterminate)
- Amish Paste (very Roma-like, but definitely indeterminate)
- San Marzano (Roma’s famous ancestor—usually indeterminate)
Always check your seed packet. If it doesn’t specify determinate or indeterminate, assume it could grow like a vine 🪴.
🛠️ Garden Setup: What to Expect From Each Type
✅ If Your Roma is Determinate…
- Expect a plant around 3-4 feet tall.
- Use a medium tomato cage or a few bamboo stakes in a triangle for support.
- Fruit will come on fast and in one main wave.
- Minimal pruning needed—don’t take off too many suckers or you’ll reduce your harvest!
- Great for: 🍅 big weekend canning sessions, sauces, ketchup, and tomato paste.
Affiliate tip: I use these heavy-duty tomato cages from Amazon that are foldable and rust-proof—perfect for bush types like Roma.
🔁 If Your Roma is Indeterminate…
- Be ready for 6+ foot vines.
- Stake early with something strong—a cattle panel trellis.
- Prune suckers regularly for better airflow and energy focus.
- You’ll harvest steadily throughout the season.
- Great for: 🍽️ fresh use, freezing small batches, drying, or sauce-making in stages.
💡 How to Tell What You’re Growing (Early Signs)
- If your plant stays short and starts flowering quickly at the tips → likely determinate.
- If it keeps pushing upward with lots of leafy offshoots and slow initial flowering → probably indeterminate.
Either way, you’ll get delicious tomatoes—but knowing ahead of time means fewer surprises (and fewer broken cages 😅).
🍴 Roma Tomato Uses: Why They’re the Canning King 👑
Romas are built for:
- Thick sauces (low water = no endless simmering)
- Roasting with garlic & herbs (like little flavor bombs)
- Freezing whole or halved
- Oven-drying into chewy tomato “jerky”
- Tomato paste or ketchup batches
They’re not as juicy as slicers, which is why they hold up in cooking. Every year, I grow at least 6–10 Roma plants just for preserving.
🧑🌾 My Roma Growing Tips (From Trial & Error… and More Error)
- Start with strong seedlings: Wait until after your last frost and the soil is 60°F+ before planting. Use a soil thermometer.
- Space them 18–24” apart: Even bushy Romas need breathing room.
- Mulch early: It keeps the soil moist and tomatoes clean.
- Water consistently: Uneven watering causes blossom end rot. I use a $12 timer and drip tubing set.
- Harvest when firm and red: They’re ready when they’re deep red and slightly firm to the touch.
🔄 Quick Comparison Table
| Trait | Determinate Romas | Indeterminate Romas |
|---|---|---|
| Growth | 3–4 ft bush | 6+ ft vine |
| Harvest | One big flush | Continuous |
| Support | Medium cage | Strong trellis |
| Best for | Canning all at once | Harvesting fresh all season |
| Pruning | Minimal | Regular suckering |
🔗 Want to Ask Questions or Share Pics?
👩🌾🌿 We just opened a brand new Sprouting Homestead Forum where gardeners like you and me swap tips, troubleshoot pests, and celebrate tomato wins.
🧺 Final Thoughts
So—are Roma tomatoes determinate or indeterminate?
✅ Most are determinate.
⚠️ Some are indeterminate.
📦 And a few fall somewhere in between.
The key is checking the variety, giving them the right support, and growing with your goals in mind. If you’re batch-canning in August, go bush-type. If you want tomatoes all summer with weekly freezer batches, go vine-type.
Either way—Roma’s meaty fruit, bold flavor, and productivity make it a must-have for any serious garden.
Happy planting, and I’ll see you in the forum! 🍅👨🌾
Are San Marzano Tomatoes Determinate or Indeterminate? Here’s the Truth from My Dirt-Stained Hands
🍅 Are San Marzano Tomatoes Determinate or Indeterminate? Here’s the Truth from My Dirt-Stained Hands
If you’re planning your tomato garden and eyeing those famous San Marzanos, you’re asking the right question:
“Are San Marzano tomatoes determinate or indeterminate?”
The answer isn’t as simple as you’d think. I found that out the hard way—standing in my garden mid-July, squinting at a 6-foot tomato plant I thought would stay knee-high. So, let me save you the trouble (and the busted cages).
This post is my no-fluff, dirt-tested guide to understanding how San Marzanos grow, what to expect, and how to plan for it in a real-life homestead garden like mine. 🧑🌾
🌿 Quick Refresher: Determinate vs. Indeterminate Tomatoes
- Determinate tomatoes (aka bush types): Grow 3–4 feet, fruit all at once, then stop.
- Indeterminate tomatoes: Keep growing, flowering, and producing until frost. Usually 6–8 feet or more.
This distinction matters when you’re planning your support system, pruning style, and especially when you’re timing your harvests.
🍝 So… What Are San Marzano Tomatoes?
These Italian plum tomatoes are world-renowned for making rich, sweet, low-acid tomato sauce. Thick walls, few seeds, and a deep flavor that makes them a favorite for canning and cooking.
They’re also the parent to Roma tomatoes—but unlike Roma, San Marzano’s growth habit isn’t always cut-and-dry.
🧬 Are San Marzano Tomatoes Determinate or Indeterminate?
🟢 Traditional heirloom San Marzanos are indeterminate.
They grow tall, require pruning and staking, and produce over a long season.
🔵 BUT… Modern seed companies now offer bush-type San Marzanos that are determinate or semi-determinate. These grow more compact, fruit faster, and are great for small spaces or quick harvests.
🛠️ How I Learned (and Now Handle) Both Types
On my homestead, I’ve grown both types—and it’s a whole different game depending on what you’re planting:
Indeterminate San Marzanos:
- Need tall stakes or cages
- Keep growing and producing all summer
- Require pruning to manage suckers
- Great for sauce in batches across the season
Determinate San Marzanos:
- Grow to about 3–4 feet
- Produce a big flush all at once
- Need only a simple cagelow ring support
- Little to no pruning needed
🧪 How to Know Which One You’re Growing
Check your seed packet or plant label:
- If it says “San Marzano” with no further info → probably indeterminate
- If it says “San Marzano Bush,” “Determinate,” or “Semi-Determinate” → you’ve got the compact kind
Not sure? Treat it like indeterminate for the first month—better safe than sorry when it comes to support.
🍅 Pros of Each San Marzano Growth Type
Indeterminate Pros:
- Longer season = steady sauce-making
- Higher total yield if weather holds
- Ideal for fresh pasta sauce all summer long
Determinate Pros:
- Shorter harvest window = big one-time harvest
- Easier to manage & support
- Great for cooler climates where early frost hits
Semi-Determinate?
- 4–5 ft tall plants
- Produce in 1–2 waves
- Needs medium support and light pruning
🌞 What San Marzanos Need to Thrive
- Full sun: 6–8 hours/day
- Even watering: Prevent blossom end rot
- Compost-rich soil: Add aged manure or tomato food
- Support: Stake or cage depending on type
- Harvest ripe: Deep red, firm, and meaty
💬 Final Word from the Dirt
If you’re growing San Marzanos, you’re in for a treat—no matter the growth type. 🍅 But knowing whether yours are determinate or indeterminate can save you the headache (and snapped tomato cages) later.
💚 Want more help on pruning, timing, or choosing varieties?
👉 Join the Sprouting Homestead Forum — it’s where I share behind-the-scenes photos and chat with growers like you.
📦 Suggested Tools I Use
Are Beefsteak Tomatoes Determinate or Indeterminate? Here’s What You Actually Need to Know Before You Plant
Are Beefsteak Tomatoes Determinate or Indeterminate? Here’s What You Actually Need to Know Before You Plant 🍅
📋Rooted Field Note: 07
Beefsteak tomatoes are massive, juicy, and a showstopper on any summer plate. But if you’re planning to grow them, there’s one question you need answered before you stake your claim in the garden: Are beefsteak tomatoes determinate or indeterminate?
Let’s cut through the fluff. I’ve grown more than a few of these over the years—and I’ll tell you what actually matters when it comes to supporting them, when you’ll get fruit, and how much space you’ll really need.
🧇 Most Beefsteak Tomatoes Are Indeterminate—Here’s What That Means
Indeterminate tomatoes don’t know when to quit. They keep growing, flowering, and producing fruit all season until frost shuts them down ❄️. That means your beefsteak tomato plant is going to turn into a towering, vining monster if you let it—and you’ll be harvesting tomatoes gradually throughout the season.
Expect:
- A 6+ foot tall plant 🌳
- Ongoing blooms and fruit set
- Heavy fruit (often over 1 lb each)
- A serious need for strong support (stakes, cages, or trellises)
That continuous growth means you’ll need to tie them up, prune strategically, and stay on top of watering and feeding. But the reward? Big, flavorful slicers that are perfect for sandwiches and burgers all summer long 🍔.
❓ Are There Determinate Beefsteak Varieties?
Yes—but they’re rare ⚠️. Most beefsteak tomatoes, especially the heirlooms like Brandywine or Cherokee Purple, are indeterminate.
However, there are a few determinates out there if you’re short on space or want a more compact plant. Look for names like \”Bush Beefsteak\” or other hybrid varieties that specify determinate or semi-determinate. These usually:
- Grow to about 3-4 feet tall
- Set most of their fruit at once
- Mature slightly earlier (some in ~62-70 days)
- Need less staking, though some still get heavy
I tried growing a bush variety once for a container experiment. It worked, but the tomatoes weren’t as large or as flavorful as the big indeterminate types I usually grow in the ground.
🌿 How I Grow Indeterminate Beefsteak Tomatoes
- Start early indoors. Beefsteaks take longer to mature. I start my seeds indoors 6-8 weeks before last frost.
- Use tall, sturdy stakes. I drive 6-8 foot stakes deep into the bed and tie up the main stem as it grows.
- Prune for airflow and size. I remove suckers to keep the plant to 1-2 main vines.
- Water deep, mulch well. Big tomatoes need consistent moisture. I mulch to keep it steady and reduce cracking.
- Feed throughout the season. Compost + a balanced tomato fertilizer does wonders.
If you skip the support or let it sprawl on the ground, expect disease, rot, and way fewer harvests.
⚡ Why Indeterminate Beefsteaks Are Worth It
These aren’t your quick, tidy, container tomatoes. But if you want:
- Giant slicers for real tomato sandwiches
- Complex flavor that actually tastes like summer
- A season-long harvest from a single plant
…then beefsteaks are worth the space and effort 🍅👌.
They may take 80+ days to start producing, but they don’t stop until you do.
💚 A Few Favorites (All Indeterminate):
- Brandywine — Classic heirloom, huge and flavorful
- Cherokee Purple — Deep color, rich taste
- Mortgage Lifter — Giant fruit, fun backstory
- Black Krim — Sweet and smoky
- Big Rainbow — Striking color, balanced taste
I rotate through a few each year just to keep things interesting.
🧑🌾 Should You Grow Determinate Beefsteaks?
Maybe—if:
- You’re growing in a container
- You want one big harvest
- You don’t want to deal with staking or pruning much
Just know you’ll probably trade off some flavor, size, or total yield.
🌧️ Watch for Cracking and Blossom End Rot
These are common issues with big-fruited tomatoes. Consistent watering is key. Mulch helps.
Also: Don’t let them ripen too long on the vine or they’ll split wide open after a rain 🌧️.
🏡 Final Word
Beefsteak tomatoes are almost always indeterminate. They’re big, sprawling, and high-maintenance—but if you have the space and the patience, they’ll reward you with tomatoes that make store-bought ones taste like cardboard.
Just give them room, give them love, and tie them up like they’re trying to escape 🧇🧐.
Happy planting.
Why My Tomatoes Grow Like Wild Vines (and Yours Might Too): Indeterminate vs Determinate Tomatoes Explained
🌱 Why My Tomatoes Grow Like Wild Vines (and Yours Might Too): Indeterminate vs Determinate Tomatoes Explained
📋Rooted Field Note: 06
Back when I started growing tomatoes, I had no clue there were different types of tomato plants — let alone ones that just… stop growing? Yeah, apparently that’s a thing. I used to think all tomato plants grew like vines. Turns out, that’s not always the case. If you’re a beginner and standing in front of seed packets or starts trying to figure out indeterminate vs determinate tomatoes, I’ve been there. Let’s break it down in plain English, and I’ll share what’s worked best for me on the homestead.
This isn’t me telling you what you should grow — just pulling back the curtain on what I do with my own tomatoes, what’s made my life easier, and where I’ve totally messed up (so you don’t have to).
🪴 So… What Is an Indeterminate Tomato Anyway?
I remember reading “indeterminate tomato” on a tag and thinking, “That sounds like the name of a legal case, not something I’d want in my garden.”
But here’s the deal:
- Indeterminate tomatoes just keep growing. They’re basically the overachievers of the tomato world.
- They don’t stop producing until the frost tells them it’s time to quit.
- That means you’ll get a slow and steady harvest from summer into fall — not one big haul all at once.
They’re tall. Like really tall. I’ve had them grow past 6 feet, and I’ve seen some monster vines online that look like they could trap a goat if left unsupervised. These guys need solid support — tall stakes, trellises, or cages that won’t buckle under pressure. I use these sturdy cages from Amazon (affiliate) — they’ve been a game changer in saving me from tangled chaos.
I usually pick the suckers off mine (those little side shoots that grow between the main stem and a branch) to keep things tidy and focus the plant’s energy on fruit. But some days I skip it and let them get a little wild — that’s the beauty of indeterminate tomatoes. They’ll keep coming back with more fruit, no matter what kind of day you’re having.
🍅 Then There’s Determinate Tomatoes — The Chill Cousin
Now, if indeterminate tomatoes are wild vines, determinate tomatoes are their neat little cousins.
- They grow to a certain height (usually 2–4 feet) and then stop — like, done, no more climbing.
- They put out most of their tomatoes in one big flush. Boom — all ripe within a week or two.
- After that? Not much. They sort of wrap up their show and call it a season.
These are what I plant when I want a big batch for canning or sauce-making. That’s the magic of determinates — I get a boatload of fruit all at once. It’s perfect for those days when I feel like going full-on tomato kitchen warrior.
They’re also super low maintenance. I barely prune them, and even a cheap cage from the dollar store can usually keep them upright. If you’re short on space or new to all this, determinate tomatoes are a great way to dip your toes in the tomato game. I even grow them in containers — something like this grow bag setup (affiliate) works great on a porch or patio.
🔍 Indeterminate vs Determinate Tomatoes: The Real Difference
Let’s compare the two the way I wish someone had done for me in the beginning:
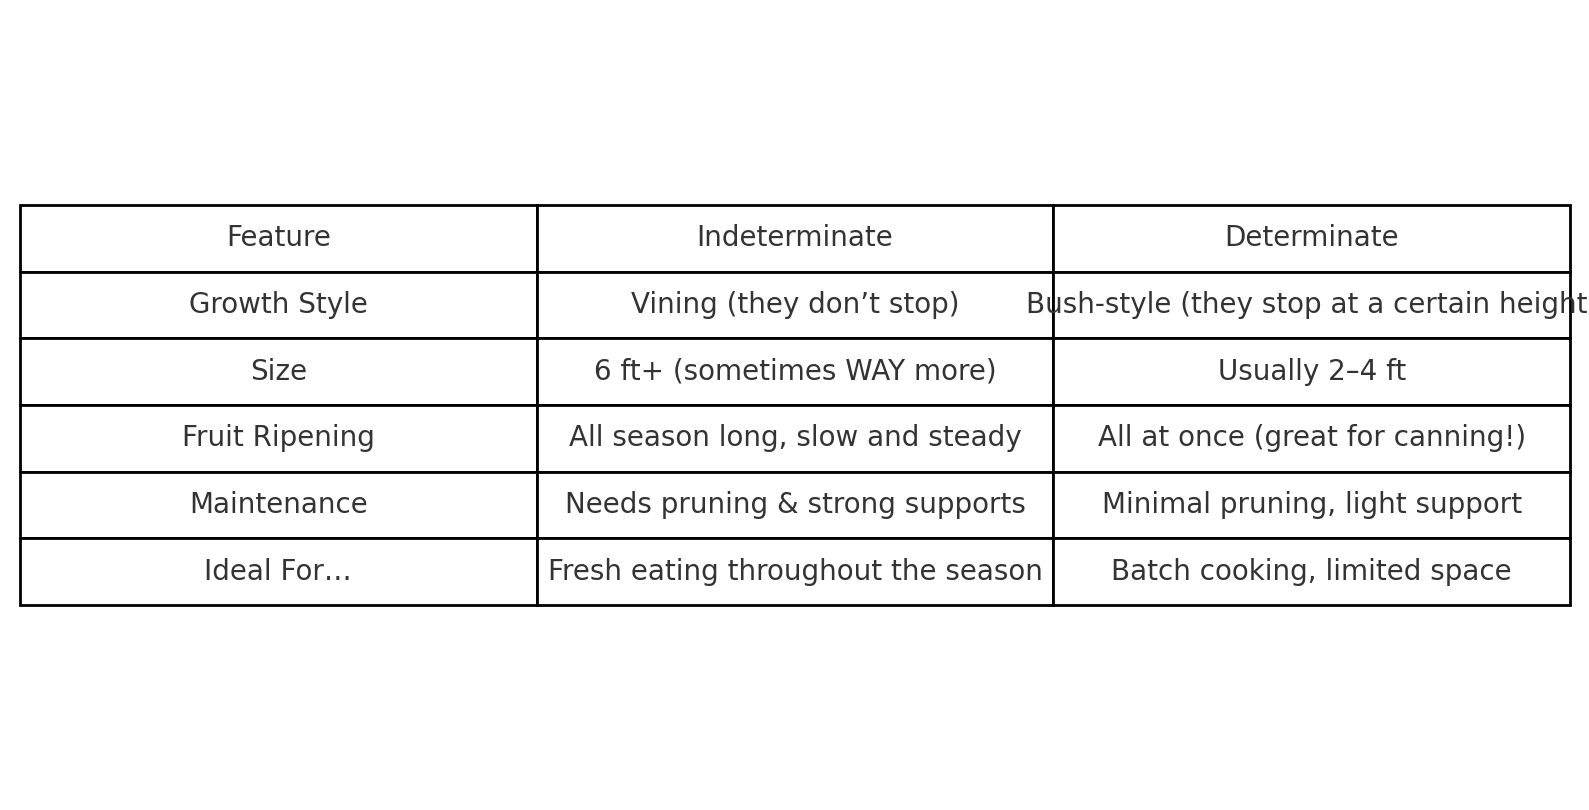
| Feature | Indeterminate Tomatoes | Determinate Tomatoes |
|---|---|---|
| Growth Style | Vining (they don’t stop) | Bush-style (they stop at a certain height) |
| Size | 6 ft+ (sometimes WAY more) | Usually 2–4 ft |
| Fruit Ripening | All season long, slow and steady | All at once (great for canning!) |
| Maintenance | Needs pruning & strong supports | Minimal pruning, light support |
| Ideal For… | Fresh eating throughout the season | Batch cooking, limited space |
💡 Some Tips from My Garden
If You’re Growing Indeterminate Tomatoes:
- Support them early: Don’t wait. They’ll grow overnight like they’ve got something to prove.
- Space them out: Trust me, your peppers or basil won’t stand a chance if you cram them too close.
- Prune lightly: If you want big fruits, trim a few suckers. But don’t stress too much — they’re forgiving.
- Harvest regularly: The more you pick, the more they’ll give.
If You’re Growing Determinate Tomatoes:
- Let them do their thing: They don’t need much fuss. I barely prune mine.
- Plan for the harvest: Once they’re ready, they come in hot and heavy. Be ready to preserve or share.
- Great for kids or first-time growers: Easy, tidy, and satisfying.
🎯 Final Thoughts (and What I Grow Most)
If you’ve made it this far, you’re probably already leaning toward one or the other. Or maybe, like me, you’ll just grow both and let your tomatoes tell their own stories.
Honestly, I couldn’t pick just one. I love indeterminate tomatoes for fresh salads and late-season sandwiches. But when it’s time to make sauce or salsa? Give me those tidy, determined little bush tomatoes every time.
So… what is an indeterminate tomato? It’s a gift that keeps giving. And determinate tomatoes? They’re the kind of friend who shows up once, brings a giant casserole, and then lets you rest.
Whichever you choose, I hope your tomato season is overflowing 🍅✨
The Secret to Big, Juicy Tomatoes? Here’s What I Do with Suckers (Hint: You Don’t Have To)
🍅 The Secret to Big, Juicy Tomatoes? Here’s What I Do with Suckers (Hint: You Don’t Have To)
📋Rooted Field Note: 05
When I first started growing tomatoes, I was overwhelmed by all the advice out there. “Prune the suckers!” “Leave the suckers!” “Single-stem your tomatoes!” I had no clue what a tomato sucker even was, much less what to do about it. Over time, through trial and error (and a lot of muddy hands), I found what works for me. So today, I’m not here to tell you what you should do. I’m just sharing what I do with my indeterminate tomatoes and why it works in my garden. If you’re just starting out, hopefully this gives you a bit of insight – and maybe even encourages you to experiment and find your own style.
🌿 What on Earth Is a Tomato Sucker?
If you’re scratching your head, I get it – I was there too. Tomato suckers are those little shoots that sprout in the “V” where a leaf meets the main stem. They look like tiny baby branches. On indeterminate tomato plants (the vining kind that just keep growing), these suckers can eventually turn into full branches with their own leaves, flowers, and fruit.
But here’s the thing: when the plant pours energy into growing all those extra branches, it can mean smaller tomatoes and a wilder, more tangled plant. Some gardeners pinch them off to “train” the plant and focus its energy. Others let them grow freely for a bushier plant with more (but usually smaller) tomatoes.
✂️ How I Handle Tomato Suckers
Here’s what I do with my indeterminate tomatoes:
- I Start Early. As soon as the plant is about a foot tall and I see those little shoots forming, I start checking for suckers.
- I Pinch the Small Ones. If the sucker is less than 4 inches long, I just pinch it off with my fingers. It’s quick and easy.
- I Cut the Bigger Ones. For anything thicker than a pencil, I use clean pruners to snip them off close to the main stem. (Don’t forget to clean your tools with rubbing alcohol to prevent disease spread!)
- I Prune Gradually. I never strip the plant bare. I focus on removing the suckers below the first flower cluster and leave the upper ones to grow a bit if I feel the plant can handle it.
- I Stay Consistent. I check my plants once a week (more often if it’s rainy) and pinch off any new suckers I find. It’s a lot easier to keep up with them when they’re small.
🌞 Why I Prune (But Not Too Much)
I prune suckers mainly to keep my plants manageable and healthy. With fewer branches competing for resources, the tomatoes I get tend to be bigger, juicier, and ripen a bit earlier. Plus, by thinning out some of the foliage, I give the plant better airflow, which reduces the risk of diseases like blight.
That said, I’m careful not to overdo it. I always leave enough leaves to protect the fruit from sunscald (no one wants sunburned tomatoes!). And honestly, I’m not aiming for “Instagram-perfect” plants – I’m just trying to grow tomatoes I can actually eat.
🌱 The Trade-Offs – And Why It’s Okay to Experiment
Here’s the thing: pruning isn’t a magic bullet. It’s just one tool in the toolbox. If you don’t prune at all, you’ll probably get more fruit, but they might be smaller and ripen a bit later. If you prune too much, you could end up with fewer fruits overall. I aim for a balance – prune enough to keep the plant healthy and productive, but not so much that it stresses the plant or leaves it vulnerable.
💧 Watering and Feeding: Keeping My Plants Happy
Pruning is just one part of the puzzle. To keep my tomatoes thriving, I focus on:
- Watering Deeply: I water at the base of the plant, soaking the soil deeply once or twice a week. This encourages deep roots and helps the plant handle hot summer days.
- Avoiding Wet Foliage: I use drip irrigation or a soaker hose (or just aim low with my watering can) to keep leaves dry and reduce disease risk.
- Feeding Wisely: I avoid overdoing it on nitrogen-rich fertilizers, which can make the plant grow tons of leaves and suckers. Instead, I use a balanced or slightly phosphorus-heavy fertilizer like this organic tomato fertilizer. I apply it at planting time, when the first fruits set, and again after a big harvest to keep the plant productive.
🏡 My Setup: Simple, Effective, and Beginner-Friendly
Here’s my setup: I use a single or double stem approach for my indeterminate tomatoes. I remove suckers below the first flower cluster and tie the main stem(s) to a tall stake or cage as they grow. I mulch around the base with straw or wood chips to keep the wanted moisture in and the unwanted weeds out. And I check for new suckers every week or so. That’s it!
I’m not chasing perfection – just healthy plants that give me a steady supply of delicious tomatoes all season long. And if I miss a sucker or two, no big deal – I just let it grow and see what happens.
🤝 My Two Cents
If you’re just starting out, I encourage you to experiment. Try pruning one plant and leaving another unpruned. See what works best for you, your garden, and your climate. Gardening isn’t about following rigid rules – it’s about learning, observing, and adapting.
And remember, you don’t have to do exactly what I do. I’m just sharing what works for me, in my garden, with my tomato plants. Whether you decide to prune every sucker or let your tomatoes go wild, you’ll learn something along the way. 🌿
🌟 PS: I’ve linked a few of my favorite tools and fertilizers throughout this post. These are affiliate links, which means I might earn a small commission if you decide to buy through them, at no extra cost to you. It’s a simple way to support my gardening adventures while you grow your own!
Unlock Endless Tomato Plants: How to Clone Tomatoes from Suckers!
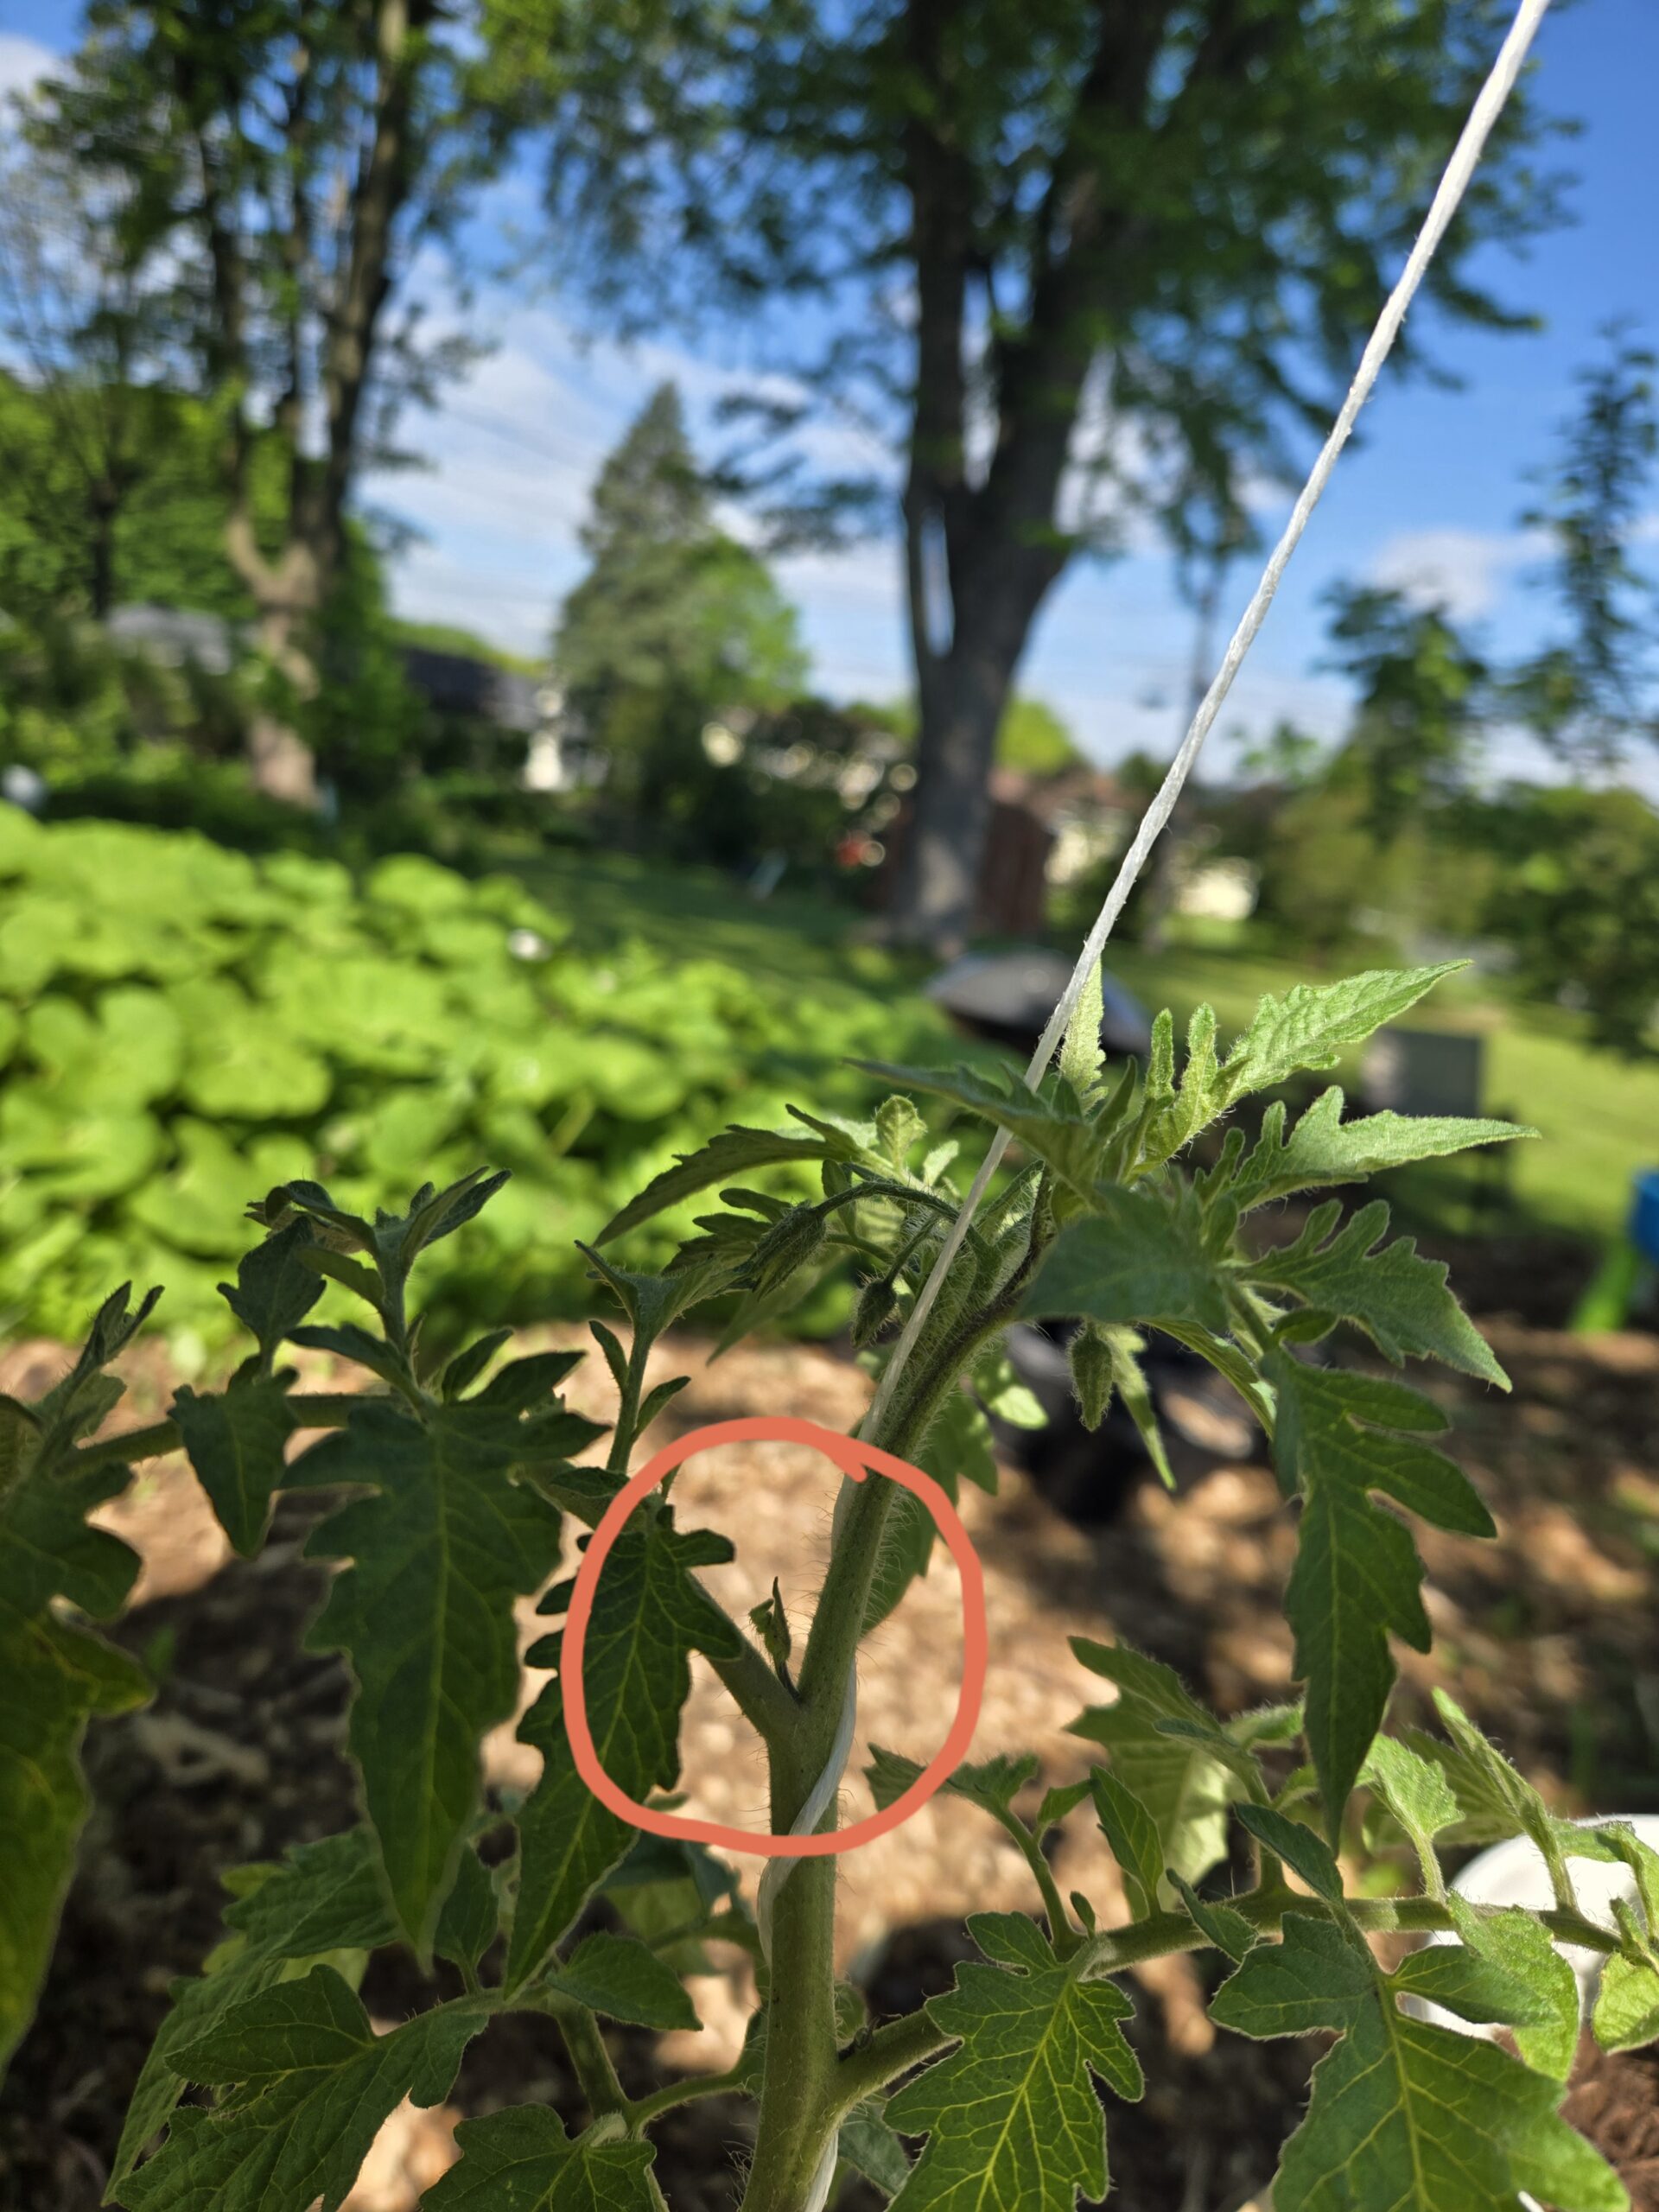
This photo highlights the correct spot to cut a tomato sucker for propagation. The red circle marks the sucker emerging between the main stem and a branch. Use clean shears and remove lower leaves to prepare for rooting.
🌱 Unlock Endless Tomato Plants: How to Clone Tomatoes from Suckers! 🍅
📋Rooted Field Note: 04
Ever wish you could multiply your favorite tomato plants without spending a penny? Well, friend, that’s exactly why I’m here today—to share an incredibly useful gardening trick: propagating tomatoes from suckers! This method is not only cost-effective but also simple enough for even beginner gardeners. The best part? You’ll create healthy clones of your beloved plants quickly and efficiently.
What Are Tomato Suckers? 🤔
Tomato suckers are small shoots that grow in the angle between the stem and branches of your tomato plant. Typically, gardeners remove these to boost the plant’s fruit production, as leaving too many suckers can divert energy away from growing larger fruits. However, these seemingly unwanted shoots are perfect for creating entirely new tomato plants, offering you a straightforward way to increase your harvest without extra cost.
Why Propagate from Suckers? 🌟
- Free Tomato Plants: Propagating from suckers allows you to multiply your plants without purchasing seeds or new seedlings.
- Genetically Identical Clones: If you have a tomato variety you love, sucker propagation ensures the new plants will produce the same tasty tomatoes.
- Rapid Growth: Tomato cuttings root quickly, often producing new roots in just 7-14 days.
- Extended Harvest: Rooted suckers can be transplanted later in the season, offering continuous fruit production into late summer or fall.
Ready to get started? Here’s exactly how to do it step by step.
Step-by-Step Guide to Cloning Tomatoes from Suckers 🌿✂️
Step 1: Select the Right Sucker
Look for a healthy sucker about 4-6 inches in length without any blossoms or tiny fruits. Early morning is the best time for cutting because the plant is hydrated and less stressed, increasing your chances of success.
Step 2: Make a Clean Cut
To keep my plants healthy, I always begin by wiping my sharp shears with rubbing alcohol before making any cuts. Using rubbing alcohol will decrease the chances of diseases spreading between plants. When I’m ready to prune, I carefully trim the sucker close to the main stem, ensuring I don’t nick the surrounding plant tissue. Once the cut’s made, I pop the cutting straight into a jar of clean water or wrap it in a damp towel. This keeps it from drying out and gives it the best shot at rooting and thriving.
Step 3: Prepare Your Cutting
Remove all the lower leaves on the sucker, leaving only the top two or three small leaves. Removing leaves reduces water loss and helps the cutting concentrate on developing roots.
Step 4: Choose Your Rooting Method
Water Method:
- Place the cutting in a jar/container filled with room-temperature water, submerging the lower third of the stem.
- Keep the jar out of direct sunlight to avoid overheating or wilting.
- Change the water every 2-3 days to maintain oxygen levels and prevent rot.
- Expect roots to appear in about one week.
Soil Method:
- Fill a small pot or cup with moist, well-draining potting mix.
- Insert the sucker deep into the soil, burying the stem up to the remaining leaves.
- Keep the soil moist, but avoid waterlogging.
- Place in indirect sunlight, ensuring consistent humidity.
- Roots typically develop within two weeks.
Sand Method:
- Fill a small container with clean, coarse sand and moisten it thoroughly without making it soggy.
- Insert the prepared sucker deep into the sand, burying the stem to just below the remaining leaves.
- Maintain consistent moisture in the sand, and keep the container in indirect sunlight.
- Expect roots to develop within about 7-14 days.
Step 5: Transplant Your Rooted Sucker
Once your cutting has established strong roots (visible roots in water, firm resistance in soil, or roots visibly protruding from sand), transplant it carefully into its final growing location or a larger pot. Bury it deeply, ensuring the roots and part of the stem are underground, to encourage a strong root system.
Caring for Your Newly Rooted Tomato Plants 🌞💦
-
- Gradual Sunlight Exposure: Initially, your new plant should be placed in partial shade to prevent stress. Gradually increase its exposure to full sunlight over one week.
Get the sunlight👇exposure guide
- Consistent Watering: Maintain even moisture levels in the soil, especially during the initial weeks. Mulch can help retain moisture.
- Support Structures: Provide stakes or cages early to support the growing plant and encourage upward growth, particularly for indeterminate varieties.
Common Mistakes and How to Avoid Them 🚫
- Choosing Poor Quality Cuttings: Always start with healthy suckers from vigorous, disease-free plants.
- Leaving Too Many Leaves: Excess foliage drains resources needed for rooting.
- Immediate Full Sun Exposure: New cuttings must be acclimated slowly to sunlight to prevent wilting and stress.
- Overwatering or Underwatering: Maintain balanced moisture levels, as extremes can hinder rooting and growth.
My Proven Tips for Guaranteed Success 🌟
- Experimentation: Try rooting multiple suckers simultaneously, using water, soil, and sand methods to see which yields better results in your garden.
- Labeling: Clearly label your cuttings if propagating different tomato varieties to avoid confusion.
- Patience and Consistency: Handle cuttings gently and maintain consistent care routines for the best rooting success.
Final Thoughts: Enjoy the Benefits of Tomato Cloning! 🍅✨
Learning how to propagate tomatoes from suckers has been a total game-changer for me in the garden. It’s such a smart way to save money, expand the garden fast, and really get hands-on with the amazing regenerative power of plants. I hope this guide inspires you to give it a try and experience just how rewarding it can be. 💬 Got any tomato cloning tips or tricks? Add a comment below and share your wisdom to help fellow gardeners thrive! Happy gardening and enjoy your bountiful tomato harvests!
Unlock Unlimited Herbs & Veggies: Master Stem Cutting Propagation Indoors
How to Clone Your Favorite Food Plants Indoors Using Stem Cuttings 🌱🏡
📋Rooted Field Note: 03
The first time I heard about cloning plants from a stem cutting, I honestly thought it sounded like some gardening wizardry straight from a sci-fi movie. Cloning plants? It sounded complicated and futuristic. But guess what—it’s actually super simple, budget-friendly, and an amazing way to fill your indoor garden with more of your favorite edible plants.
If you’re just dipping your toes into the world of gardening or looking to grow your indoor food collection, you’re in exactly the right spot. I’ll guide you through cloning plants step-by-step using stem cuttings. Stick with me—it’s easy, rewarding, and genuinely fun. Let’s jump right in!
Why Use Stem Cuttings?
Cloning plants through stem cuttings simply means you’re making an exact replica of the original plant. The new plants will carry the exact same tasty qualities and strength of their parent. Got a basil plant that makes perfect pesto? Your new plants will have those delicious traits too. It’s an awesome method for expanding your indoor garden without constantly buying new plants or seeds.
What You’ll Need
Before we dive into the details, gather these basic items:
- Healthy indoor plants (think basil, mint, rosemary, oregano, tomatoes, peppers)
- Clean, sharp scissors or pruning shears (sanitized with rubbing alcohol)
- Small cups or jars for rooting in water
- Small pots or containers with drainage holes
- Organic, fast-draining potting soil
- Optional: rooting hormone or cinnamon powder
- Labels (this might seem extra, but you’ll thank me later!)
Your Step-by-Step Guide to Stem Cutting Propagation
Ready? Here’s your simple blueprint:
Step 1: Choosing the Best Stem 🌿
Look for a strong, healthy stem without flowers. For softer herbs like basil or mint, choose a flexible green stem. For woody herbs such as rosemary or oregano, opt for semi-woody stems. For vegetables like tomatoes or peppers, select vigorous, young stems without buds or fruits.
Step 2: Making the Cut ✂️
Take your clean scissors and snip off about 3 to 6 inches of stem, just below a leaf node (that’s where leaves branch off). Aim to cut at a 45-degree angle—this helps the stem absorb more water and root better. Immediately after cutting, remove the leaves from the lower half of the stem, leaving only 2-4 leaves on top. This helps the plant focus on root development rather than maintaining extra leaves.
Step 3: Rooting Your Stem Cutting 💧
Choose one of these easy rooting methods:
Water Method:
- Place your cutting into a jar of clean water, making sure no leaves are underwater. Set it in indirect sunlight, like on your kitchen counter. Change the water every few days to keep things fresh.
Soil Method:
- Dip the cut end in rooting hormone or cinnamon powder (totally optional but beneficial). Plant the stem directly into moist potting soil, burying at least one node. Cover lightly with a plastic bag to retain humidity.
Step 4: Be Patient—but Not for Long! ⏳
Roots typically appear:
- 1-2 weeks for herbs like basil, mint, or oregano
- 3-4 weeks for woody herbs like rosemary
- 3-4 weeks for veggies such as tomatoes or peppers
Ensure the cuttings stay warm (around 70°F), moist, and in indirect, bright sunlight. If rooting in soil, mist regularly to maintain moisture.
Caring for Your Clones 🌞
Once your stem cuttings have roots about 1-2 inches long, it’s time for their own pots:
- Use small pots with drainage holes filled with good-quality potting soil.
- Carefully transplant your rooted cuttings, gently pressing soil around them.
- Water thoroughly and place them in bright, indirect light.
- Gradually introduce your new plants to stronger indoor lighting over the next week.
Use the seedling 👇checklist to reintroduce your cuttings back to sunlight
🌱 Get Your Printable Seedling ChecklistCommon Mistakes and Simple Solutions 🚫
Here are quick fixes for common problems:
- Rotting stems: Remove lower leaves and avoid letting leaves sit underwater or in the soil.
- Slow or no roots: Double-check temperature and lighting—bright, indirect light and warmth are key. Avoid drafts and cold windows.
- Wilted or dry leaves: Maintain high humidity by regular misting or using humidity covers.
Troubleshooting Quick Tips 🛠️
Having trouble with your stem cuttings?
- Make sure they’re getting 12-16 hours of indirect light.
- Adjust humidity levels by misting or using covers.
- Ensure soil moisture is consistent—not too wet, not too dry.
Quick Checklist for Success ✅
Here’s a handy checklist to keep you on track:
- Choose healthy plants
- Use sanitized scissors
- Cut below leaf nodes at 45 degrees
- Strip lower leaves
- Root in water or moist soil
- Provide indirect bright light
- Keep moisture consistent
- Transplant when roots reach 1-2 inches
Wrapping Up and Growing Together 🌱✨
I vividly remember rooting my first stem cutting—it felt almost magical seeing those tiny roots appear. Every time I clone a plant now, it deepens my connection with nature and fills my home with lush, edible greenery.
Stem cutting propagation is more than just expanding your indoor garden. It’s about the joy of gardening, saving money, and having fresh herbs and veggies always within reach. Give it a try—you’ll be amazed at how easily and beautifully your indoor garden flourishes.
Happy growing, and enjoy every moment! 🌿💚