🧄 I Waited 9 Months for This Moment: How to Harvest Garlic Without Screwing It Up 😅
Rooted Field Note: Some links in this Field Note are affiliate links to tools, seeds, or gear we actually use. If you click and buy, we may earn a small commission — no extra cost to you, just a little help for the homestead. 🌻
Let’s be honest — growing garlic feels a bit like a long-term relationship. You plant in the fall, protect it through the winter, get excited in spring, and then… you wait. 🕰️
And just when your patience is hanging by a thread, the tops start yellowing, and you wonder: Is it time?
That’s exactly what happened to me the first year I grew hardneck garlic in Zone 5.
If you’re like I was, staring down a row of browning garlic tops with no clue whether it’s go time or “wait a week,” this Rooted Field Note is for you.
🔍 How to Know When Garlic is Ready to Harvest (Zone 5 Friendly)
In our northern Zone 5 climate, hardneck garlic is typically ready to harvest in mid-to-late July — give or take a week depending on your season.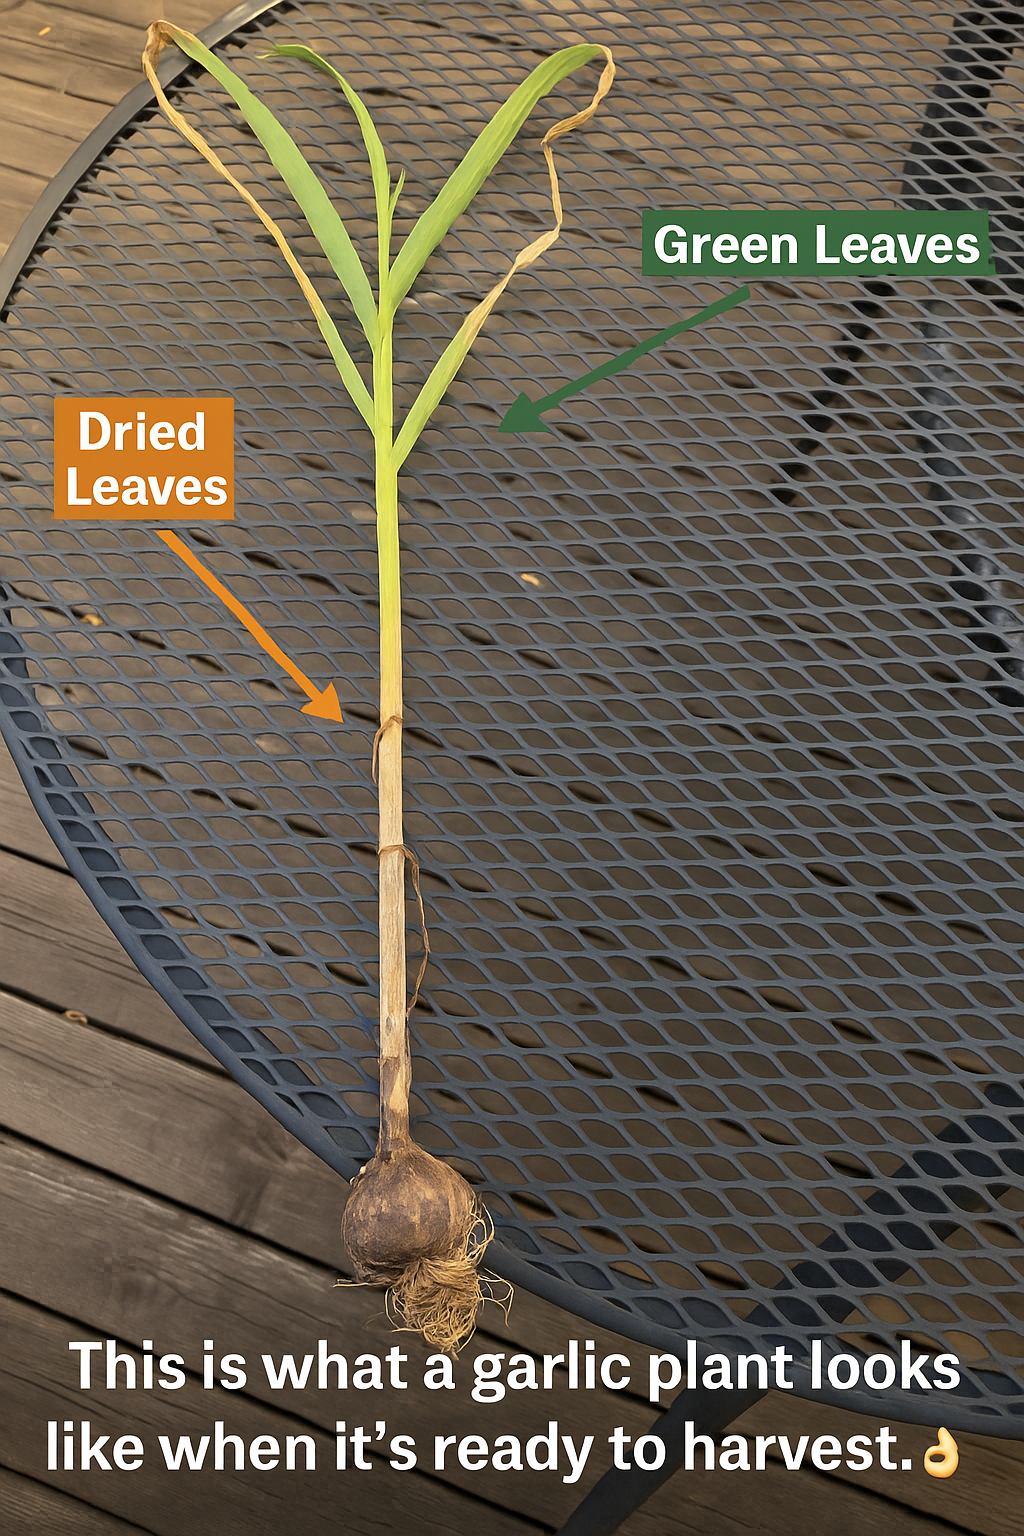
👉 When ⅓ to ½ of the leaves have turned brown, it’s time to harvest.
That’s not a random number. Garlic leaves represent the layers of protective skin around each bulb. If too many leaves die off, your garlic ends up with fewer papery wrappers — which means less protection and a shorter shelf life.
💡 Pro Tip: Don’t pull early! You want the cloves to fill their skins but not bust through them like a balloon animal in a heatwave.
🧰 What You’ll Need to Harvest Garlic Like a Pro
| Tool | What It’s For |
|---|---|
| 🪓 Radius Garden Broadfork | Loosens deep soil without slicing bulbs (this fork changed my soil game). |
| 🧤 Gardening Gloves | Keeps your hands clean and saves your knuckles from angry dirt clumps. |
| 🧺 Harvest Basket or Crate | Keeps bulbs dry and safe after pulling. Avoid buckets or plastic bags. |
| 🧵 Twine or Garden String | For tying bunches together during the curing phase. |
| ✂️ Garden Scissors | To trim roots and stalks after curing. |
I used the Radius Garden fork to gently loosen the soil before planting the bulbs — game changer. 👌
🪓 Step-by-Step: How to Harvest Garlic (Without Wrecking It)
1. Pick a Dry Day
Garlic pulls cleanest and stores longest if you harvest when the soil’s dry. I usually stop watering 7–10 days before harvest to help bulbs cure naturally in-ground.
2. Loosen the Soil
This is where your fork shines. Push the broadfork 6–8 inches from the plant’s base and lean it back gently to loosen the soil. Work around the bulb, don’t stab directly under it like a vampire hunter.
🎯 Goal:
Loosen, don’t lift yet.
3. Pull Gently by the Stalk
Once the soil’s loosened, grab the garlic by the base of the stem and gently work it up. If it resists, loosen more. If it breaks, well… time to dig carefully with your fingers.
💬 Been there. Learn from me: don’t yank.
4. Shake, Don’t Wash
After lifting, shake off loose dirt — do this carefully by hand, not by hitting the bulbs on the ground. Avoid washing them at this stage; extra moisture can invite mold. If any bulbs got nicked or bruised during digging, set those aside to use soon, as damaged garlic won’t store well.
🌬️ Curing Garlic: The Make or Break Step
Once you’ve got your bulbs out, the work’s not done. Garlic requires a few weeks to dry out properly, during which it develops the distinctive papery skins that are familiar to many. To cure my garlic, I follow a specific process that ensures optimal flavor and preservation. Here’s a step-by-step guide on how I cure mine for the best results:
✅ Where:
Dry, dark, airy spot. I use our shed, but a covered porch or garage works too. Just avoid sunlight — it can cook or bleach the bulbs.
✅ How:
Tie garlic in bundles of 6–10 with twine and hang them upside-down like little garlic chandeliers, or lay bulbs flat on a screen or raised surface. Good airflow is the goal.
✅ How Long:
3–4 weeks in a cool (60–70°F), dry area. The bulbs will feel firm, and the outer skins will look papery when they’re done.
✂️ After Curing: Trimming, Cleaning & Storing
- Trim the tops to about ½ inch above the bulb
- Trim the long roots off to a small nub
- Peel one or two outer layers if they’re dirty — leave the tight wrappers
- Store in a cool, dark, dry place with good airflow — NOT the fridge
🤦♂️ Rookie Mistakes to Avoid
- Too Early? Cloves are tiny and soft. They won’t store.
- Too Late? Bulbs split and start rotting in storage.
- Bruising the Bulbs? They spoil faster. Treat the bulbs like eggs.
- Washing Garlic? Nope. Just don’t.
🌱 Ready to Try It Yourself?
Harvesting garlic is one of the most satisfying moments on the homestead. There’s just something about pulling your own homegrown bulbs from the earth that hits different. You feel like a dang pioneer with your own pantry stash. 🧄🔥
If you’ve got questions or want to share your harvest pics, jump into The Rooted Forum — it’s new, and we’re building it together. Ask, share, laugh, learn. We’re rooting for you in more ways than one.
👀 Coming Soon: What to Do With Garlic Scapes + How to Grow Bigger Bulbs Next Year
Bookmark this Rooted Field Note or save it to your garden journal for next season.
🛒 Tools I Actually Use (Affiliate Picks)
Categories
- ✅ Custom Planting Timeline by ZIP Code Never miss a planting window again—get a schedule tailored to your local frost dates.
- ✅ Seedling Checklist & Prep Guide Get your garden babies off to the best start with our printable, foolproof seed-starting guide.
- ✅ Compost & Fertilizer Calculator Mix it right the first time—use our tool to balance browns, greens, and amendments for thriving plants.