Monthly Archives: September 2025
How to Prune a Tomato (Step-by-Step with Real-Life Photo Guide)
🪴 How to Prune a Tomato (Step-by-Step with Real-Life Photo Guide)
🗒️Rooted Field Note: 27
🧑🌾 The Honest Truth About Tomato Pruning
I didn’t always prune my tomatoes. For a long time, I just let them sprawl. But once I saw what sucker propagation and single-stem pruning could do? Everything changed.
Now? I get cleaner plants, fewer diseases, and an entire second round of tomato plants from what most folks toss in the compost.
So if you’re wondering how to prune a tomato or looking for a real step-by-step photo guide on how to prune tomato plants, you’re about to see exactly what I do—dirt, roots, and all.
I didn’t create this guide because I planned everything perfectly. Truth is, I started pruning late — June 16 to be exact — way past the “ideal” time most gardeners talk about. But I wanted to show what’s still possible, even if you’re behind or working with what you’ve got. These photos and this process weren’t staged — they’re real-time, real-garden moments from my homestead. It’s proof that with a sharp snip and a little sand, you can turn tomato chaos into calm… and even multiply your harvest along the way.
✂️ Why I Prune My Tomato Plants
- Less leaf mess = more airflow
- Energy goes into fruit, not jungle vines
- Cutting off low leaves helps prevent blight
- Suckers? I root ‘em. Free plants.
🔍 Step-by-Step: How I Prune Tomatoes (with Photos)
✅ Step 1: Find the Main Stem
This is your plant’s backbone. You’re training it to go up, not sideways. That’s the one we stake and protect.
✅ KEEP: This is your main stem
-
The stem marked with the green check is your main leader — the vine you’ll be training upward.
-
This is the one you’ll support with a stake, cage, or string.
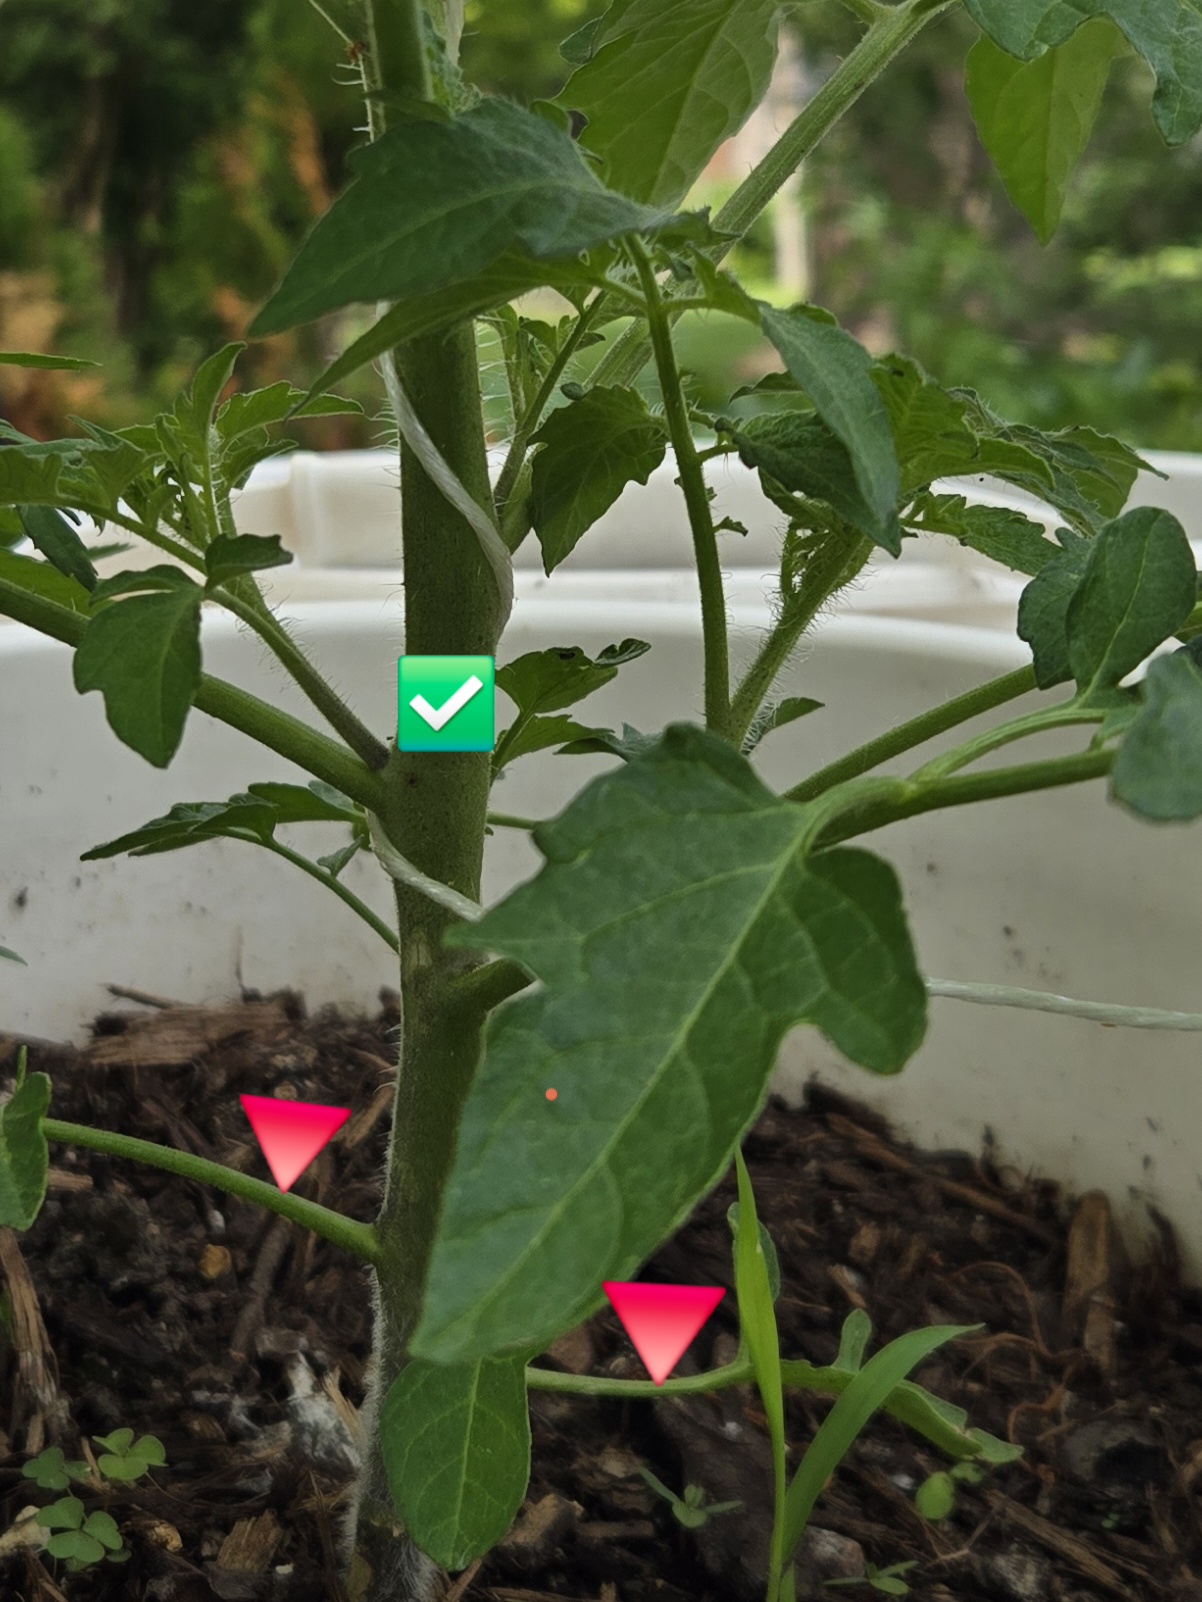
This is the central leader — the one we support and train. All pruning decisions start here.
🔻 REMOVE: Lower Leaves
-
The red triangle markers point to lower leaves that are close to or touching the soil.
-
These should be pruned off to:
-
Prevent soil-borne diseases (like early blight or fungal infections)
-
Improve airflow around the base
-
Focus the plant’s energy upward toward fruiting
-
✂️ Use clean pruners or gently pinch them off. You can prune them now if the plant is well-established and healthy.
✨ Additional Tip:
-
After removing those lower leaves, consider adding a layer of straw mulch around the base to prevent soil from splashing up during watering.
❌ Step 2: Remove Suckers
Suckers pop out of the V between the main stem and a branch. Tiny ones? Pinch. Big ones? Snip and root.
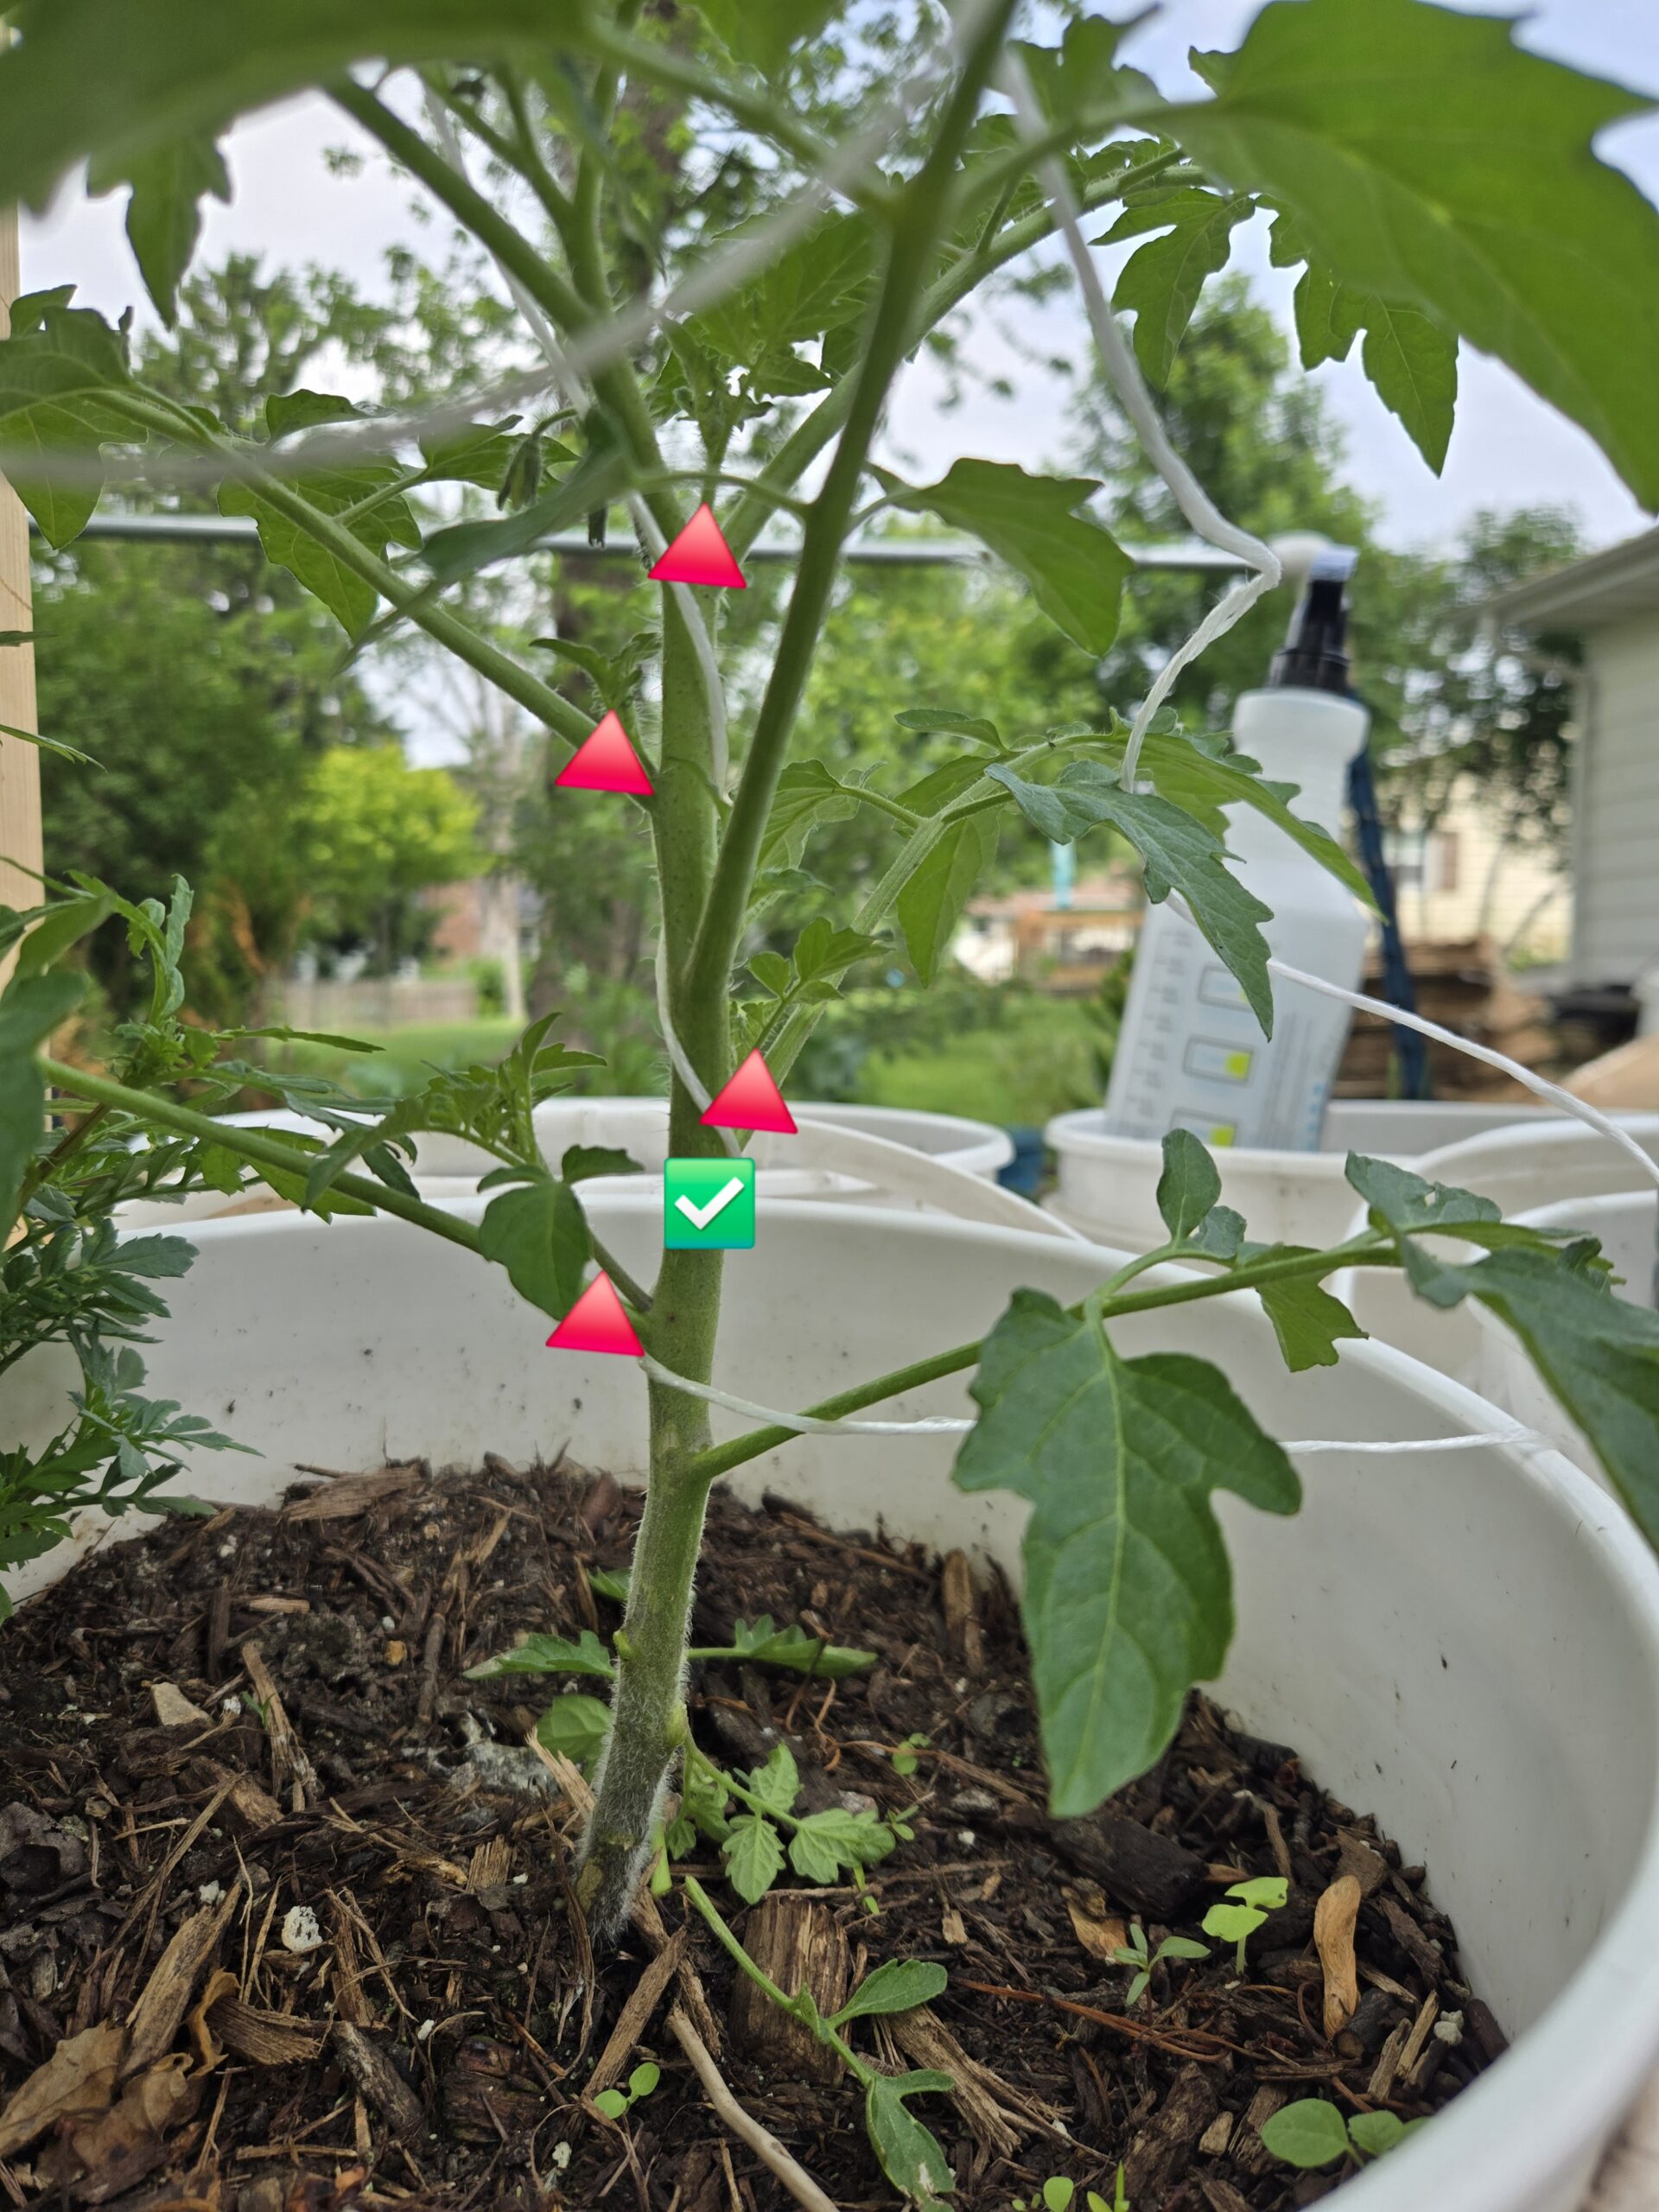
Suckers grow in the “V” between a leaf and the main stem — and they’re the key to keeping your tomato plant under control (or multiplying it!).
✅ KEEP: Central Main Stem
🔻 REMOVE: Bottom Leaves & Suckers
Each red triangle 🔻 points to something that should be removed:
-
Suckers (mid-point V’s):
-
A couple red triangles point to small shoots growing in the “armpits” (leaf crotches) between the main stem and a leaf stem.
-
These will grow into full branches and compete for nutrients unless you’re doing a multi-stem method.
-
For single-stem pruning, these should be pinched or snipped off.
-
✨ Optional Tip:
-
Now that the lower section is cleared, add a thick mulch layer (like straw or wood chips) to further protect from disease and maintain soil moisture.
-
Tie the main stem gently to the string or stake to guide its upward growth.
🌱 From Trash to Tomato: How I Root Suckers
🛠 Step 3: Quick Dip in Water
Freshly Snipped Sucker
-
This is a healthy sucker taken from the plant — perfect for propagation.
-
You can turn it into a whole new plant.
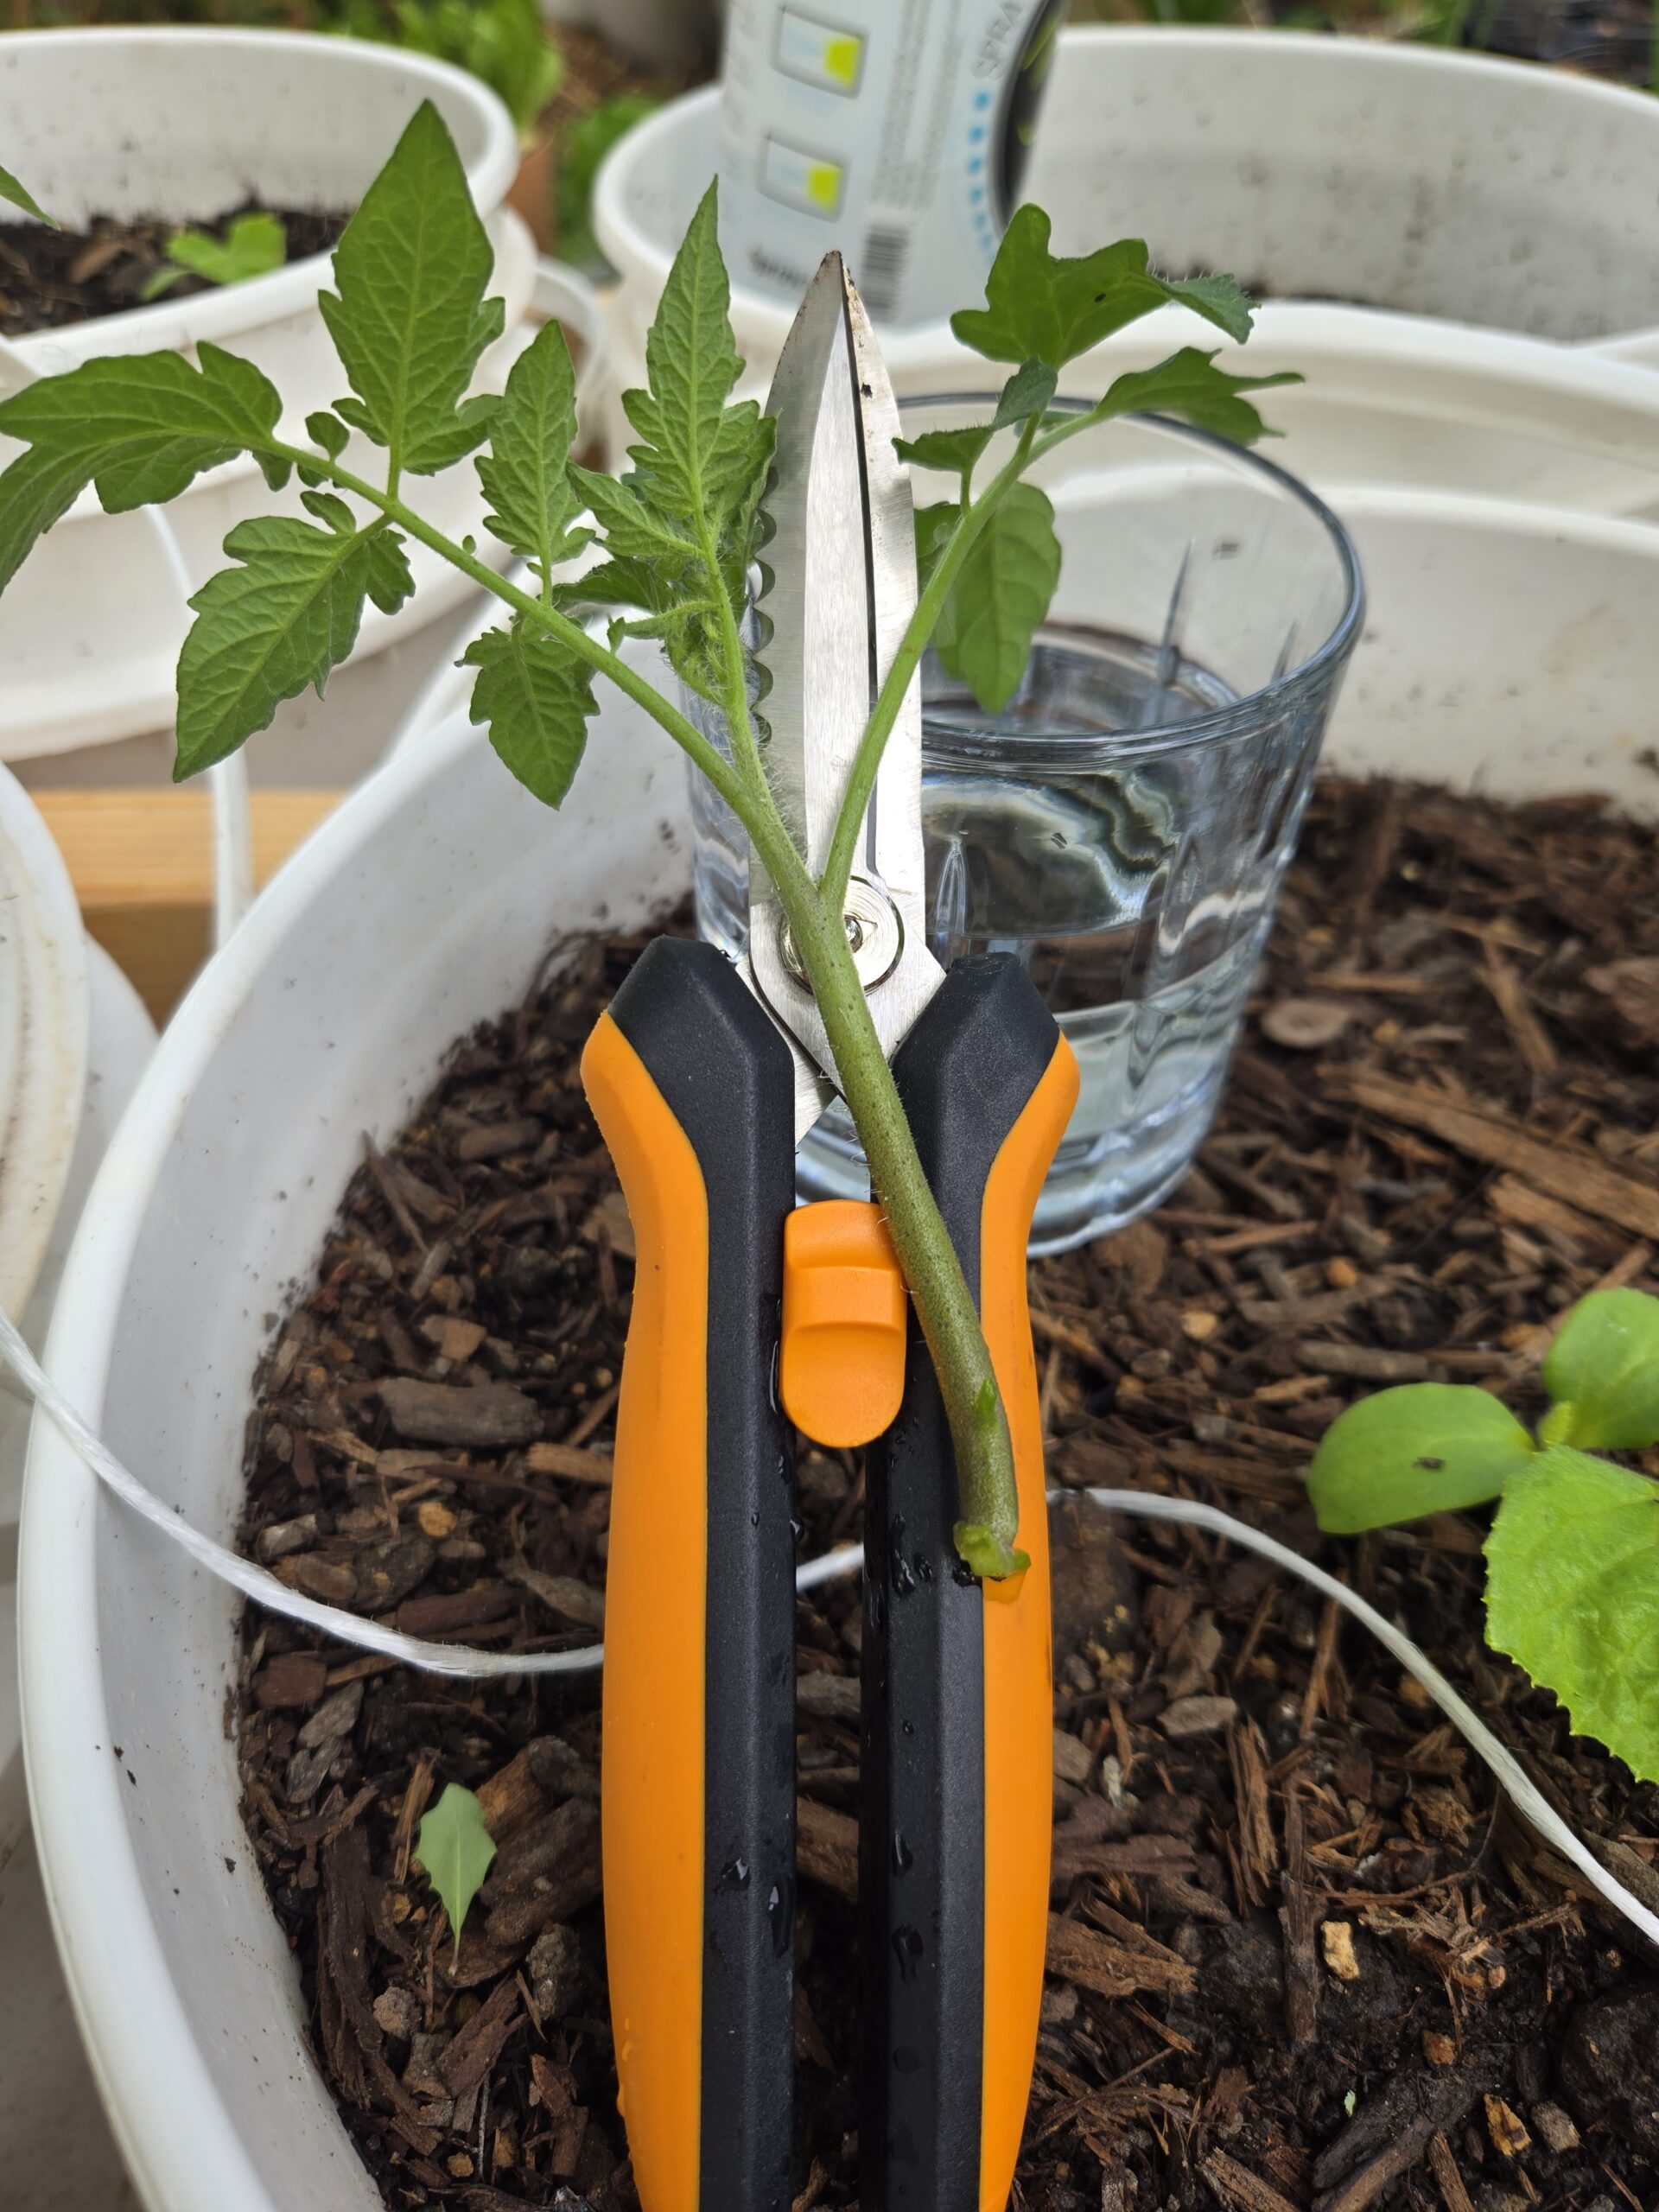
Keep them hydrated until you plant in sand
🌿 Step 4: Stick ‘Em in Sand
I use plain sand in a tray. No hormone powder. No drama. Just moisture and shade.
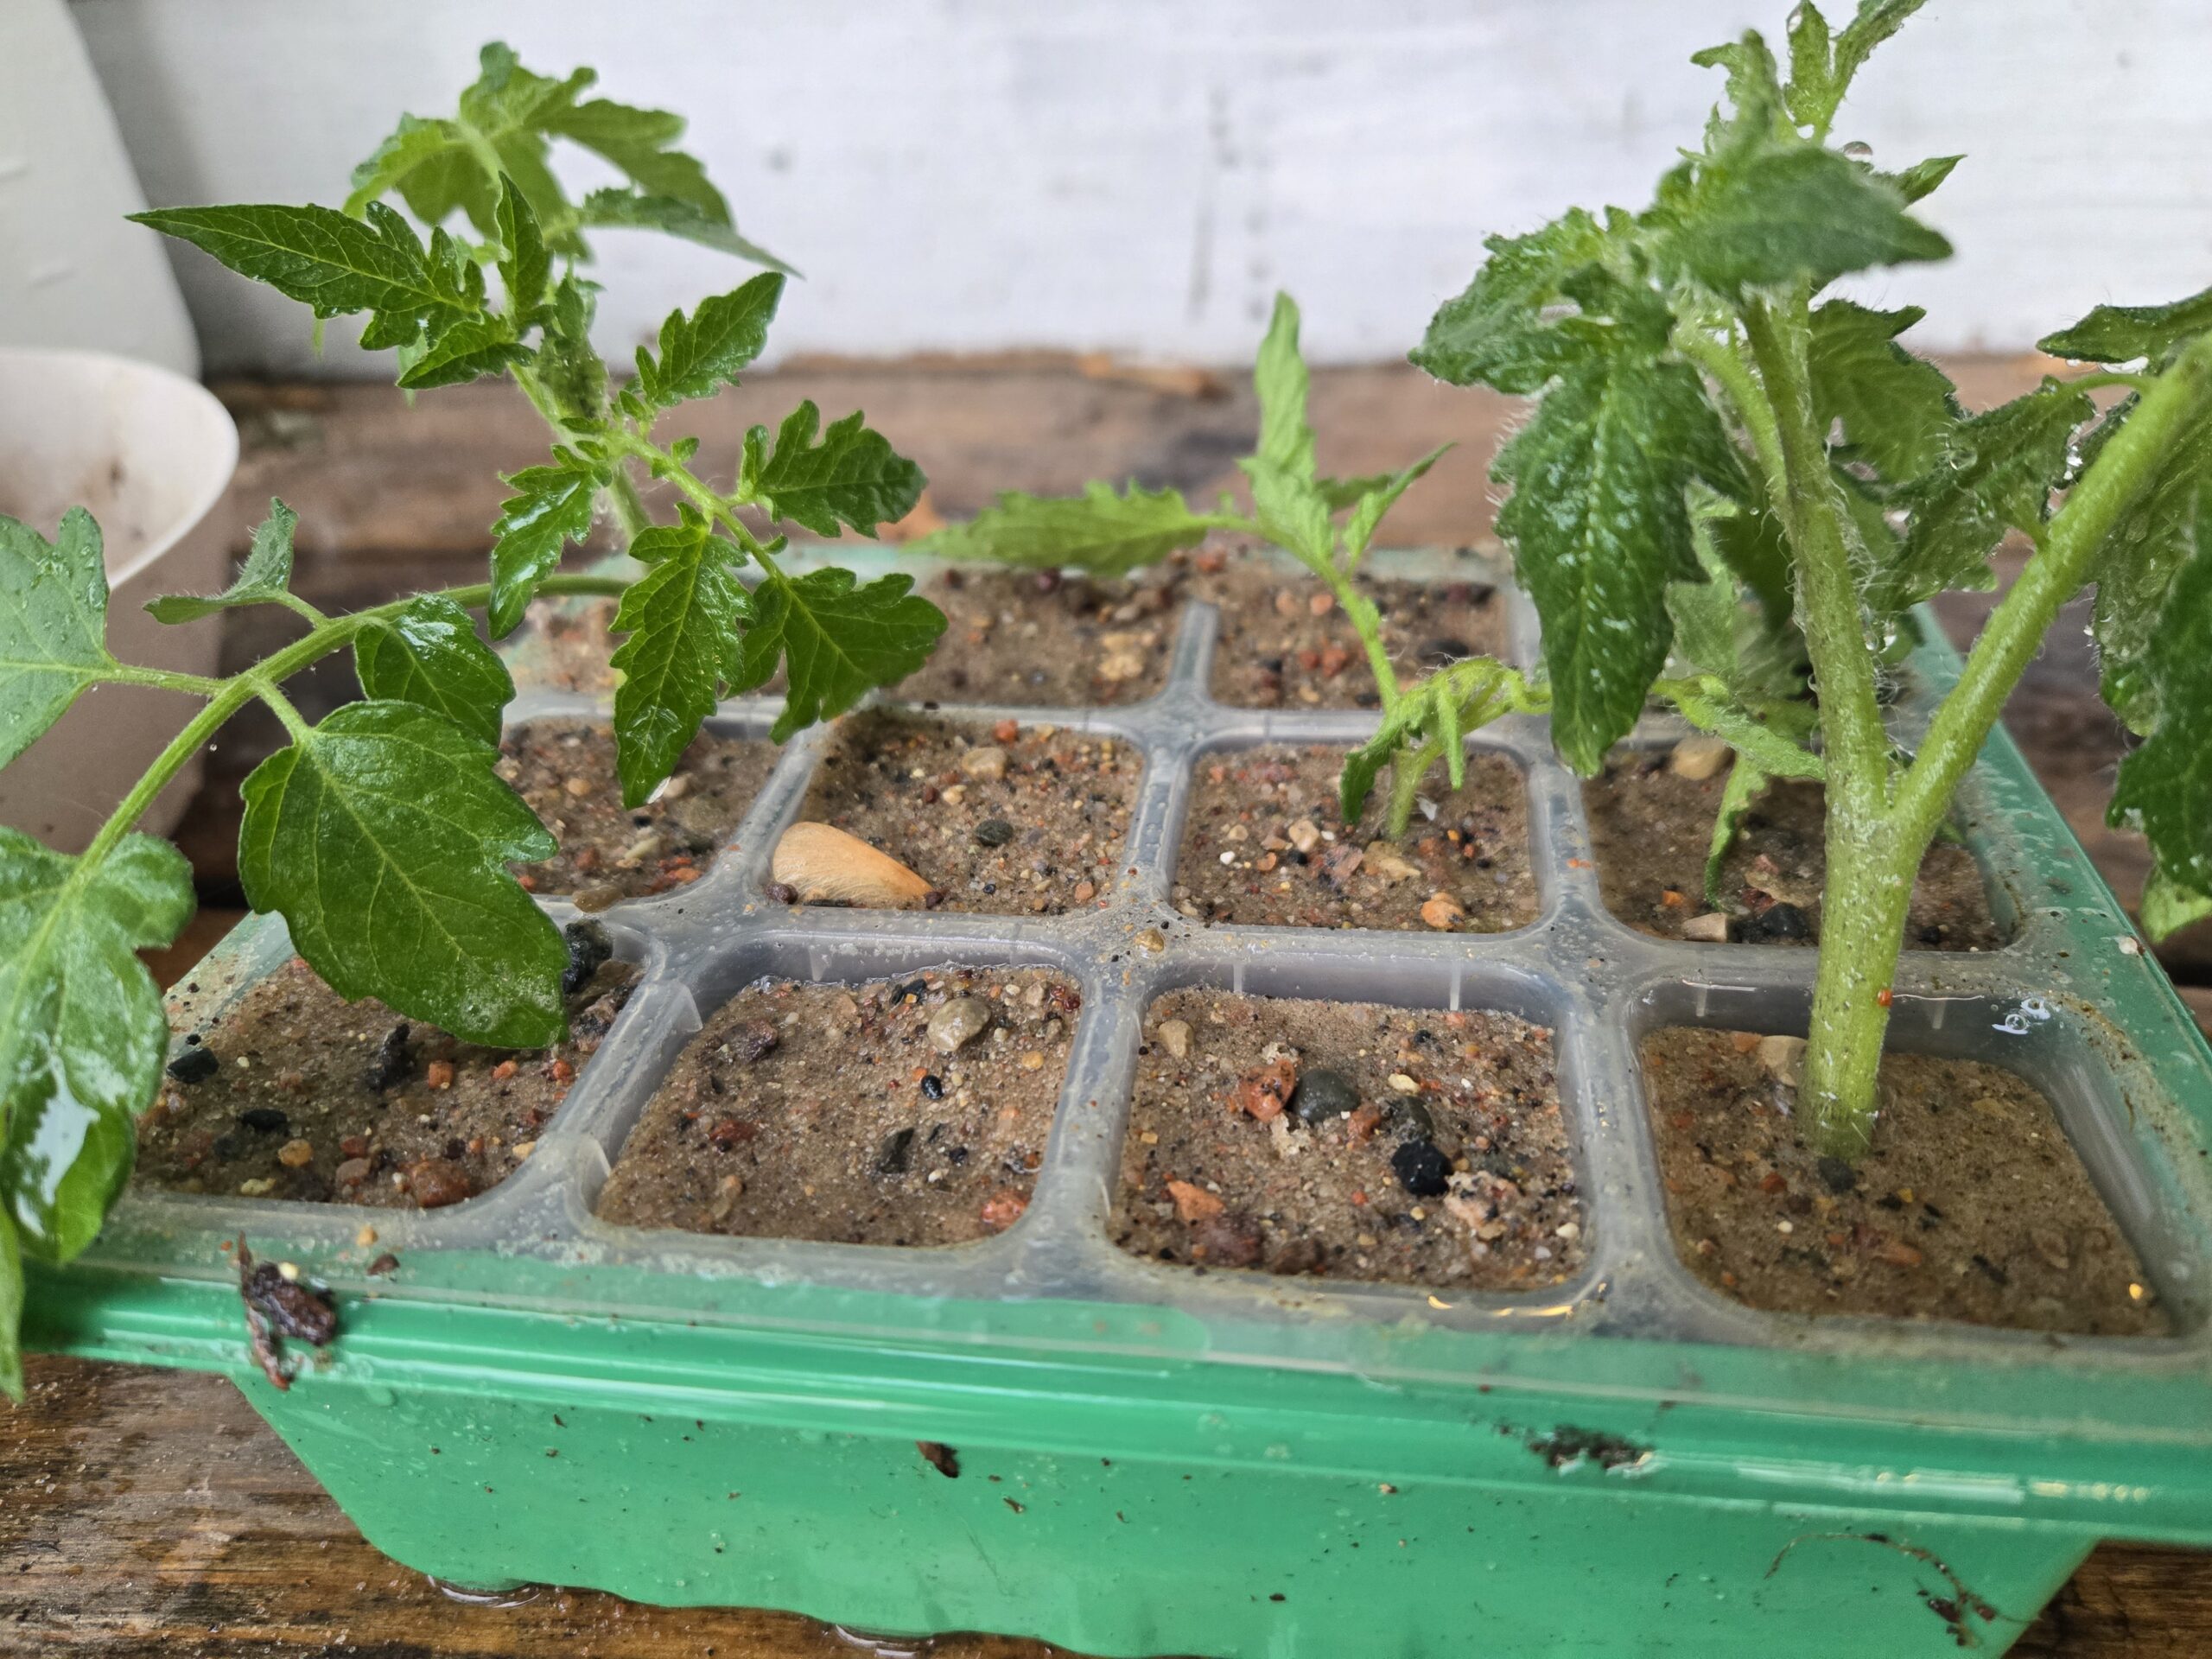
Simple propagation method, no hormone needed.
After snipping and briefly holding your sucker in water:
-
- Plant it directly into moist sand, as shown here.
- Press the sand around the stem to give support.
- Set your container somewhere shaded or lightly filtered — direct sun too early can wilt your cutting.
- Water gently to keep the sand moist but not soaked.
- Within 1–2 weeks, check for resistance when you gently tug — a sign roots are forming.
🌿 Bonus: Using sand instead of potting mix reduces rot and speeds up root development.
📦 Step 5: Transplant Time
Once roots show? I pull ‘em gently and plant them deep. This time, I used a bed I hadn’t touched in years — the soil was compacted and full of weeds. I grabbed my Radius garden fork and worked through it to loosen things up without flipping it over completely. No digging. Just lift and wiggle
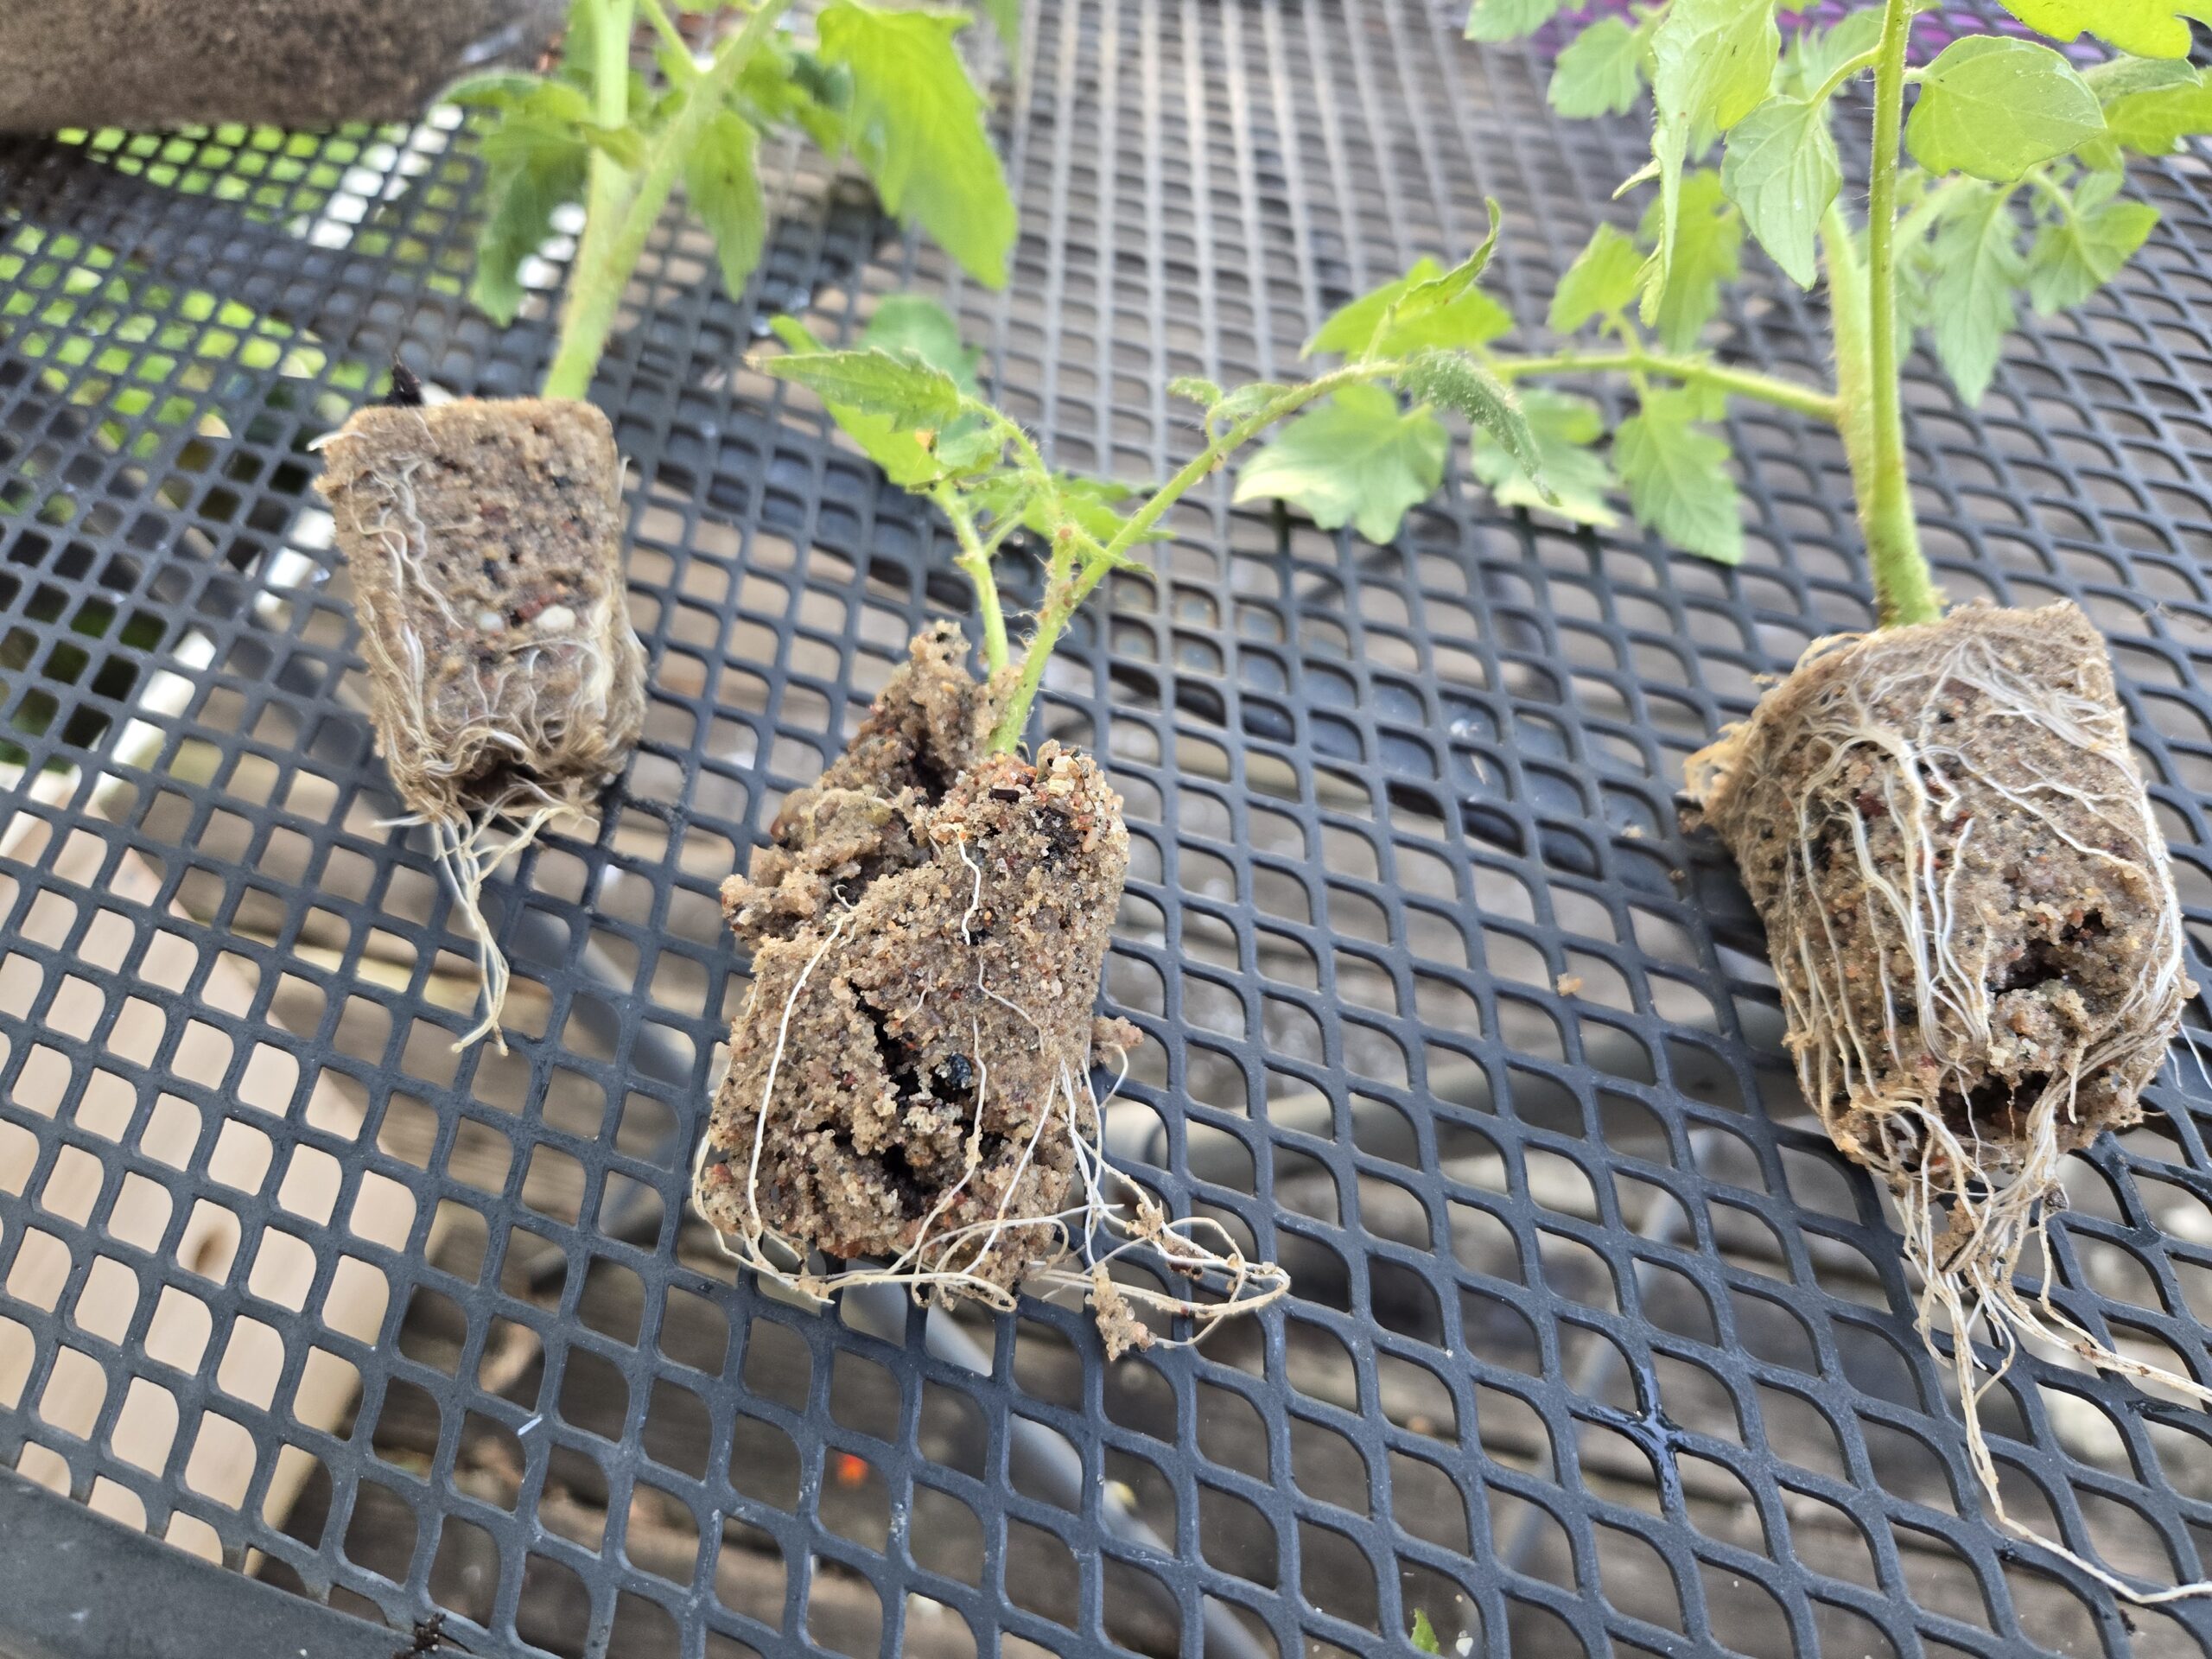
These tomato suckers rooted cleanly in moist sand — no soil, no hormones — and are now ready for transplanting. You can see the strong white roots forming around the base.
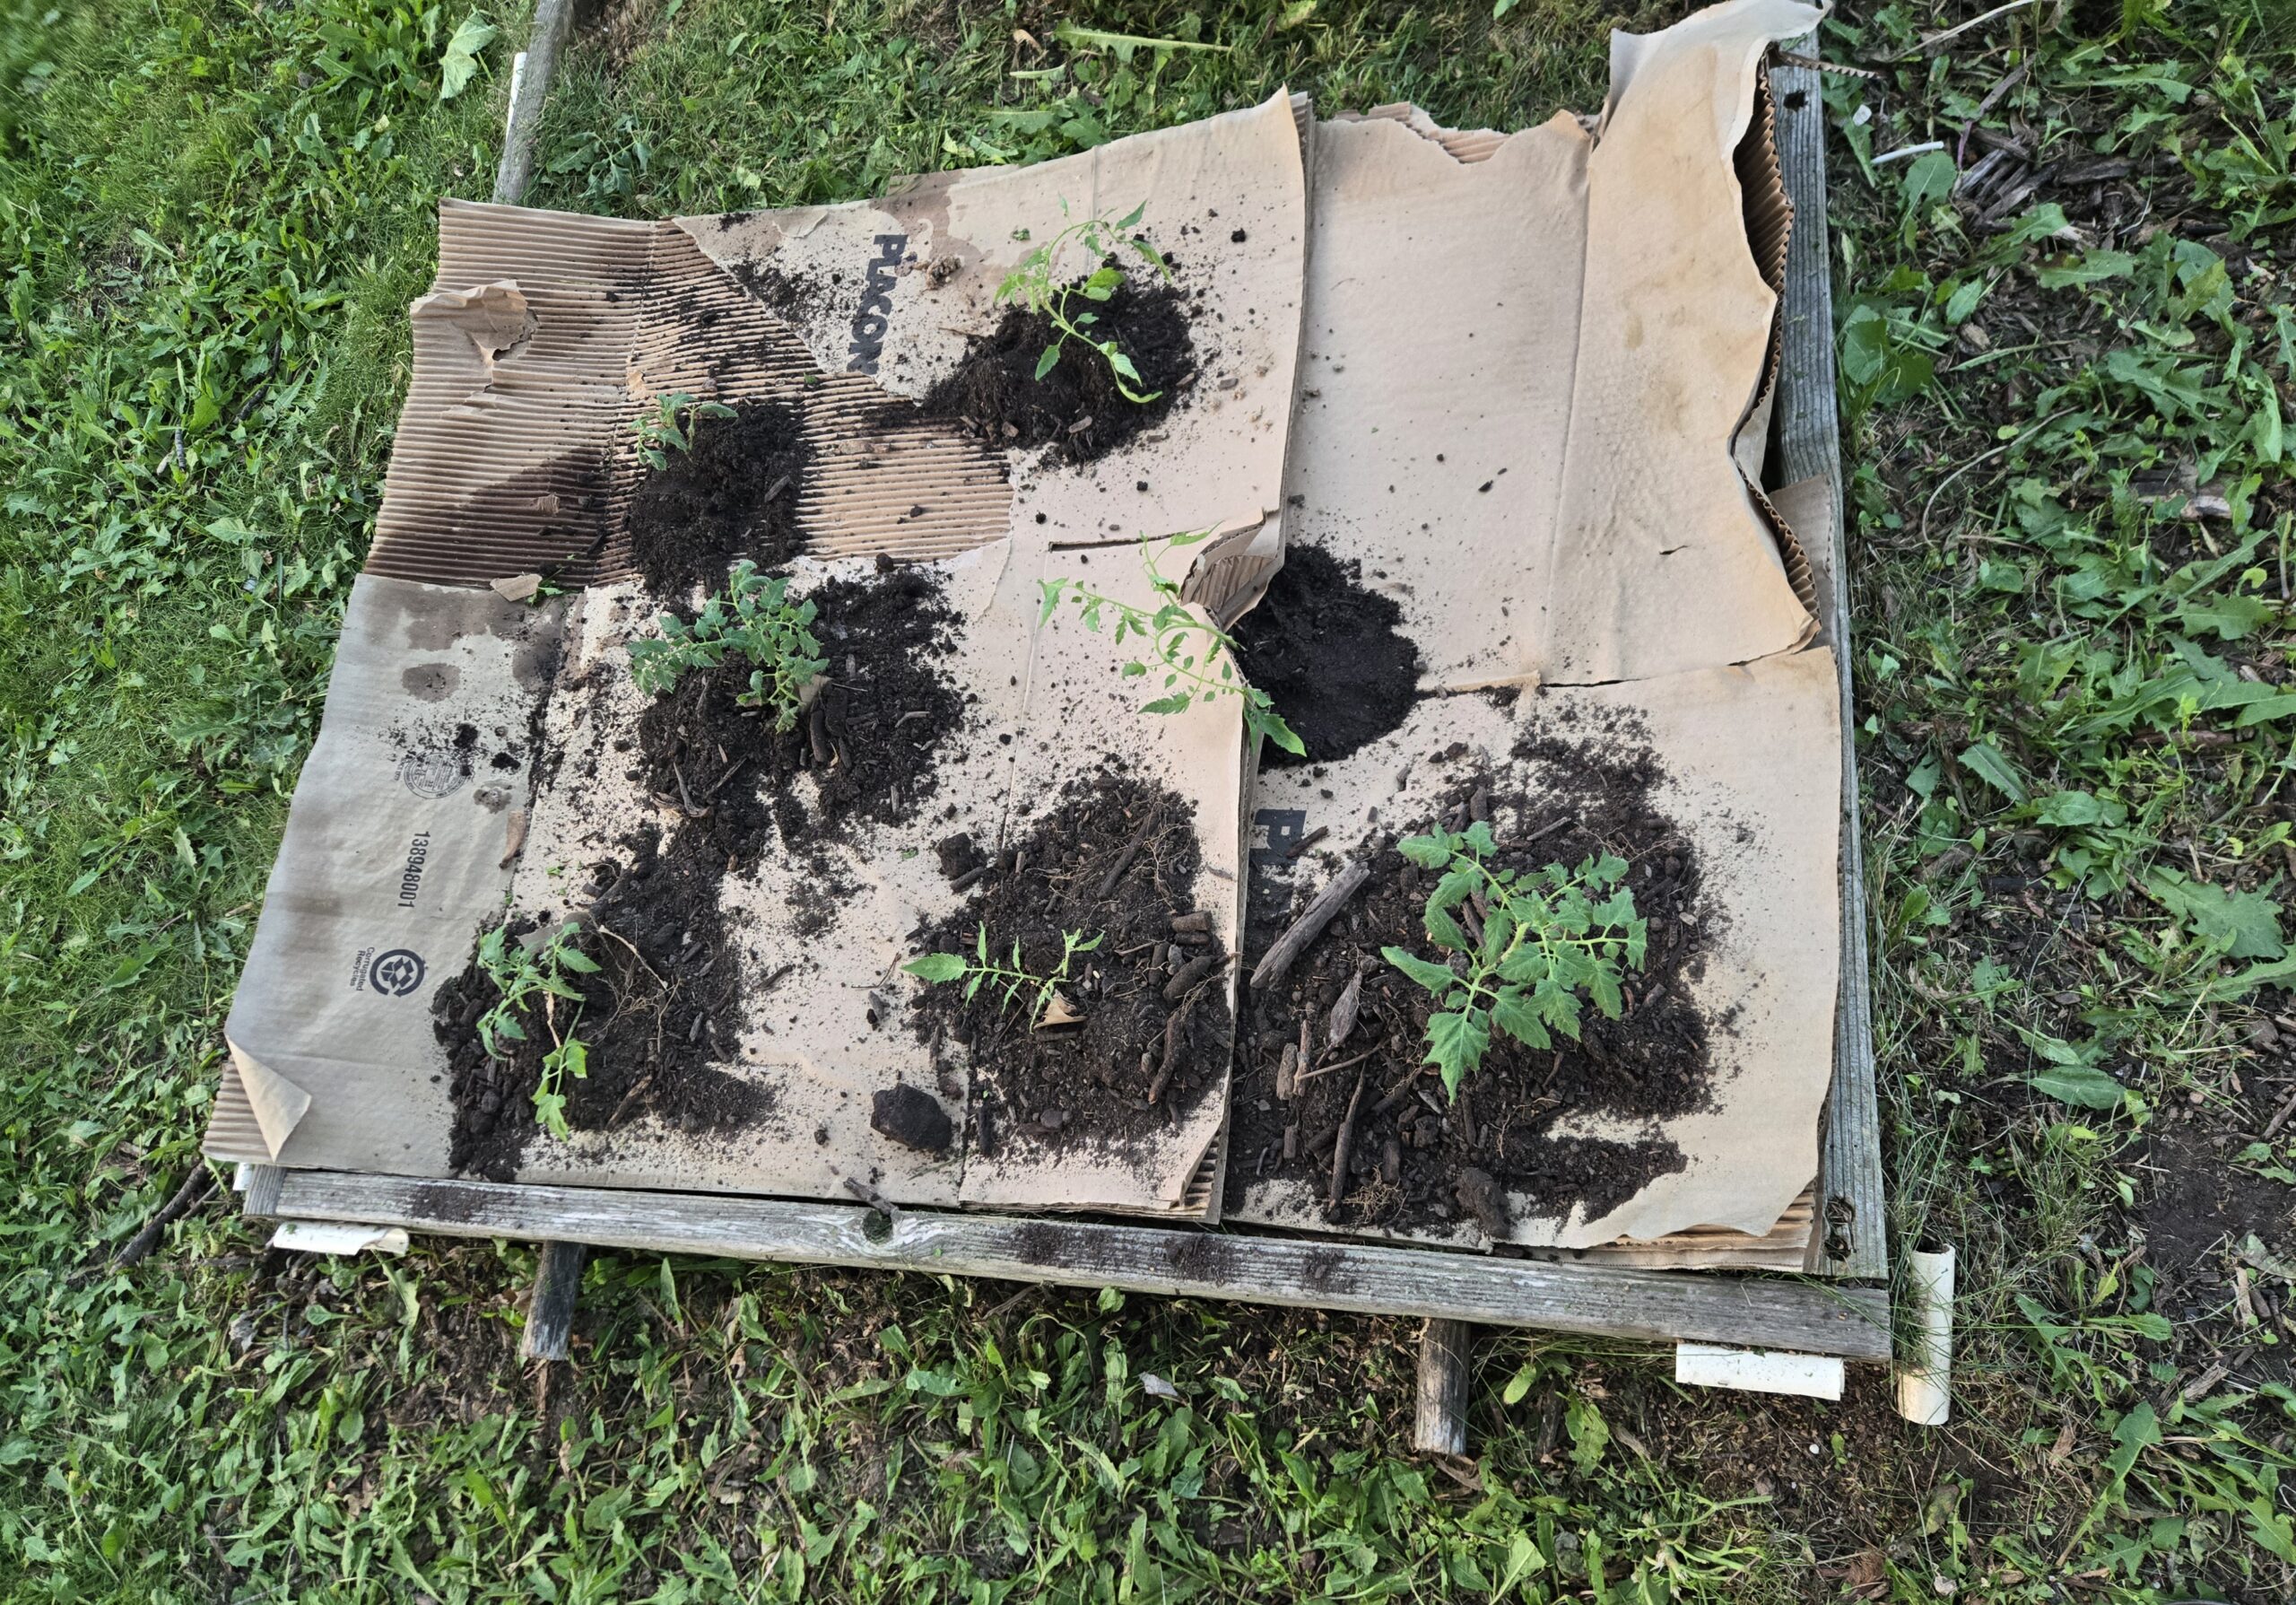
A no-dig bed makes it easy to tuck them right in.
After laying the cardboard down, I followed up with a thick layer of bark mulch. It holds moisture and keeps the weeds down while those new roots settle in.
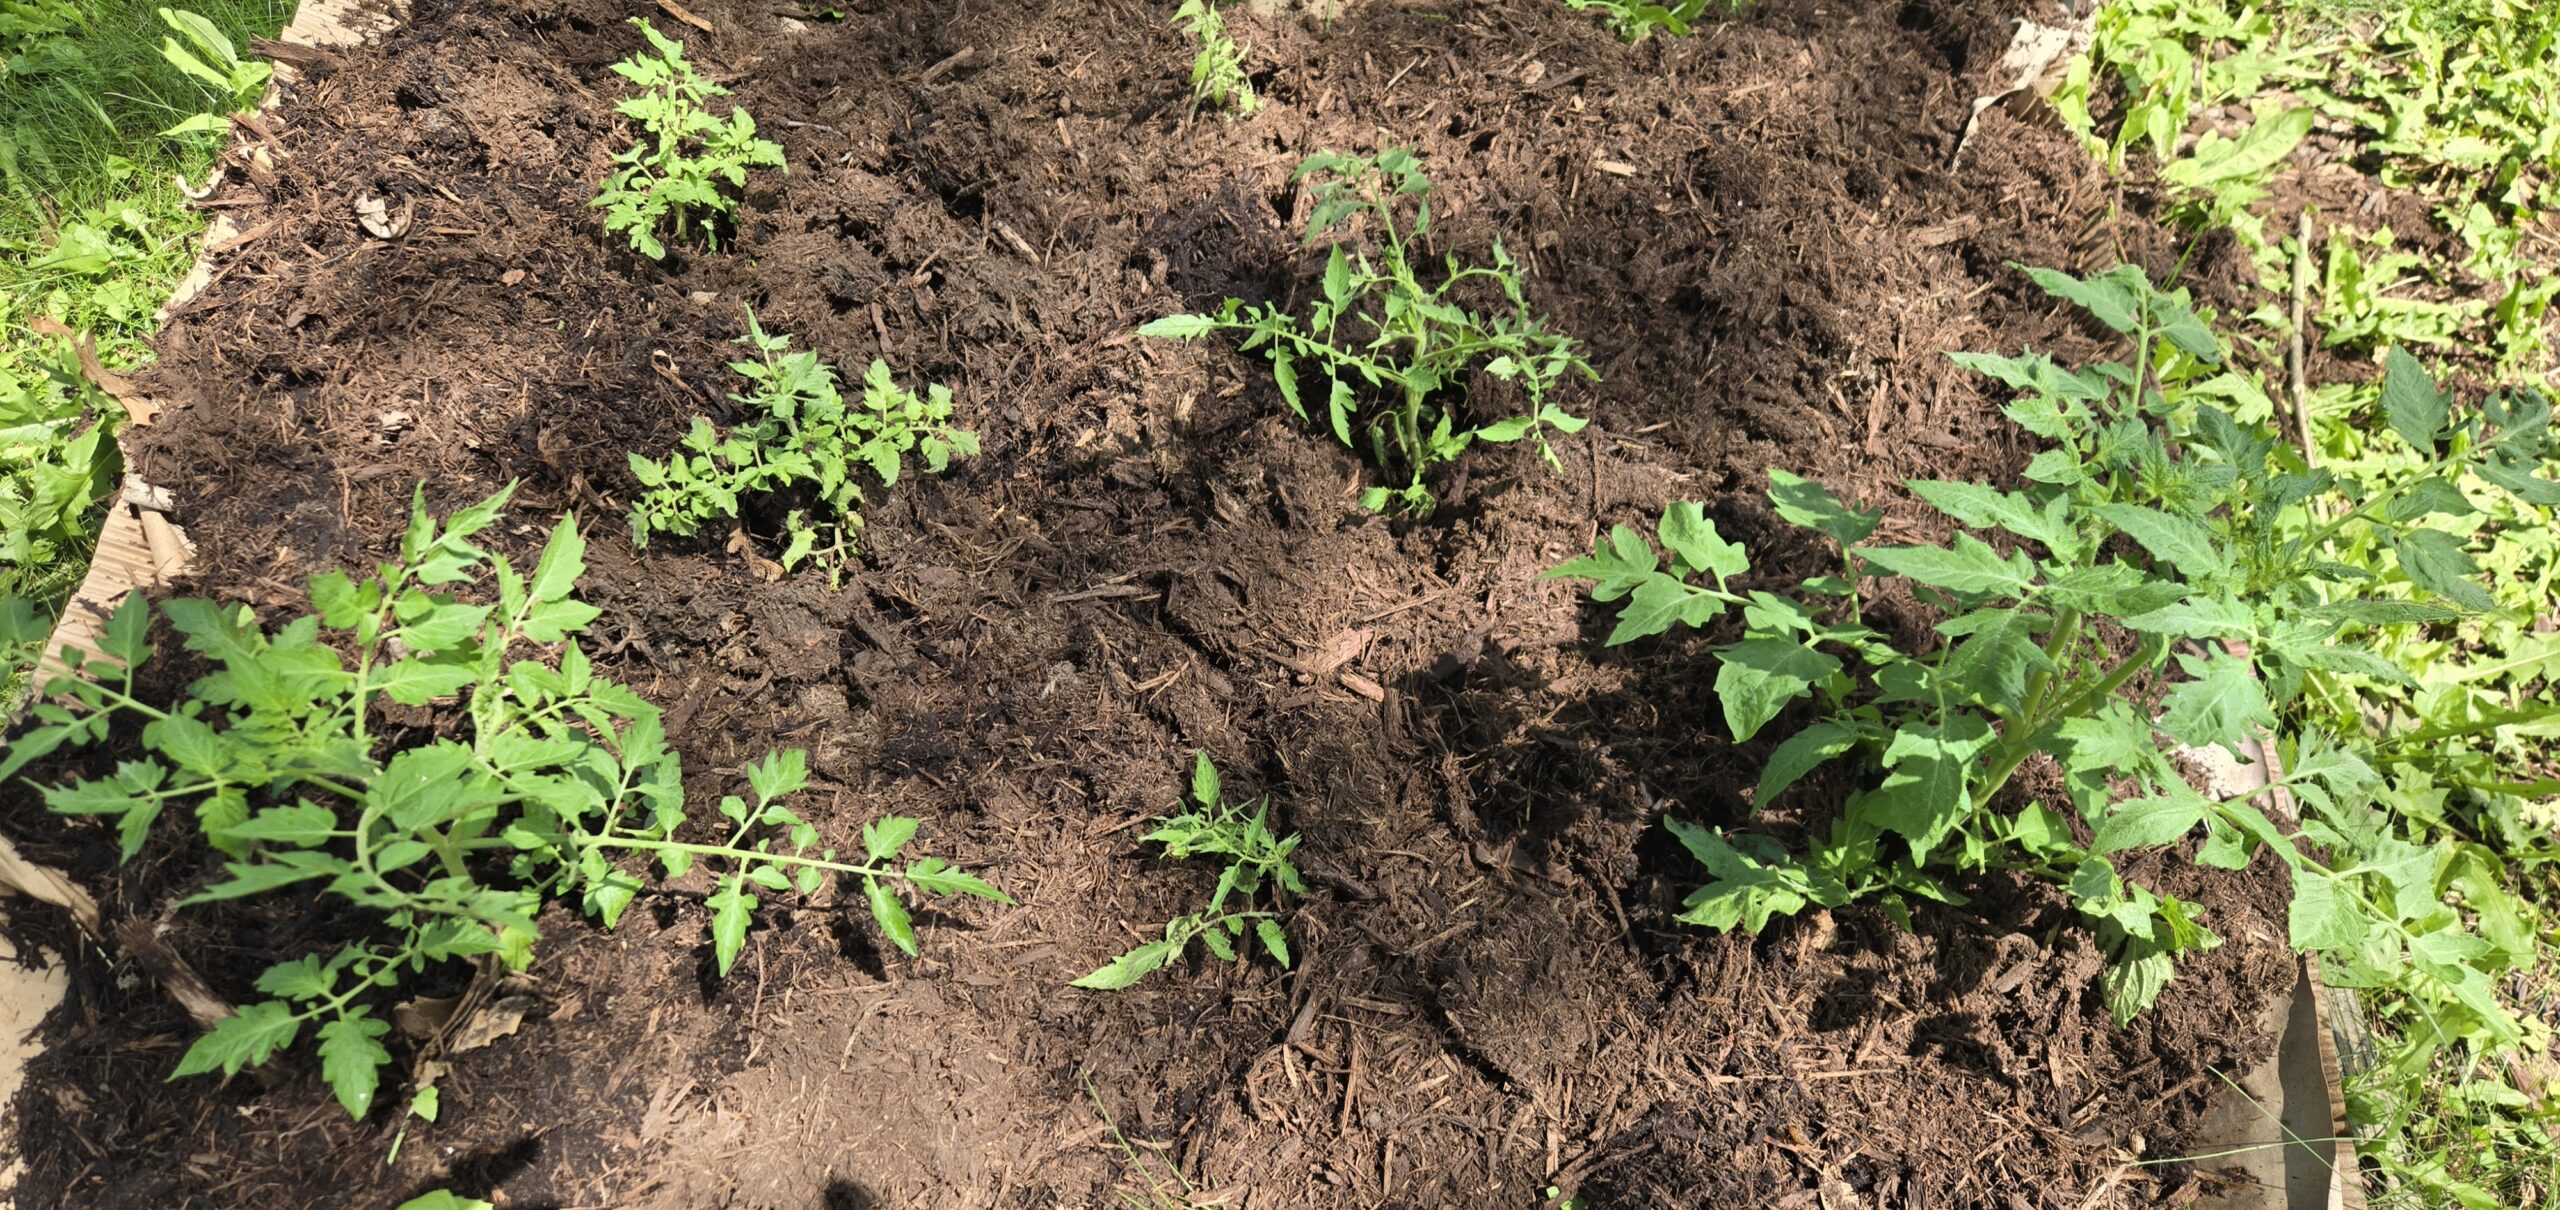
After loosening the soil, I laid down cardboard and covered it with bark mulch to suppress weeds and lock in moisture.
⚒️ Stuff I Actually Use:
-
-
- Radius Garden Fork — aerates soil without disturbing life
- Sharp garden snips — clean cuts without squishing stems
- Basic trays for sand rooting
-
🍅 Final Update: Sept 22
These were suckers. Planted in a no-dig bed. Not watered. Barely touched.
Now they’re fruiting. I honestly forgot about them. Nature didn’t.
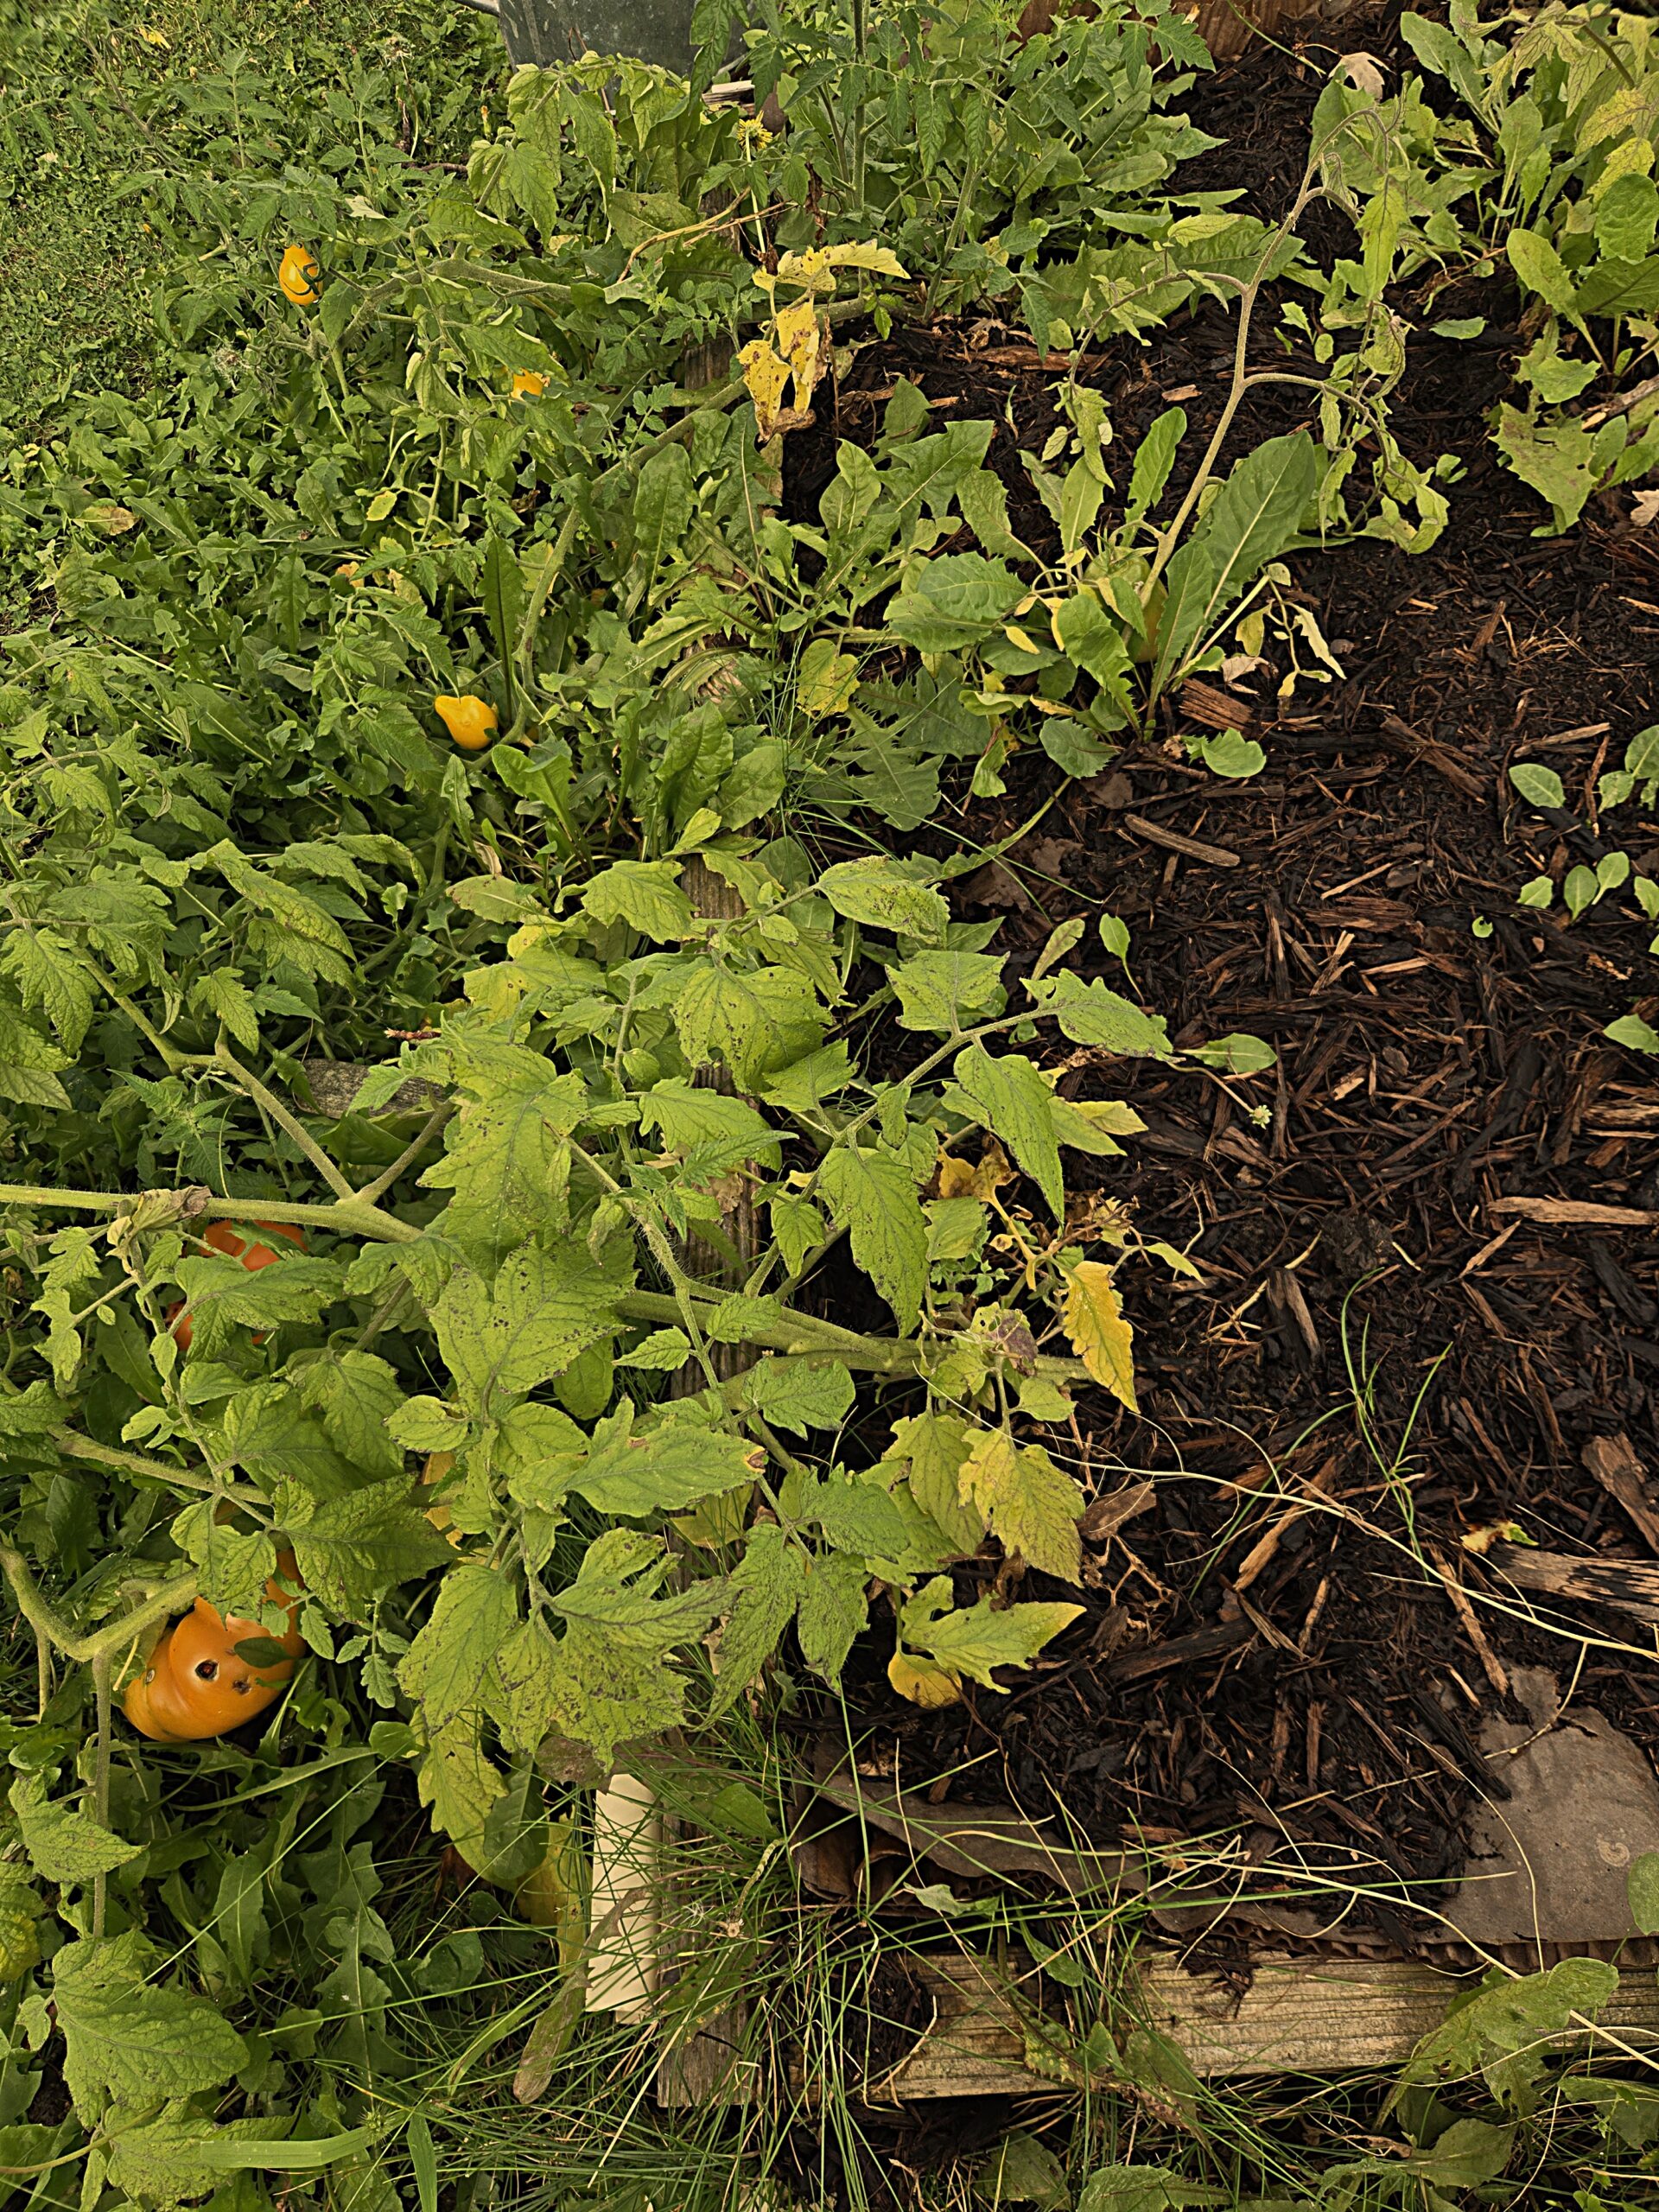
They weren’t babied. But they grew.
“They weren’t babied. But they rooted deep and did what tomatoes do — they grew.”
⚡ The Recap:
-
-
- Snip the suckers
- Root ‘em in sand
- Plant ‘em deep
- Let ‘em grow wild
-
It’s free propagation. It works. And it still feels like a little tomato miracle machine every time.
🌿 Come share your sucker stories
The Rooted are waiting. Let’s talk tomatoes, compost wins, and garden fails in the forum:
👉Enter the Sprouting Homestead Forum »
How to Grow Chamomile in a Pot (Beginner-Friendly, Tea-Ready)
How to Grow Chamomile in a Pot (Sip Calm Right from Your Porch) 🌼☕
🗒️Rooted Field Note: 26
Every time I see chamomile, I swear the plant is smiling at me 😌🌼. Tiny white petals, golden centers, and that apple-like scent that makes me stop and breathe deep. The best part? You don’t need a whole meadow. You can learn how to grow chamomile in a pot and have enough blooms for tea right on your porch, balcony, or even a sunny windowsill. One pot = endless calm. 🌱☕✨
Why Chamomile Deserves a Pot of Its Own 🪴
Chamomile is like the friend who doesn’t need much to be happy — give it sunshine, a drink now and then, and it’ll reward you with blossoms all summer long. Growing it in a container means you control the soil, dodge the weeds, and can scoot the pot around until it finds its happy place. Plus, when the blooms pop, your whole space smells like a calm summer afternoon. 🌞🌼
German vs. Roman Chamomile 🤔
Here’s the quick scoop: German chamomile (annual) shoots up tall and showers you with tons of blooms — perfect if you want tea on repeat. Roman chamomile (perennial) stays short, creeps along the pot edges, and returns each year like an old friend. I’ve grown both, but if you’re sipping tea at night like I do, German wins for pure flower power 🌸➡️☕. Roman? Cute and cozy, but a little bitter in tea.
The Pot & Soil Setup 🏺🌱
Grab a pot about 12 inches wide with drainage holes (no shortcuts — chamomile hates wet feet 🚫💦). I love terra cotta because it breathes, but a glazed ceramic pot works too. Fill it with a fluffy potting mix and stir in a handful of perlite or coarse sand for good drainage. Think light and airy, like a bed the roots can sink into without suffocating. 🌬️🌿
Planting Chamomile: Seeds or Starts 🌱✨
Chamomile seeds are tiny — like fairy dust 🧚♀️. Sprinkle them on top of damp soil, press gently (don’t bury — they need light 🌞), and mist until the surface glistens. In a week or two, little feathery sprouts will peek out like shy toddlers. If patience isn’t your thing, tuck a nursery start right into the center. Either way, give it a drink, whisper some encouragement (totally optional 😉), and let it settle in.
Light, Water & Feeding ☀️💧🍵
Chamomile loves 6–8 hours of sun. On my porch in Wisconsin, full sun makes it bloom like crazy. But when summer heat hits hard 🔥, I slide the pot where it catches morning light and afternoon shade. For watering, I do the finger test 👆 — when the top inch is dry, I water until it trickles out the bottom. Fertilizer? Rarely. Too much food makes chamomile lazy and floppy 😴. A little compost at planting is usually all it needs.
Troubleshooting the Drama 🎭
Chamomile is low-drama, but here’s the cast of characters you might meet:
- Leggy stems: Not enough sun 🌥️ — move it into the spotlight.
- Aphids: Tiny green freeloaders 🪲 — rinse them off with the hose like an eviction notice.
- Powdery mildew: Looks like powdered sugar ❄️ — trim bad leaves and give the plant more airflow.
- Flopping German stems: Use a twine corral or mini stake. Or just let it flop — tea still tastes the same. 😉
Harvesting Calm 🌼✂️➡️☕
Here’s the magic moment: when the petals are open and lying flat around the yellow cone, pinch or snip them off. I love doing this in the morning, basket in hand, while the dew dries. The more I harvest, the more chamomile offers back 🙌. Some weeks, I’m out there every other day, scooping up enough for tonight’s tea and tomorrow’s drying rack.
Drying & Storing for Tea 🍵🫙
I spread fresh blossoms on a mesh rack in a shady corner of the house. Within a week, they’re crisp, golden, and smell like summer. Into a glass jar they go — labeled, sealed, and tucked in a cupboard. On a cold winter night ❄️, a spoonful in hot water feels like opening a jar of sunshine. 🌞☕
Rooted Takeaway 🌱❤️
One pot. One packet of seed. A handful of sunlight and water. That’s all it takes to grow your own chamomile and sip calm you raised yourself. If you want to nerd out deeper, I’ll be linking this Field Note soon to my chamomile-from-seed deep dive and my herb-drying guide. For now, go grab that pot — your porch is ready to smell like peace. 🌼☕✨
Future posts: Chamomile from Seed · Drying Herbs the Easy Way · Porch-Friendly Tea Herbs
Related Rooted Field Notes: Best Organic Potting Mix Tweaks · Container Herb Companions
How to Grow Chamomile (and Why Every Zone 5 Gardener Should Start Here)
🌼 How to Grow Chamomile (and Why Every Zone 5 Gardener Should Start Here)
🗒️Rooted Field Note: 25
Why I Plant Chamomile Every Year 🌿🍵🐝
Chamomile is one of those plants that sneaks up on you. The seeds are so small they look like dust. Honestly, the first time I planted them, I thought I’d lost them. My son thought I spilled flour.
Fast forward a couple months, and there we were—standing in a patch of tiny white flowers. Bees buzzing, the smell of apples in the air. We filled a basket with what he calls “sun buttons” ☀️, and that night we made tea from our own backyard.
That’s when I decided chamomile had earned its spot here.
German vs. Roman (What I’ve Learned) 🌼🌿
I’ve tried both kinds.
– German chamomile grows tall and airy. It’s an annual but reseeds if you let it. It’s the one you want for tea.
– Roman chamomile creeps low, smells incredible, and comes back each spring in Zone 5 if you mulch it. Fewer flowers, but still worth it.
Now I grow German in the main bed for tea jars, and Roman along the edges so the bees have a runway. Works for us.
Starting From Seed in Zone 5 🌱
Here’s the truth: chamomile seeds are fussy because they’re tiny, not because they’re hard.
– I start mine indoors about 6–8 weeks before the last frost (late Feb or March).
– Sprinkle seeds on damp soil. Don’t bury them. Just press them in.
– Keep the tray moist. I mist or bottom-water. Too much water will wash them away.
– Germination takes a week or two. Sometimes longer. Don’t panic.
Once they’ve got their first true leaves, I thin them with scissors. Leaving the strongest. Before planting out, I harden them off—an hour outside, then two, then a full day.
👉 Side note: I’ve broken enough cheap seed trays to know better. The heavy-duty ones are worth it.
Moving Them Outdoors 🌞
In Zone 5, I plant them outside in May once frost danger has passed. The soil should be warming—55 to 60°F. (Yes, I actually check with a thermometer. My fingers lie.)
**Before planting outside learn how to harden off seedlings**
– Soil: Loose, drains well, a scoop of compost mixed in.
– Sun: Full sun makes them happiest. Afternoon shade is fine in the heat of July.
– Spacing: German chamomile about 6–8 inches apart. Roman 8–12 inches apart so it can spread. (Inches, not feet. I’ve seen people space them like tomatoes—nope. You’ll regret that.)
They also do well in pots, which I’ll cover in the next Rooted Field Note.
Water & Feeding 💧
Chamomile is tough once it’s settled.
– Keep soil moist while seedlings are young.
– Once established, let the top inch dry before watering again.
– Skip the fertilizer. Compost is plenty. Too much nitrogen just makes floppy plants.
Basically, don’t love it to death.
Pests & Problems 🐞🛡️
Most bugs leave chamomile alone. That smell? It’s strong. But here’s what I’ve seen:
– Aphids now and then. A blast of the hose takes care of them.
– Powdery mildew in muggy summers. Give them space, water at the base, and if you feel poetic, spray them with cooled chamomile tea. Works.
– Root rot only happens if you plant in soggy soil.
The upside? Chamomile attracts ladybugs, hoverflies, and bees. Free garden helpers.
Harvesting Sun Buttons ☀️🧺
Pick the flowers when the petals are open and starting to bend back. Pinch them off or snip them. The more you pick, the more you get.
Ten plants gave us enough tea to last through winter. My son thinks harvesting is fun. I think drinking the tea is better. Win-win.
Drying & Storing 🌞🍯
I lay the blossoms on a mesh rack in a dark, breezy spot. They dry in a few days. You can use a dehydrator on low if you’re impatient.
When they’re crisp, I store them in amber jars. Every time I open one in January, the smell takes me right back to June.
Brewing 🍵
Two teaspoons of dried chamomile. Hot water. Five minutes. That’s all it takes.
Add lemon balm and honey if you want. Or mint. Chamomile and lemon balm + mint is our bedtime blend.
Final Thought 🌻
Chamomile doesn’t need you to fuss. Plant it, pick it, dry it, drink it. It’s that simple.
If you’re new to herbs, start here. If you’ve been gardening for years, plant it anyway. Your tea jar—and your pollinators—will thank you.
Next Rooted Field Note → How to Grow Chamomile in Pots
🪴 Dig deeper into this Rooted Field Note and explore more tools from the homestead: