Uncategorized
Plant Timeline Calculator
❄️ Don’t know your last frost date?
No problem — it only takes about 10 seconds to find it.
- Open the frost date tool below
- Type your ZIP code
- Look for “Last Spring Frost”
- Enter that date into the calculator on this page
This opens in a new tab so you can quickly come back and use the calculator.
🌿 Plant Timeline Calculator
Pick what you’re growing, drop in your Last Frost Date, and I’ll hand you your seed-start window 🗓️🌱
Seedling Soil Mix Calculator
🌱 Seedling Mix Calculator (5:3:2)
Peat gets lime. Coco doesn’t.
Inside Skool we unlock presets (tomatoes vs herbs), mineral options, overwatering toggles, microbe builder & batch notes.
👉 Open Advanced Calculator
_______________________________________________

Winter Sowing Seeds: How I Learned to Let Winter Grow the Garden for Me (and Why I’ll Never Go Back)
❄️Winter Sowing Seeds: How I Learned to Let Winter Grow the Garden for Me 🌱 (and Why I’ll Never Go Back)
🗒️Rooted Field Note: 29
❄️ How Winter Turns Milk Jugs Into 200 Free Seedlings
Winter always felt like nothing season.
The beds were frozen. The air hurt my face. My son would press his nose to the window asking when we could plant again, and I’d say, “Not yet, buddy… everything’s sleeping.”
I learned one clear principle from winter sowing: Nature sets the timetable, not us. Winter sowing seeds taught me something simple but powerful: nothing in the garden is ever really idle. Roots work in the dark. Seeds listen. Timing matters more than effort.
And once I stopped fighting winter and started using it… the whole rhythm of our garden changed 🌱
🌱 What winter sowing seeds actually is (no fluff)
Think mini-greenhouses you set outside in January. Winter sowing seeds is planting seeds outdoors during winter inside clear containers that act like tiny greenhouses. Milk jugs. Clear gallon water bottles. Salad containers. Stuff most people toss.
The containers trap moisture and sunlight. The cold does the rest.
Seeds don’t sprout early. They sprout on time.
That’s the part most people miss.
This isn’t about hacking nature. It’s about finally trusting it.
🧠 Why winter sowing works so well (especially if you’re busy)
I used to think good gardening meant constant attention. Lights on timers. Daily misting. Checking soil like a nervous parent.Winter sowing flipped that idea on its head.
These seeds don’t get coddled. They experience real cold, real moisture, real temperature swings. Because of that, the seedlings come out tougher. Shorter stems. Thicker leaves. No drama when they get transplanted 🌬️
And honestly? That fits the homestead life better. Less hovering. More living.
🥶 Cold stratification (what it actually means)
Some seeds won’t grow unless they go through winter first.
That process is called cold stratification, and it’s nature’s way of saying, “Not yet.”
In the wild, these seeds fall to the ground in fall, sit through snow and freezing rain, and only wake up when spring truly arrives. That cold, damp time breaks dormancy and softens seed coats.
Winter sowing seeds handles this automatically. No fridge tricks. No plastic bag science experiments forgotten behind the milk.
This is especially important for perennials, native flowers, and many medicinal plants 🌼
(We’ll link future Rooted Field Notes here as we go deeper.)
🍼 Containers that actually work (and why)
I’ve tried fancy setups. I’ve tried cheap ones. The sweet spot is simple.
Clear containers let light in. A few inches of soil hold moisture. Drainage holes prevent rot.
Milk jugs are my go-to. They’re sturdy, tall enough for growth, and easy to cut. Clear gallon water jugs work just as well. Salad clamshells are great for flowers if you don’t mind transplanting earlier.
If you can see light through it and it holds soil — it’ll work.
What I’m Using for My Seed Sowing Containers
👇 Affiliate Links:
seed-starting mix:
garden markers and plant labels
duct tape (the unsung hero of winter gardening)
How I winter sow seeds (start to finish)
I cut the container almost in half, leaving a hinge so it still opens like a mouth. Drainage holes go in the bottom. The cap comes off — airflow matters Grab a jug and cut along with me. Let’s turn this into a real-time moment of transformation as you create your own mini-greenhouse.
Then soil goes in. Damp, not muddy. Seeds get planted according to depth, labels go inside and outside (because winter erases ink), and the whole thing gets taped shut like a tiny greenhouse gift 🎁
Then comes the hardest part…
I put them outside.
And I leave them alone.
Snow piles up. Ice forms. Sun hits. Nothing looks like it’s happening — and that’s exactly what should be happening.
🌸 Flowers, 🥬 veggies, 🍅 tomatoes — what works with winter sowing
Winter sowing flowers is where this method really shines. Coneflowers, milkweed, poppies, black-eyed Susan, lupine — these want winter. They come back stronger for it.
Vegetables like kale, spinach, lettuce, cabbage, broccoli, and onions handle winter sowing beautifully too. They sprout early and don’t flinch at cold nights.
Tomatoes? Yes… but with restraint 🍅
I winter sow tomatoes late winter, not December. They don’t need stratification — just cooler starts. Timing matters here, and we’ll do a full Rooted Field Note on this soon.
🧊 What about winter sowing seeds in Ziploc bags?
You can do it. I’ve done it.
It works for cold stratification, but it doesn’t grow strong plants. Mold happens. Roots tangle. Transplant shock is real.
Ziplocs help seeds wake up. Containers help plants grow up 🌱
🌍 Winter sowing directly in the ground (the old way)
This is how nature’s always done it — scattering seed in fall and letting winter decide.
It works… but you lose control. Birds eat seeds. Labels disappear. Rain moves things.
Containers give you just enough structure without stealing winter’s job.
About that “Winter Sowing Seed List PDF”
This is coming soon. A clean, printable Winter Sowing Seed List PDF will include flowers, vegetables, and perennials, along with notes for cold stratification. Imagine finding out that lavender not only survives the harshest cold but thrives amidst blizzards. Perfect excuse to say, “Oh yeah, I am gardening already.”
When spring settles in and seedlings have real leaves, I start opening containers during the day. A few days later, they go into the ground. It’s like watching your child confidently stride into their first day of school, without hesitation or fear. No hardening off stress. No sulking plants. They’ve already lived outside, ready and resilient.
❤️ Why this matters (more than gardening)
Watching seeds wake up after months of cold taught my son something I didn’t plan to teach.
Growth doesn’t rush.
Rest isn’t failure.
Roots form before leaves show.
Winter sowing seeds didn’t just change how we garden — it changed how we wait.
And that’s something I didn’t know we needed 🌱
🪴 Dig deeper into this Rooted Field Note
More tools, printable guides, seed lists, and quiet winter wisdom live just beyond this page — and inside the community we’re growing together.
The Day Fungus Gnats Started Seasoning My Dinner (And How I Kicked Them Out)
🪰 The Day Fungus Gnats Started Seasoning My Dinner (And How I Kicked Them Out)
🗒️Rooted Field Note: 29
They don’t just hang out near the plants.
They aim for your face. 🪰
Straight up the nose.
Right past your lips.
Then one kamikazes into your hot food like it’s seasoning. 🍲
If fungus gnats have reached the point where you’re swatting the air mid-bite and questioning your life choices, this Rooted Field Note is for you.
Why Fungus Gnats Feel So Personal 😤
At first, you try to be chill about it.
They’re near the pots.
Okay. Fine.
Plants come with dirt. Dirt comes with life. 🌱
But then they stop respecting boundaries.
They hover when you water.
They float by your face.
They show up everywhere except where they belong.
And that’s when it stops being “a plant thing” and starts being a house thing.
If you’re here trying to figure out how to get rid of fungus gnats indoors, chances are you’re already past the tolerance stage and deep into the “why is this happening in my own home” phase.
The Part Most People Miss (It’s the Soil) 🪴
Fungus gnats aren’t hanging around because your plants are weak.
They’re there because the soil is comfortable.
Warm.
Moist.
Full of organic material.
That top layer of potting mix?
That’s not decoration — that’s a nursery.
So when you swat adults and they keep coming back, it’s not because you’re doing it wrong. It’s because the real issue is happening below the surface, where you can’t see it.
Once you understand that, the whole problem starts to feel… manageable.
The Life Cycle (Why Patience Actually Works) ⏳
This is the calm part — even if the gnats aren’t calm yet.
Fungus gnats move fast, but not that fast.
Eggs hatch in just a few days.
Larvae live quietly in the soil for about two weeks.
Adults emerge, fly around for a short time, and lay more eggs.
The full cycle takes about three to four weeks indoors.
That means if you interrupt even one stage — especially egg-laying — the population starts shrinking instead of growing.
No panic required. Just timing.
When You Bring Plants Inside (Picture This) 🌿
If you’ve ever brought plants in from outside, you know the moment.
You set them down.
You admire them.
You water.
Then something lifts off the soil.
Not a swarm.
Just enough to make you pause.
Instead of reacting right away, imagine choosing to slow everything down.
No rushing to repot.
No moving them next to other plants.
Just watching.
That pause matters.
The Sand Trick (Buying Yourself Peace of Mind) 🏖️
Here’s where things start to shift.
Adding a thick layer of sand — about two inches — on top of the soil changes the game.
Picture doing this yourself:
- The soil underneath stays untouched
- The surface dries faster
- Adult gnats can’t easily reach the soil to lay eggs
Now comes the hardest step… waiting. 😑
You water carefully.
You observe.
You let the life cycle finish without giving it a place to restart.
Once there’s no movement when you water — no sudden liftoff — you know you’re winning.
Preparing Soil Before You Plant Again 🌱
This is where fungus gnats lose their invitation.
🔥 Gentle Heat (Oven Method)
Before planting anything new, warming soil through gives you a clean slate.
Think of it as pressing reset:
- Lightly moistened soil
- Low, steady heat: 350°F for 10 minutes
- Fully cooled before use
It doesn’t make soil “dead.”
It just removes the surprise guests.
♨️ Boiling Water Pre-Moistening
Another option is pouring boiling water through dry soil before planting.
It’s simple.
It’s effective.
And it turns unknown soil into soil you trust.
Both methods let you decide what comes into your home.
What Helps While You Wait 🪰
During that waiting window, a few small habits help without adding stress:
- 🟡 Sticky traps — to monitor activity
- 💧 Letting the soil surface dry slightly between watering
- 🪴 Avoiding unnecessary repotting
This isn’t a fight — it’s observation.
Why This Approach Actually Sticks 🌾
Once fungus gnats disappear, it’s tempting to forget they ever existed.
But the reason this works long-term is because it’s not aggressive — it’s intentional.
You’re not chasing bugs.
You’re changing conditions.
And once you’ve experienced the calm of soil that isn’t hosting a tiny air force, you’ll never prep indoor plants the same way again.
When It’s Safe to Relax Again 😌
If you go three to four weeks without gnats lifting off the soil when you water, you can breathe again.
No hovering.
No dive-bombs.
No surprise seasoning. 🍲
Just plants… being plants.
🌱 Coming Soon
(Future Rooted Field Note)
Starting Indoor Plants Without Inviting Fungus Gnats
This one will link perfectly right here.
🪴 Dig deeper into this Rooted Field Note and explore more tools from the homestead.
If fungus gnats drove you here, you’re not doing anything wrong.
You just reached the point where patience needed a plan.
And now you’ve got one. 🌱
How to Start a Raised Garden Bed in Cold Climates (The Way We Really Did It)
🌱 How to Start a Raised Garden Bed in Cold Climates (The Way We Really Did It)
🗒️Rooted Field Note: 28
Neighbor… starting a raised garden bed in a cold climate hits differently. It isn’t like building one in some warm Zone 9 dreamscape. Out here, fall feels like a countdown, and winter shows up early to remind you who’s in charge. ❄️
But maybe that’s why the memory of starting ours feels so sharp — because we weren’t waiting for perfect conditions. It was just me, my son, and the quiet knowing that if we wanted to grow something real, we had to begin right then… in the cold, in the wind, in the middle of falling leaves. 🌬️🍂
I still remember walking the yard with him, watching where the shadows fell, trying to find that one sunny patch that could give our plants a fighting chance. When we finally found it — flat enough, bright enough, close enough to water — I didn’t dig. I dropped cardboard. Big, beaten-up, tape-free pieces of cardboard that looked like nothing… until we laid them down like a foundation for a new life. 📦➡️🌱
When we dumped compost over the top, the steam rising from it carried this earthy, hopeful smell. There’s something about cold air mixed with warm compost that hits your chest in a way you don’t forget. My son stood there, hands stuffed in his hoodie pocket, watching like I was performing some kind of magic trick, while the first bed slowly took shape in the chill of the day.
We spread woodchips around the outside of the bed, just enough to make real paths — not muddy, not slippery, just solid footing that would keep us out of the muck when snow melted or rain soaked the yard. In that moment, the space shifted from “random section of grass” to “this is our garden now.” The bed in the middle, paths all around, everything starting to look like it actually belonged there.
Cardboard, Compost, Leaves & Cold Air
The part that still grabs me happened when we fired up the mower. The trees had dropped almost everything by then, and we ran over those leaves until they turned into tiny pieces of mulch. The sound of the mower chewing through them, the smell of that shredded leaf dust swirling in the cold air… it felt like fall itself was helping us. 🍁
We took those mower-mulched leaves and spread them across the top of the beds only — never on the paths — covering the soil the way you tuck a kid into bed at night. That leaf blanket was our secret weapon. It protects the beds all winter, feeds them slowly as it breaks down, and helps them wake up early in spring when the rest of the yard still feels half asleep.
That’s when the urge to plant something hit me, right there in the cold. So we grabbed garlic bulbs and pressed each clove deep into the soil — root side down, tip reaching up like a tiny prayer. 🧄 Garlic is the kind of crop that loves cold climates, the kind that settles in quietly while the rest of the garden goes dormant, then explodes with life when the days finally warm.
We also planted saffron bulbs — tiny crocus corms I held in my hands like treasure. Soft, delicate, and worth more than gold per ounce, they felt almost too fragile for our brutal winters. My son helped bury the bulbs under a thin layer of compost, and the two of us covered them gently with leaf mulch. The thought of purple crocus flowers pushing through next fall made the cold feel almost kind. 🌸
We even planted a handful of fall seeds — the kind meant to sleep under snow and crack open when spring finally decides to give us a break. Planting into cold soil like that feels like writing a letter to your future self. A quiet message that says, “We believed. Even here. Even now.”
Raised Beds That Fight for You in a Short Season
Out here, raised beds aren’t a cute gardening trend; they’re a survival tactic. The soil inside them warms up earlier than the ground around them. It drains better when thaw and rain compete to turn everything into a swamp. It lets you plant sooner, harvest sooner, and actually get a full season out of a place that loves to steal weeks from you with late frosts and early freezes.
When the snow finally buries everything, I know what’s happening underneath. The leaves are breaking down into new soil. Garlic is rooting deeper. Saffron is sleeping. Seeds are waiting for their moment. And that morning in spring — when you peel back the leaf mulch and find soft, dark, workable soil underneath — that moment is enough to keep you going through the hardest winters. 🌱❄️
The Tools That Don’t Quit in Cold Soil
I learned pretty quickly that not every tool is built for cold-climate work. I’ve had a cheap trowel snap clean in half in half-frozen soil, and nothing humbles you faster than standing there with a broken handle in your hand while the ground laughs at you. These days I grab the tools that have already proved themselves out there.
A solid garden fork is the first one I reach for — the kind that sinks into compacted soil and actually lifts it instead of bending. A sturdy hand trowel that feels like an extension of my arm lives in the bed with me while I tuck bulbs in and dig small holes for transplants. My pruners need to be sharp enough to make clean cuts through woody stems, even when my fingers are cold and clumsy. And the wheelbarrow has quietly become one of the heroes of this story, hauling compost, woodchips, and even the long logs we dragged home when we decided to build our second bed from free park firewood.
Those logs turned into our log-framed bed — rough, uneven, and absolutely perfect. We rolled them into place, set them into a rectangle, and the whole thing felt more ancient and more “homestead” than any store-bought kit ever could. Inside that log frame, we followed the same pattern: cardboard down first, then compost and soil on top, and finally that familiar blanket of shredded leaves. The paths around it stayed woodchips, crunching under our boots in every season.
Why This Matters More Than Just Vegetables
When I step back and look at those beds now, I don’t just see spots to grow food. I see the decision not to wait for perfect. I see cold fingers and warm compost. I see my son watching garlic cloves disappear and asking when they’ll come back. I see faith, layered in cardboard and compost and leaves, sitting quietly under the snow until its time comes.
And that’s why this isn’t just “how to start a raised bed.” It’s how to start rooting yourself into a place that doesn’t always make it easy. It’s how to say, “We’re staying. We’re building. We’re growing anyway,” even when the frost on the window says otherwise.
Growing Together: The Skool Community
👉 Join Here: https://sproutinghomestead.com/join/sproutingrootedrecipes/
I wish I’d had more people to talk to when I started this — people who understood what it feels like to plant garlic with numb fingers, to mulch with shredded leaves, to build raised beds out of free logs, to tuck saffron bulbs into cold compost and hope. That’s a big part of why the Sprouting Homestead Skool community exists now.
It’s not about showing off perfect gardens. It’s about gathering the ones who get it: gardeners, beginners, tired parents, people who want to grow real food in places where winter hangs on too long. It’s a spot where we can swap stories, compare what works in short seasons, talk about the tools that don’t give up, and remind each other that we’re not doing this alone.
You’re not behind. You’re not crazy for starting a raised bed when the world feels like it’s shutting down for the year. You’re just early in the story. And this little rectangle of soil you’re planning? It’s not just a garden bed. It’s a promise — to yourself, to your family, and maybe to a future season you can’t see yet.
This is how we started our raised garden beds in the cold. This is how you can start yours. And when you do, you’ll have more than compost and cardboard and leaves on your side. You’ll have a whole community of Rooted folks walking this out with you. ❤️🌱
👉 Join Here: https://sproutinghomestead.com/join/sproutingrootedrecipes/
🪴 Coming Soon from Sprouting Homestead
• Cold-Climate Garlic Growing Field Note | • Saffron on the Homestead: Tiny Flowers, Big Flavor | • Raised Bed Soil Mix Calculator | • Preparing Your Bed For Winter
🌾 Join Us in the Skool Garden Community
If you’re standing where I stood — cardboard in one hand, garlic in the other, wondering if any of this will actually work in your climate — you’re exactly who we built the Sprouting Homestead Skool community for. When you’re ready, come pull up a virtual chair, share your first bed, and grow alongside the rest of us trying to root ourselves into something real.
How to Prepare Your Garden for Winter (Without Losing Your Soil or Sanity)
⛄How to Prepare Your Garden for Winter (Without Losing Your Soil or Sanity)
🗒️Rooted Field Note: 29
If you think gardening ends with the first frost, I’ve got good (and slightly dirty) news: it doesn’t. That soil you just spent a whole season nurturing? It’s about to face its biggest test — winter. ❄️ And if you don’t prep it now, come spring you’ll be dealing with a compacted mess, depleted nutrients, and possibly… snow-matted weeds. 😩
This Rooted Field Note is for every new grower out there facing their first frozen season. If your raised beds are about to be buried in snow or your garden plot gets frosty overnight, you’re in the right place. 🌨️
As fall sets in and the crisp air starts nipping at your kale leaves, it’s time to gently put your garden to bed. And like putting a toddler to bed, there’s a bit of cleaning, some snuggling (or in this case, mulching), and the promise that things will sprout anew come morning — or spring. 🌱🛌
When the growing season ends, I leave the roots of annuals in the soil instead of pulling them out. This allows beneficial microbes and fungi to continue thriving around the old root systems, which break down slowly and add structure and carbon back into the soil. 🌿 It also minimizes soil disruption, which is great for maintaining mycorrhizal networks that feed future crops.
If plants were disease-free, I snip the top growth at soil level and compost it. If they showed signs of disease, the best move is to burn them safely. 🔥 Avoid sending infected material to the compost pile where it might survive and return with a vengeance next year. This simple act protects next season’s garden and helps eliminate persistent pathogens without relying on chemicals.
Once everything is trimmed and tucked, I grab bags of leaves I’ve mowed over. These shredded leaves break down beautifully over winter and spring, and unlike whole leaves, they won’t mat up or block water. 🍁 A thick layer of mower mulch goes over the entire bed like a winter quilt. The worms come up for the party, and by the time snow melts, I’ve got black gold beneath that leaf layer.
If you’ve still got a few warm weeks left before the ground freezes, consider sowing a cover crop. 🌾 It might sound intimidating, but it’s really just planting something to keep your soil from being naked all winter. Winter rye is a cold-hardy favorite that helps prevent erosion and adds organic matter when you chop it down in spring. Hairy vetch and crimson clover are also excellent — they fix nitrogen into your soil while covering it. These crops don’t need pampering. Just scatter the seeds, rake them in a bit, and water if it hasn’t rained. Then let nature take over. 🌧️
No time for cover crops? Mulch is your best friend. Think of it as your soil’s winter coat. 🧥 A thick layer of chopped leaves, straw, or pine needles keeps the soil from freezing and thawing repeatedly — which can damage plant roots and soil structure. The mulch will also suppress weeds and helps retain moisture. Mulch generously, but don’t smother the crowns of any perennials. You’re aiming for a breathable blanket, not a suffocating pile. 😮💨
Speaking of perennials — if you’ve got herbs like oregano, thyme, or chives still holding on, give them a good haircut and a cozy mulch layer. ✂️🌿 They’ll likely go dormant and bounce back come spring. If you’re leaving carrots, parsnips, or even kale in the ground, pile on the mulch. In fact, overwintered carrots taste sweeter after a frost. 🥕 Garlic should go in the ground now too. Plant individual cloves, mulch heavily once the soil cools, and then forget about them until those green shoots pop up early next season. 🌱🧄
Before you hang up your garden gloves for the year, take time to clean your tools. 🧼🧤 Remove any caked-on soil, sharpen the blades if needed, and give the metal parts a light coat of oil to prevent rust. Drain and store your hoses, tuck away tomato cages, and jot down a quick sketch of what you planted where. 📝
Winter can feel like an end, but in the garden world, it’s really just another season in the cycle. By giving your soil the attention it needs now — feeding it, covering it, protecting it — you’re planting the first seeds of next year’s harvest. 🌷 Spring starts here, beneath a layer of straw and frozen leaves. 🛌🍃
💌 Rooted Invitation:
This is the kind of seasonal rhythm we hold together inside the our community. You’re not meant to figure this stuff out alone. When winter hits and the garden goes quiet, that’s when we gather around the virtual hearth — trading wins, fails, compost secrets, and planning next year’s dreams together.
If you’ve ever wanted to be part of a group that celebrates growing slow, experimenting ethically, and laughing through the mistakes — this is your warm welcome.
👉 Come hang with us in the Skool community here 🌱
🪴 Coming Soon from Sprouting Homestead
How to Prune a Tomato (Step-by-Step with Real-Life Photo Guide)
🪴 How to Prune a Tomato (Step-by-Step with Real-Life Photo Guide)
🗒️Rooted Field Note: 27
🧑🌾 The Honest Truth About Tomato Pruning
I didn’t always prune my tomatoes. For a long time, I just let them sprawl. But once I saw what sucker propagation and single-stem pruning could do? Everything changed.
Now? I get cleaner plants, fewer diseases, and an entire second round of tomato plants from what most folks toss in the compost.
So if you’re wondering how to prune a tomato or looking for a real step-by-step photo guide on how to prune tomato plants, you’re about to see exactly what I do—dirt, roots, and all.
I didn’t create this guide because I planned everything perfectly. Truth is, I started pruning late — June 16 to be exact — way past the “ideal” time most gardeners talk about. But I wanted to show what’s still possible, even if you’re behind or working with what you’ve got. These photos and this process weren’t staged — they’re real-time, real-garden moments from my homestead. It’s proof that with a sharp snip and a little sand, you can turn tomato chaos into calm… and even multiply your harvest along the way.
✂️ Why I Prune My Tomato Plants
- Less leaf mess = more airflow
- Energy goes into fruit, not jungle vines
- Cutting off low leaves helps prevent blight
- Suckers? I root ‘em. Free plants.
🔍 Step-by-Step: How I Prune Tomatoes (with Photos)
✅ Step 1: Find the Main Stem
This is your plant’s backbone. You’re training it to go up, not sideways. That’s the one we stake and protect.
✅ KEEP: This is your main stem
-
The stem marked with the green check is your main leader — the vine you’ll be training upward.
-
This is the one you’ll support with a stake, cage, or string.
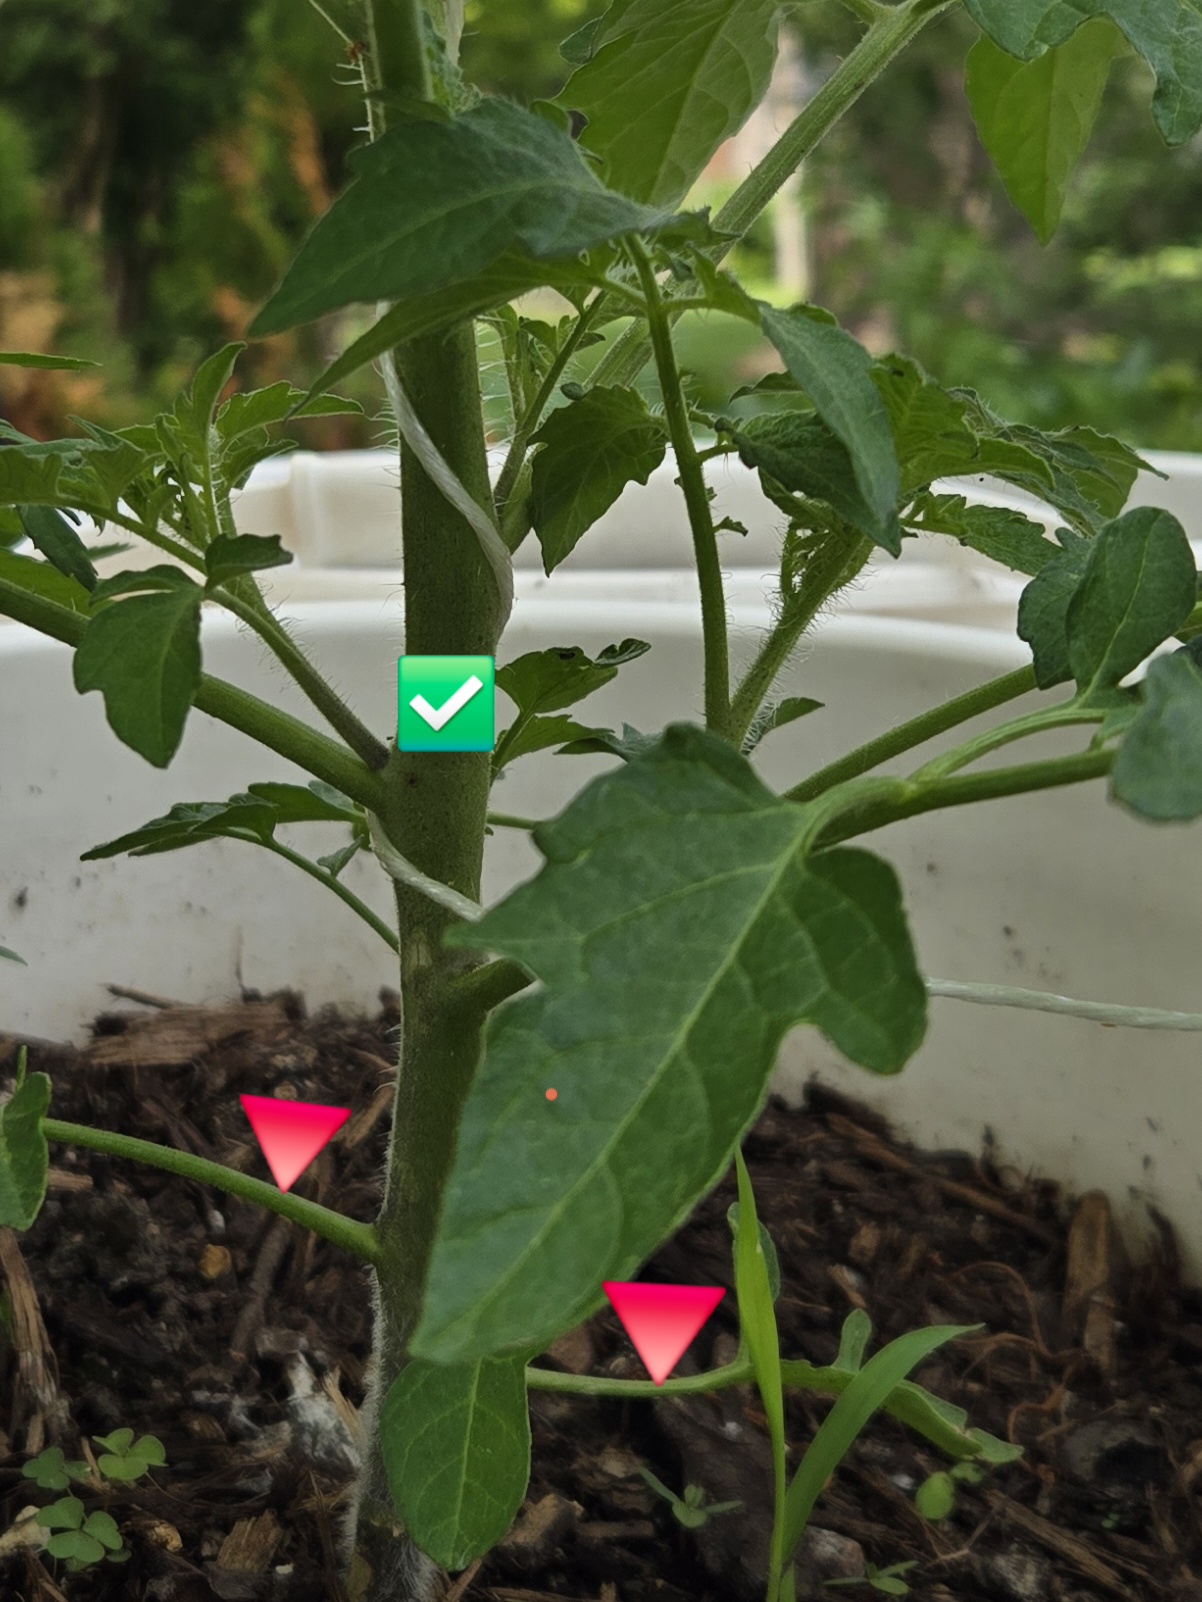
This is the central leader — the one we support and train. All pruning decisions start here.
🔻 REMOVE: Lower Leaves
-
The red triangle markers point to lower leaves that are close to or touching the soil.
-
These should be pruned off to:
-
Prevent soil-borne diseases (like early blight or fungal infections)
-
Improve airflow around the base
-
Focus the plant’s energy upward toward fruiting
-
✂️ Use clean pruners or gently pinch them off. You can prune them now if the plant is well-established and healthy.
✨ Additional Tip:
-
After removing those lower leaves, consider adding a layer of straw mulch around the base to prevent soil from splashing up during watering.
❌ Step 2: Remove Suckers
Suckers pop out of the V between the main stem and a branch. Tiny ones? Pinch. Big ones? Snip and root.
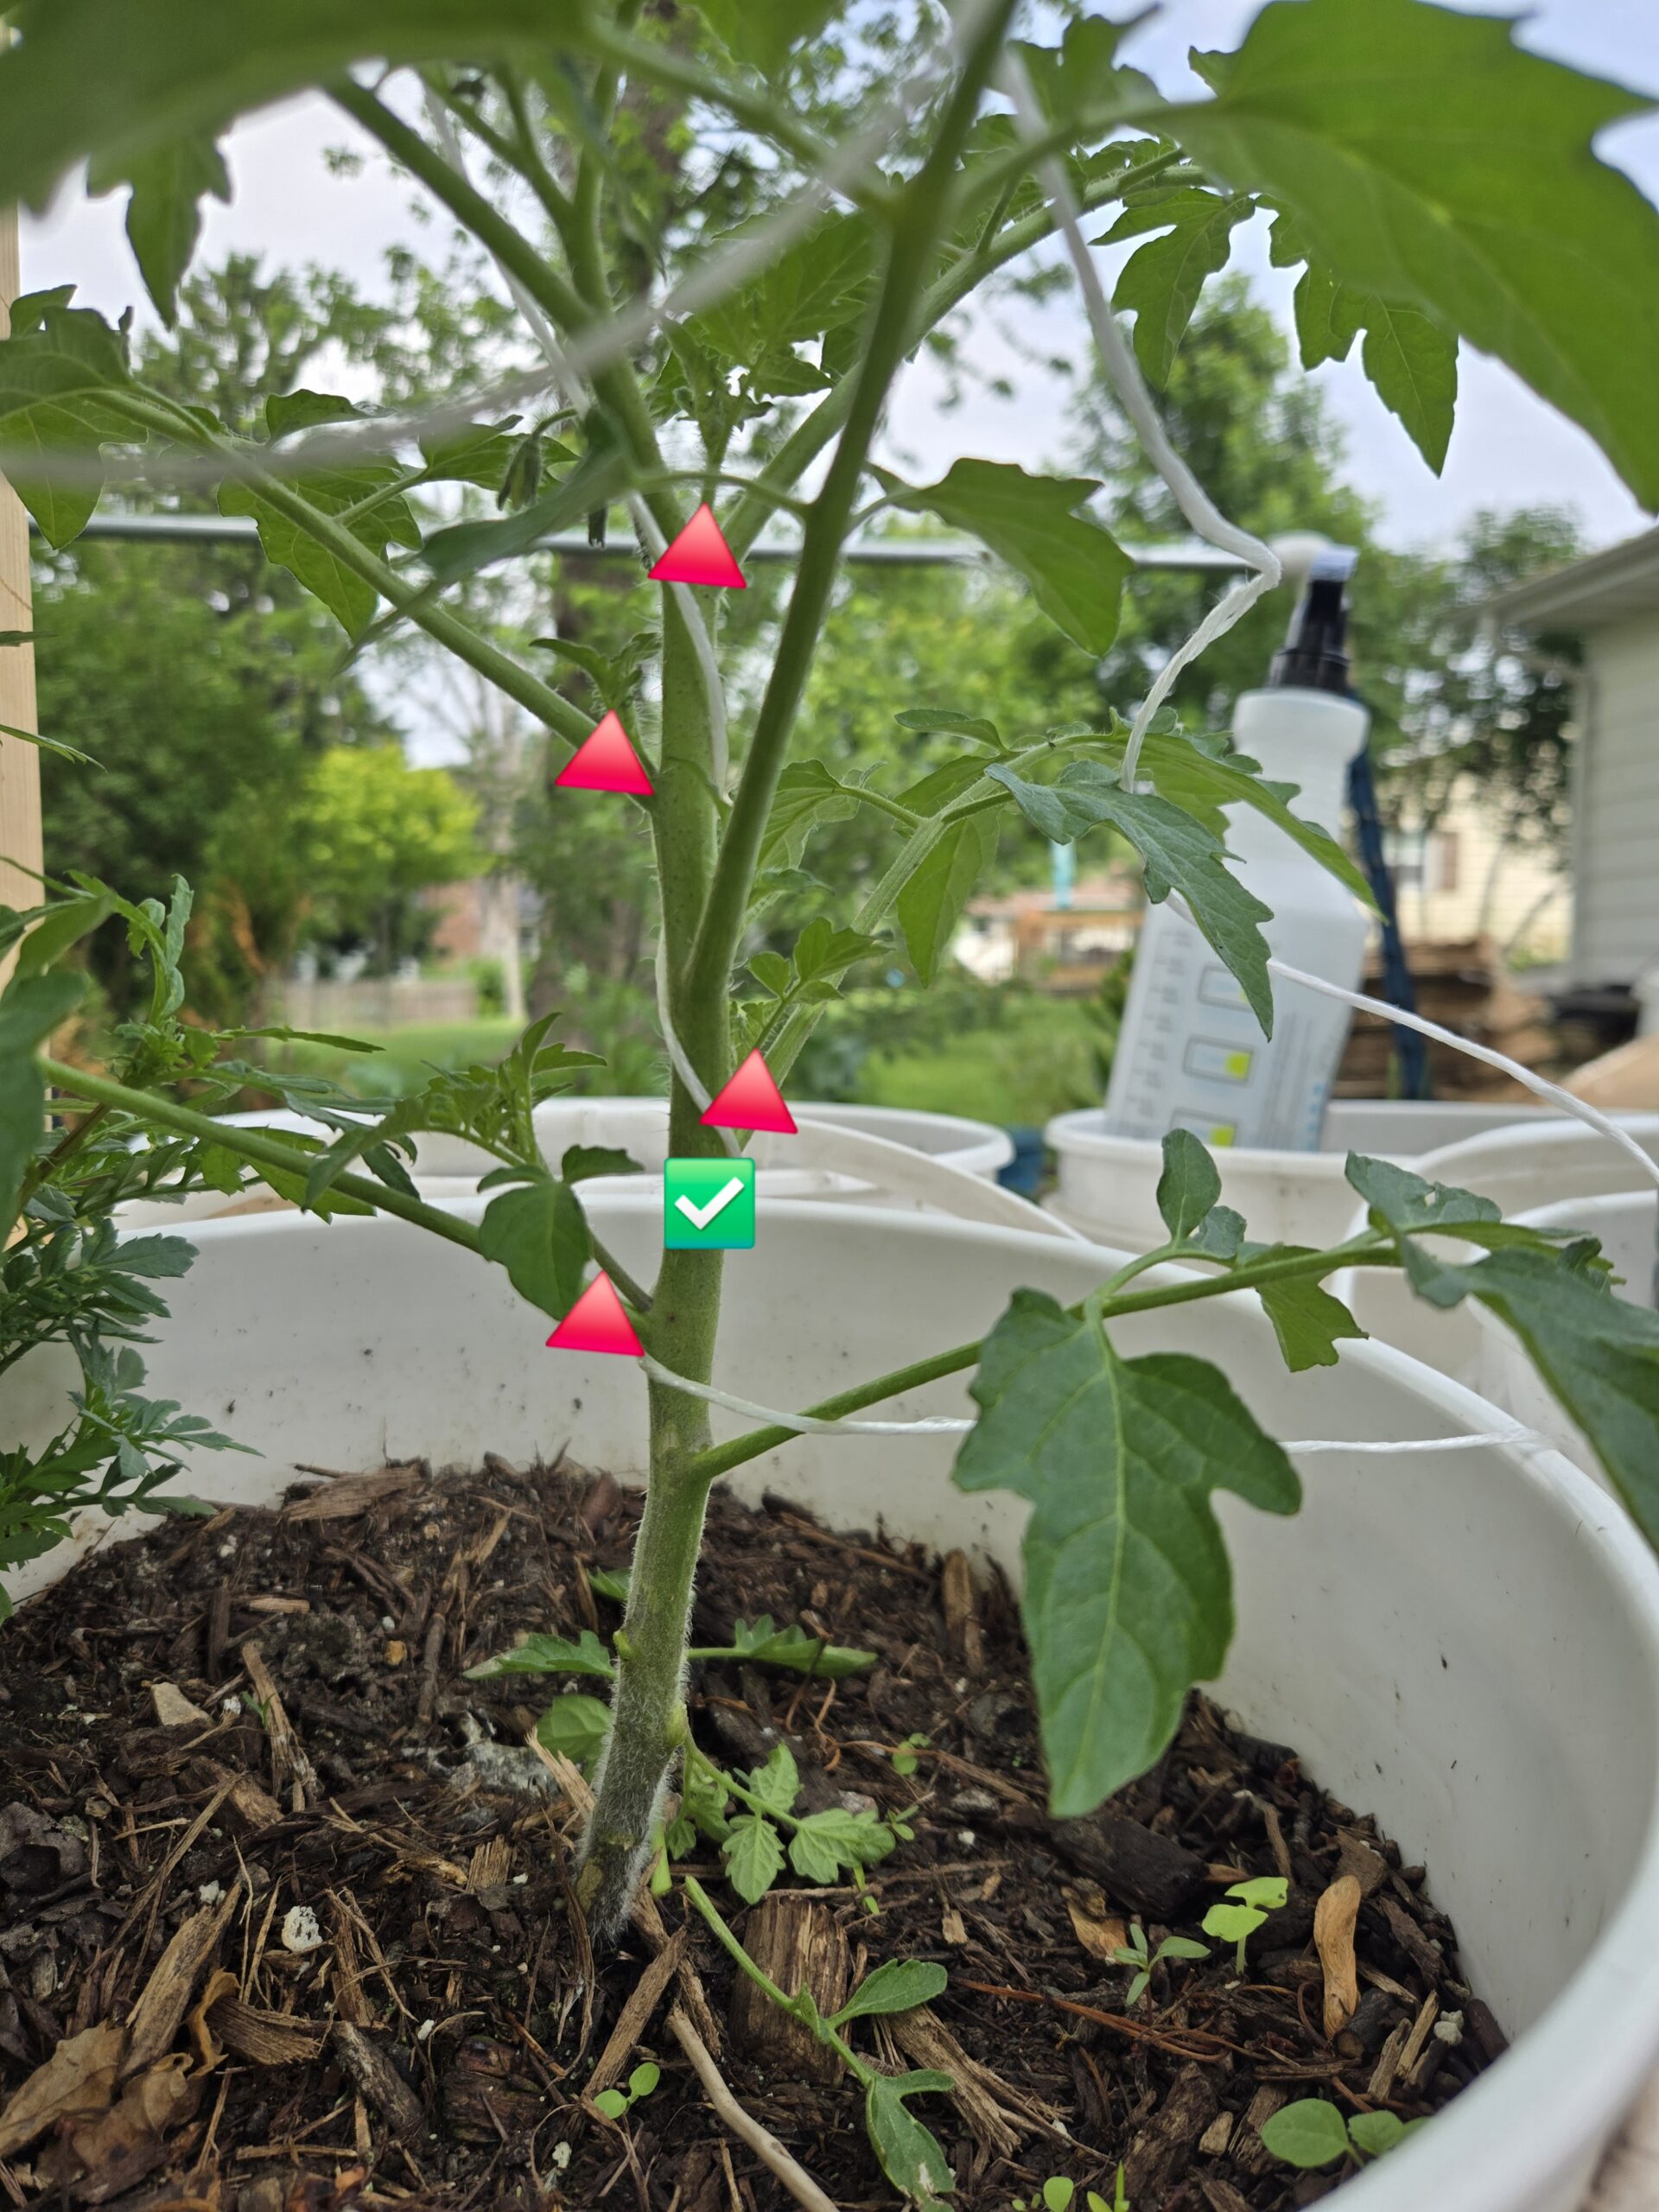
Suckers grow in the “V” between a leaf and the main stem — and they’re the key to keeping your tomato plant under control (or multiplying it!).
✅ KEEP: Central Main Stem
🔻 REMOVE: Bottom Leaves & Suckers
Each red triangle 🔻 points to something that should be removed:
-
Suckers (mid-point V’s):
-
A couple red triangles point to small shoots growing in the “armpits” (leaf crotches) between the main stem and a leaf stem.
-
These will grow into full branches and compete for nutrients unless you’re doing a multi-stem method.
-
For single-stem pruning, these should be pinched or snipped off.
-
✨ Optional Tip:
-
Now that the lower section is cleared, add a thick mulch layer (like straw or wood chips) to further protect from disease and maintain soil moisture.
-
Tie the main stem gently to the string or stake to guide its upward growth.
🌱 From Trash to Tomato: How I Root Suckers
🛠 Step 3: Quick Dip in Water
Freshly Snipped Sucker
-
This is a healthy sucker taken from the plant — perfect for propagation.
-
You can turn it into a whole new plant.
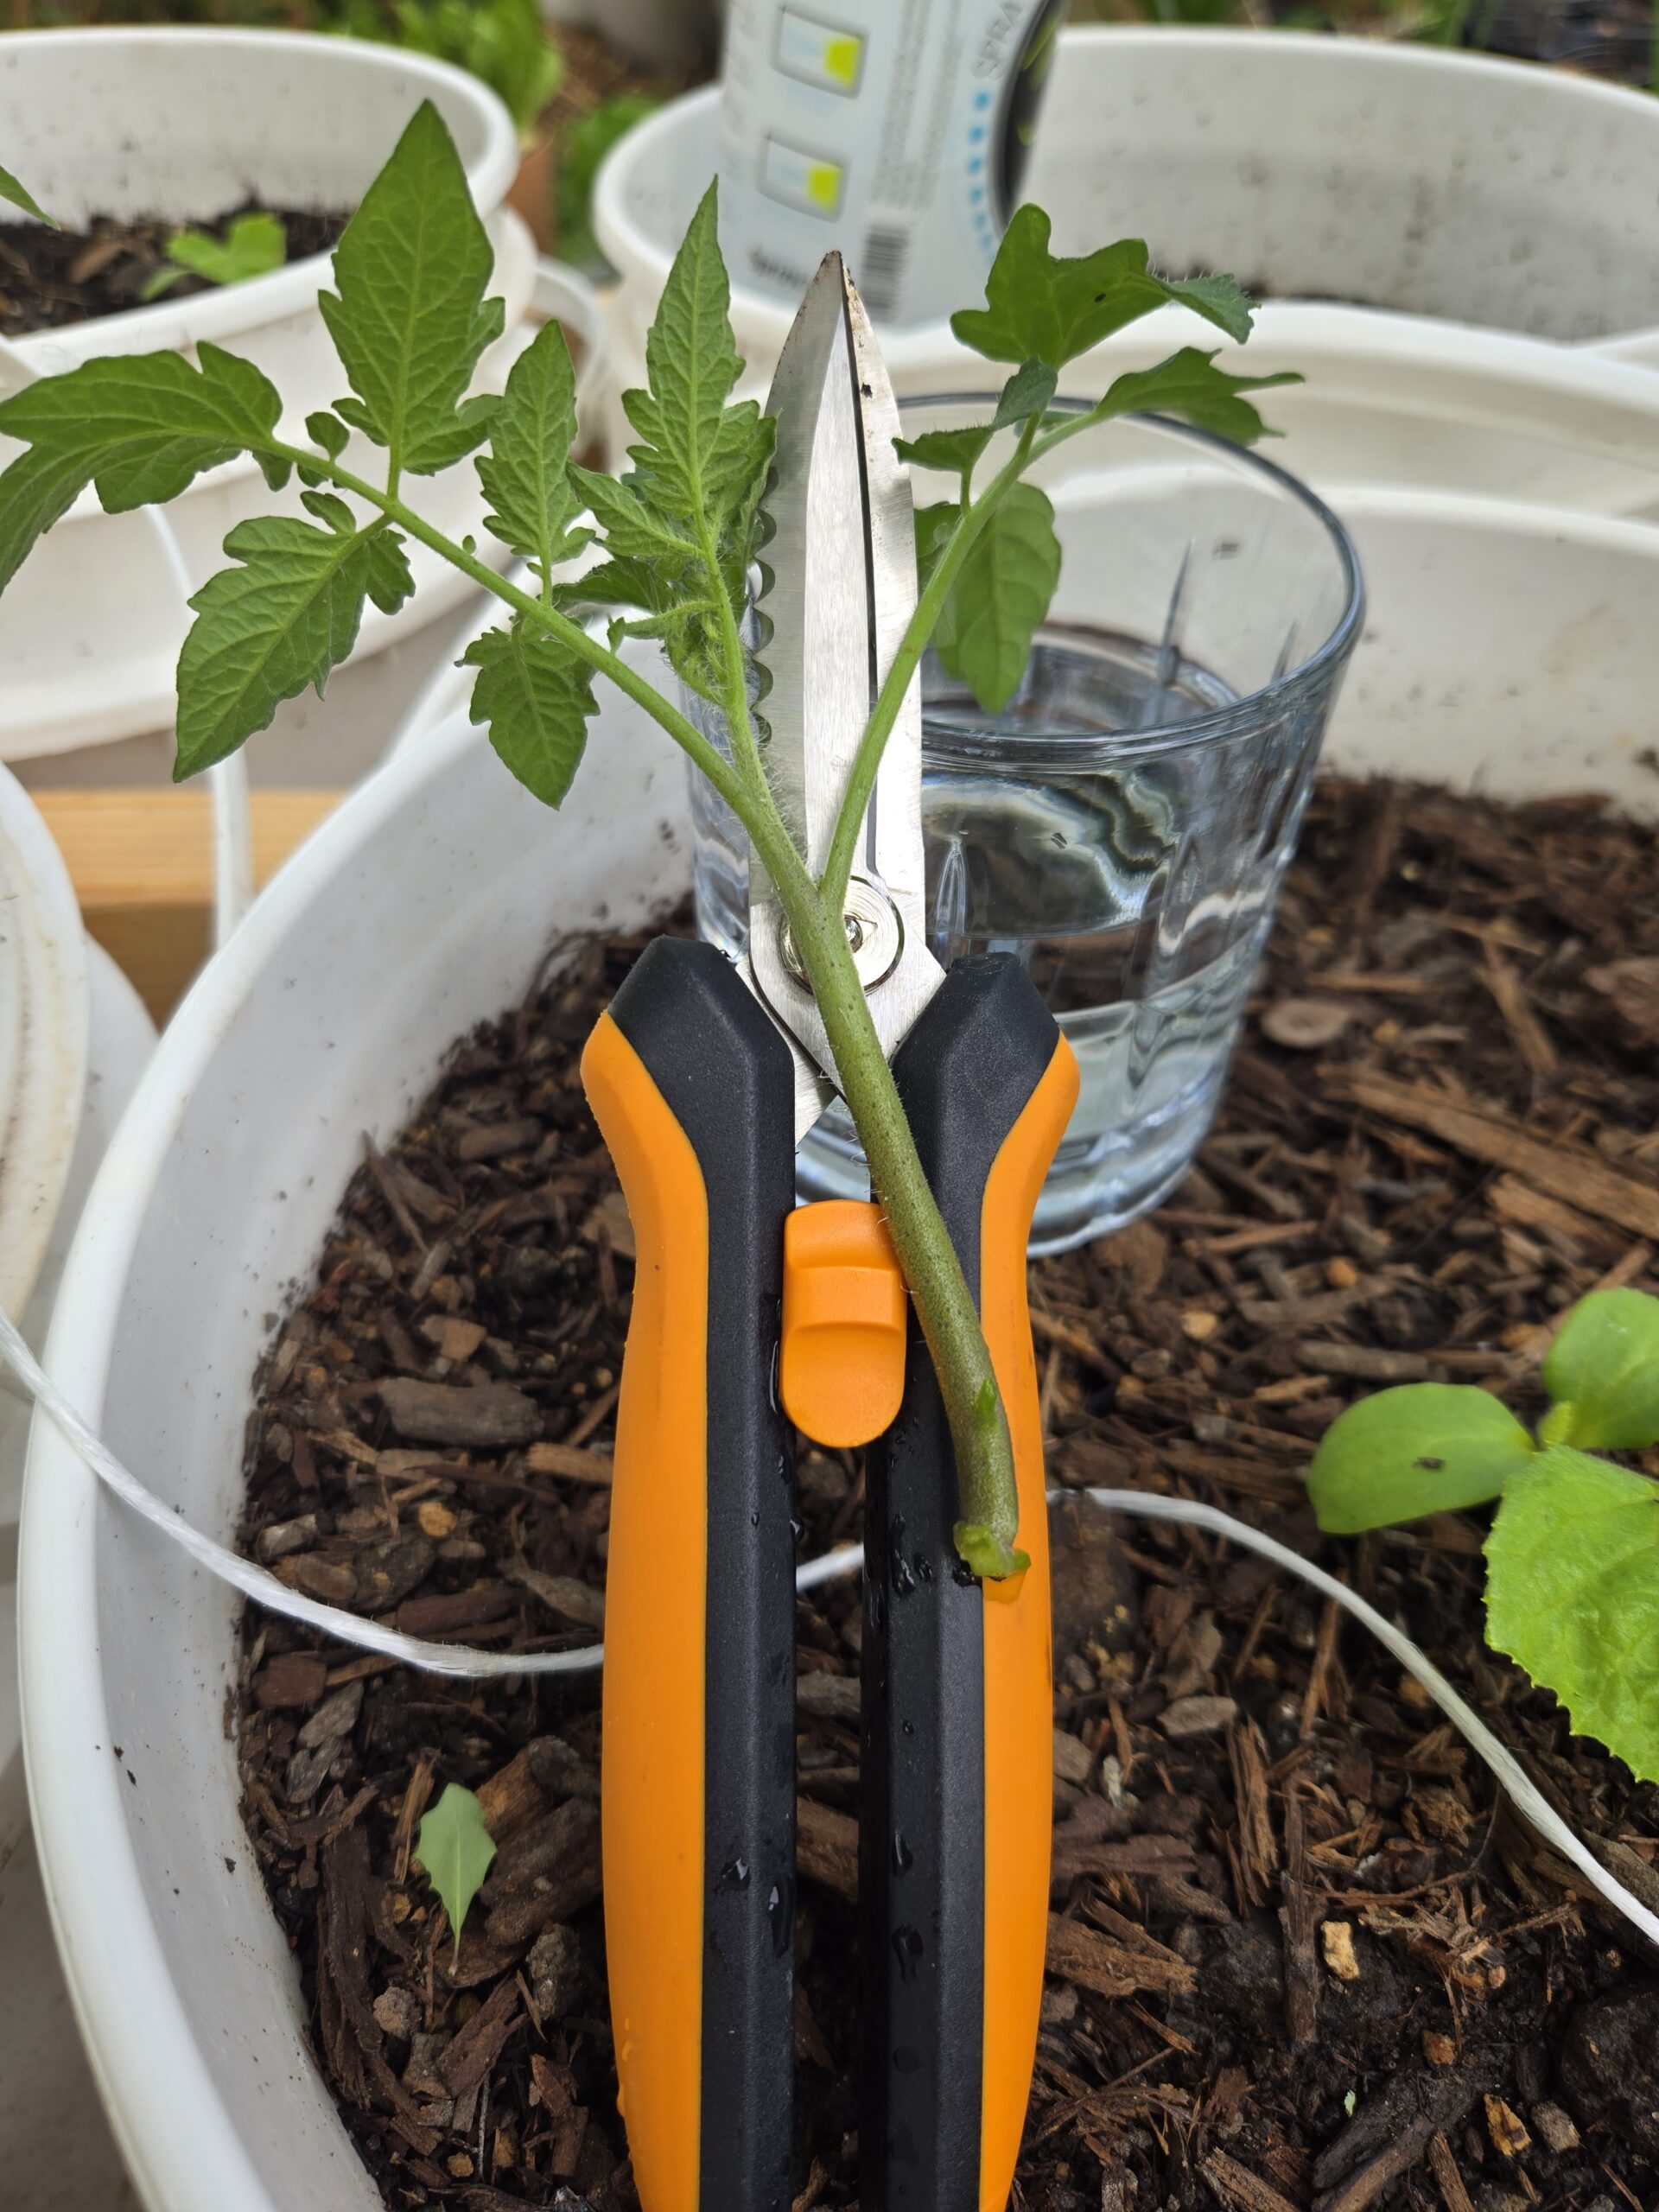
Keep them hydrated until you plant in sand
🌿 Step 4: Stick ‘Em in Sand
I use plain sand in a tray. No hormone powder. No drama. Just moisture and shade.
Simple propagation method, no hormone needed.
After snipping and briefly holding your sucker in water:
-
- Plant it directly into moist sand, as shown here.
- Press the sand around the stem to give support.
- Set your container somewhere shaded or lightly filtered — direct sun too early can wilt your cutting.
- Water gently to keep the sand moist but not soaked.
- Within 1–2 weeks, check for resistance when you gently tug — a sign roots are forming.
🌿 Bonus: Using sand instead of potting mix reduces rot and speeds up root development.
📦 Step 5: Transplant Time
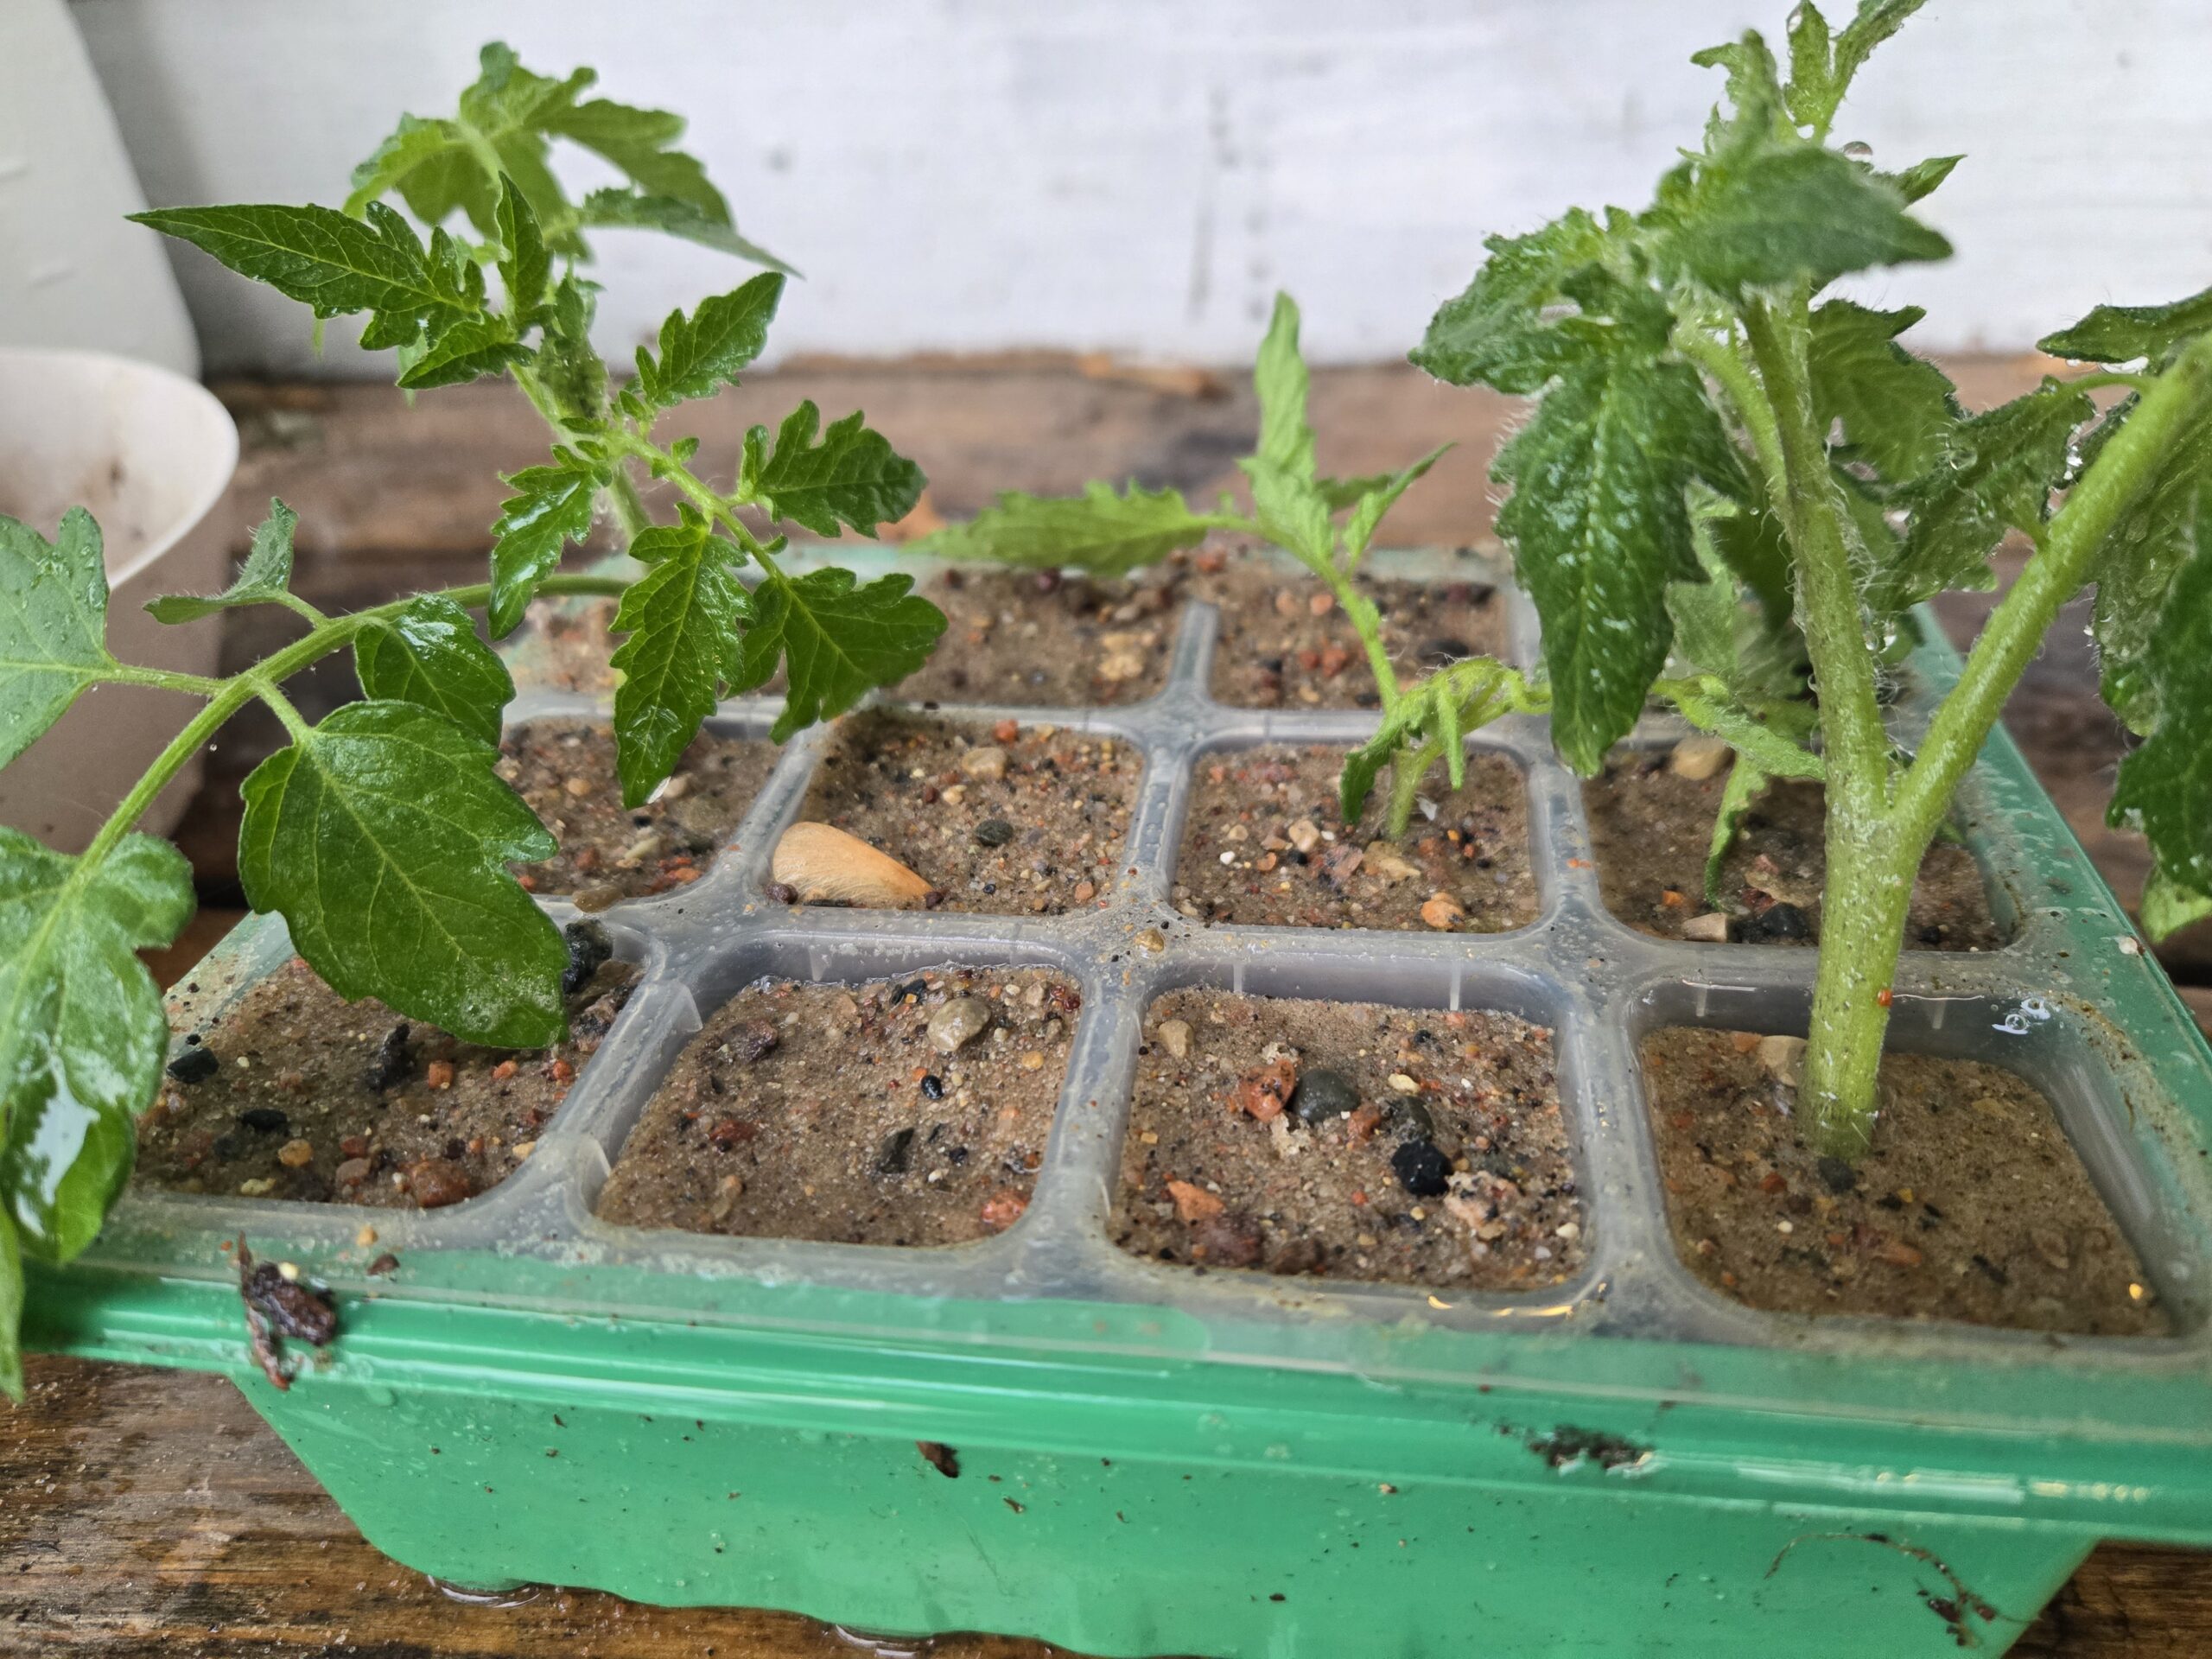
Once roots show? I pull ‘em gently and plant them deep. This time, I used a bed I hadn’t touched in years — the soil was compacted and full of weeds. I grabbed my Radius garden fork and worked through it to loosen things up without flipping it over completely. No digging. Just lift and wiggle
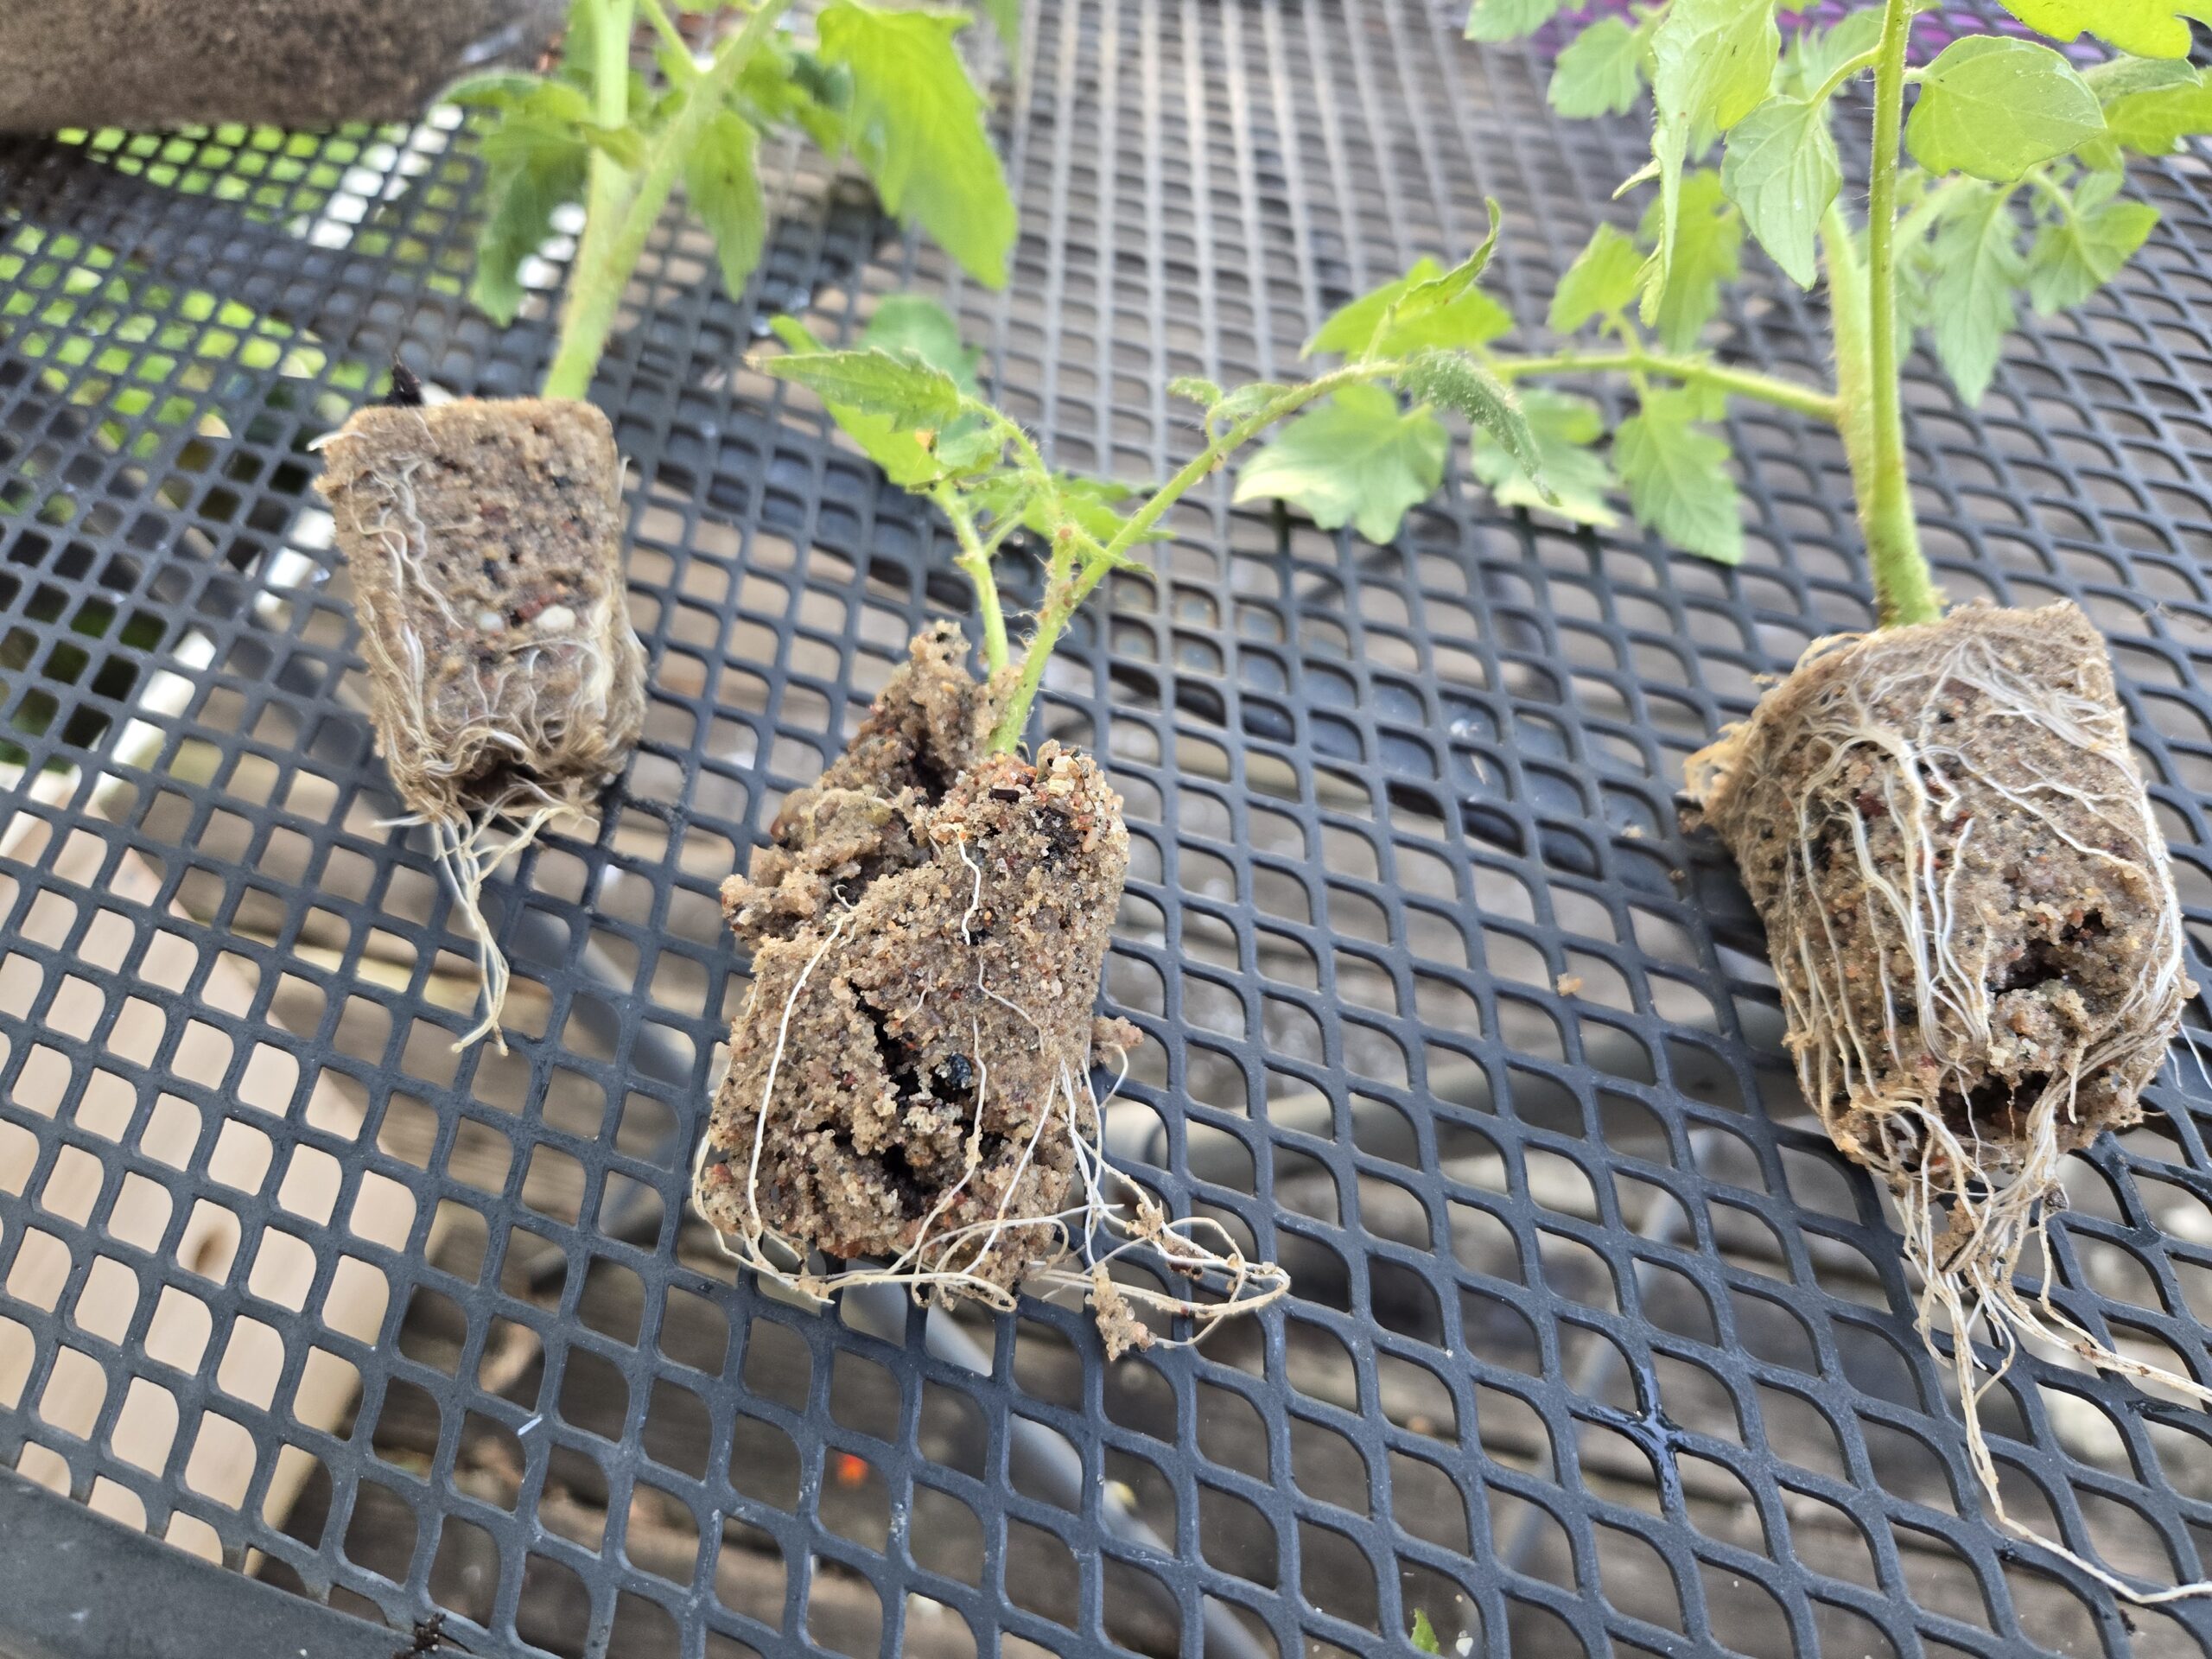
These tomato suckers rooted cleanly in moist sand — no soil, no hormones — and are now ready for transplanting. You can see the strong white roots forming around the base.
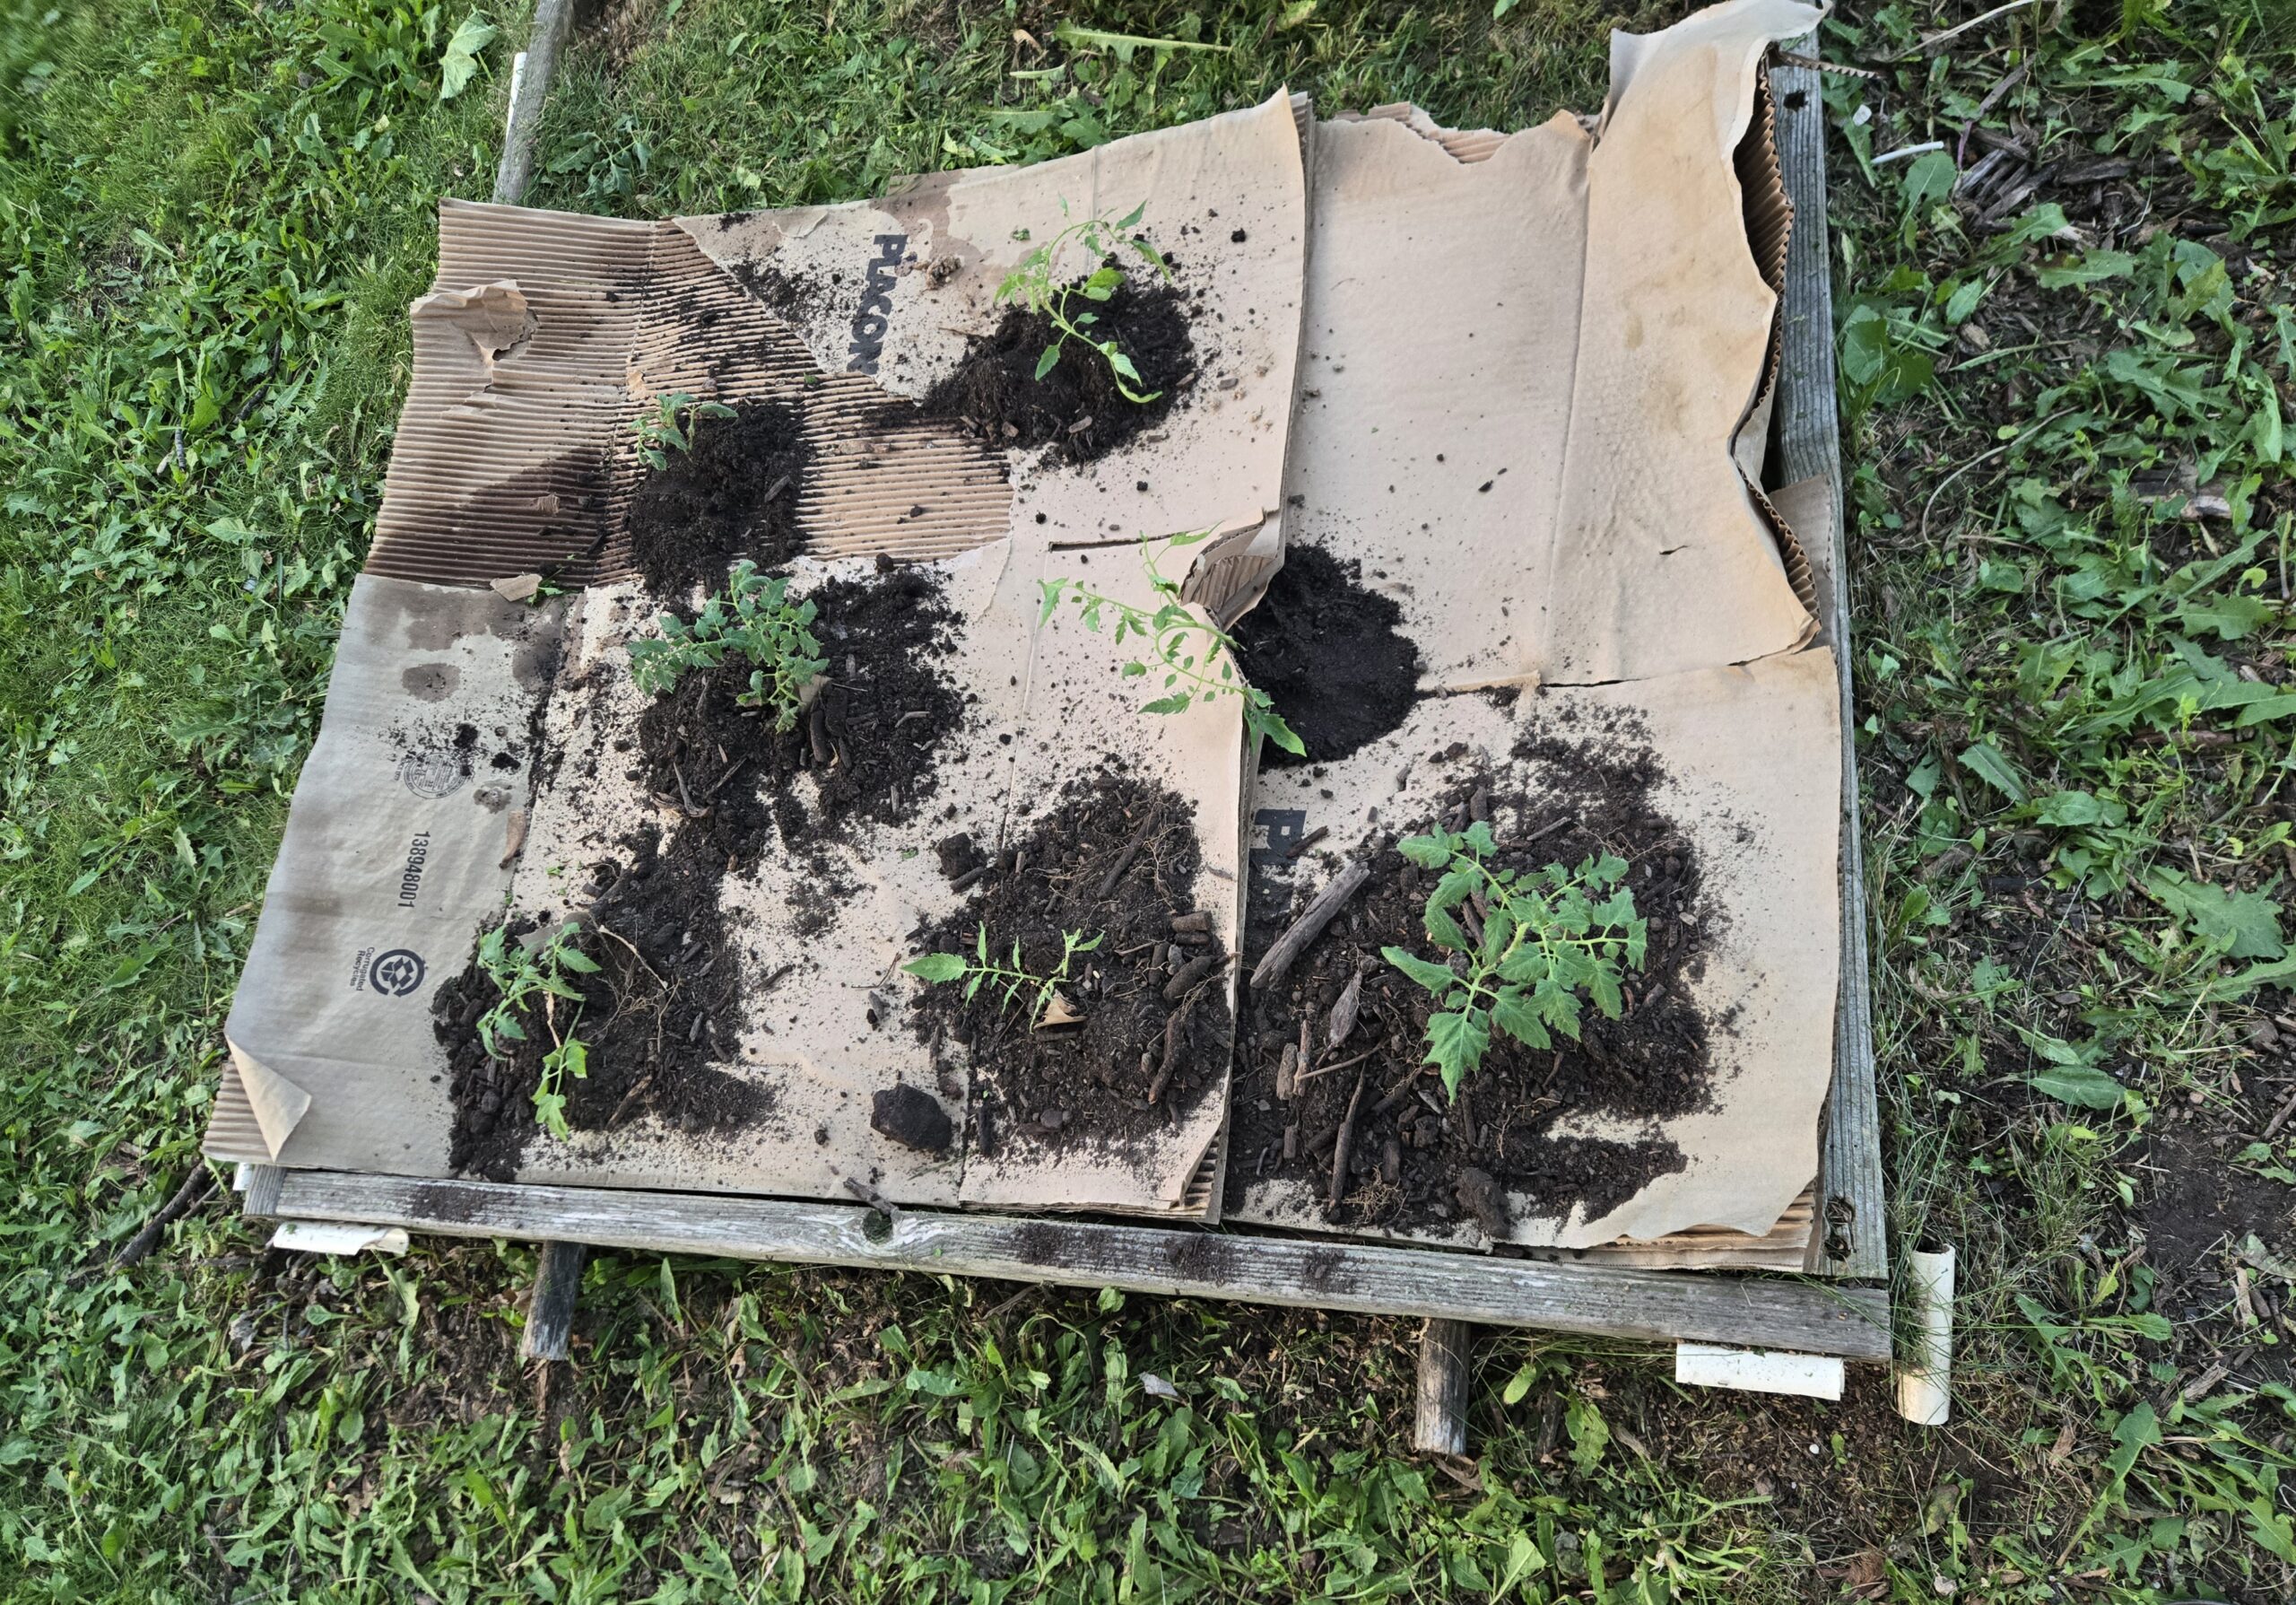
A no-dig bed makes it easy to tuck them right in.
After laying the cardboard down, I followed up with a thick layer of bark mulch. It holds moisture and keeps the weeds down while those new roots settle in.
After loosening the soil, I laid down cardboard and covered it with bark mulch to suppress weeds and lock in moisture.
⚒️ Stuff I Actually Use:
-
-
- Radius Garden Fork — aerates soil without disturbing life
- Sharp garden snips — clean cuts without squishing stems
- Basic trays for sand rooting
-
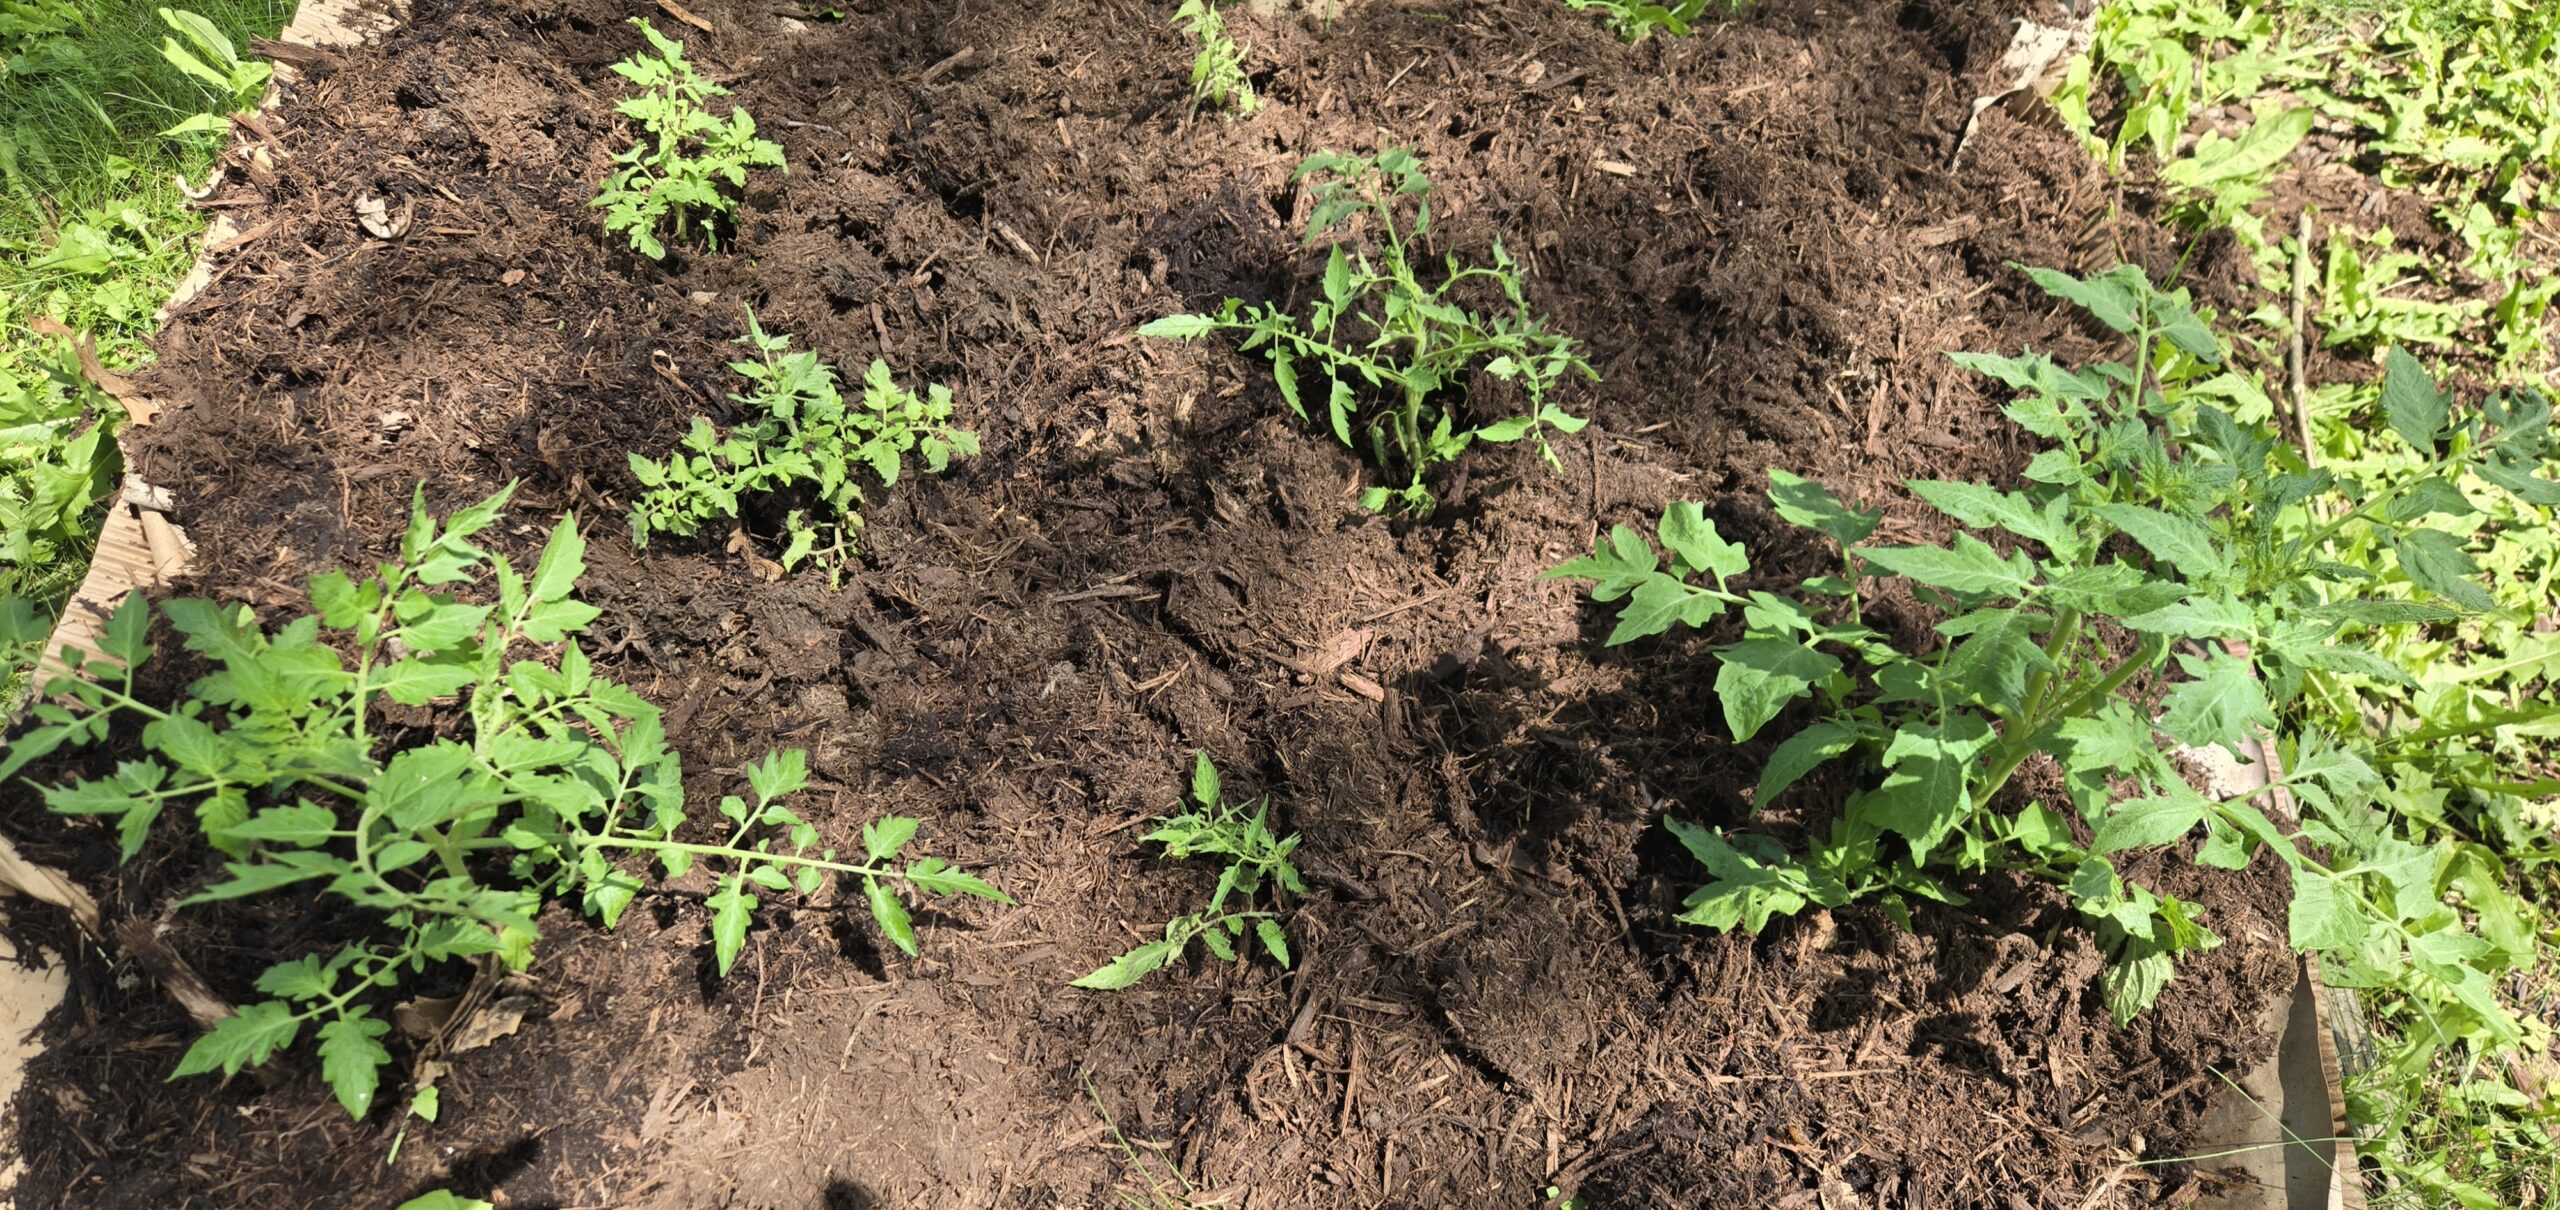
🍅 Final Update: Sept 22
These were suckers. Planted in a no-dig bed. Not watered. Barely touched.
Now they’re fruiting. I honestly forgot about them. Nature didn’t.
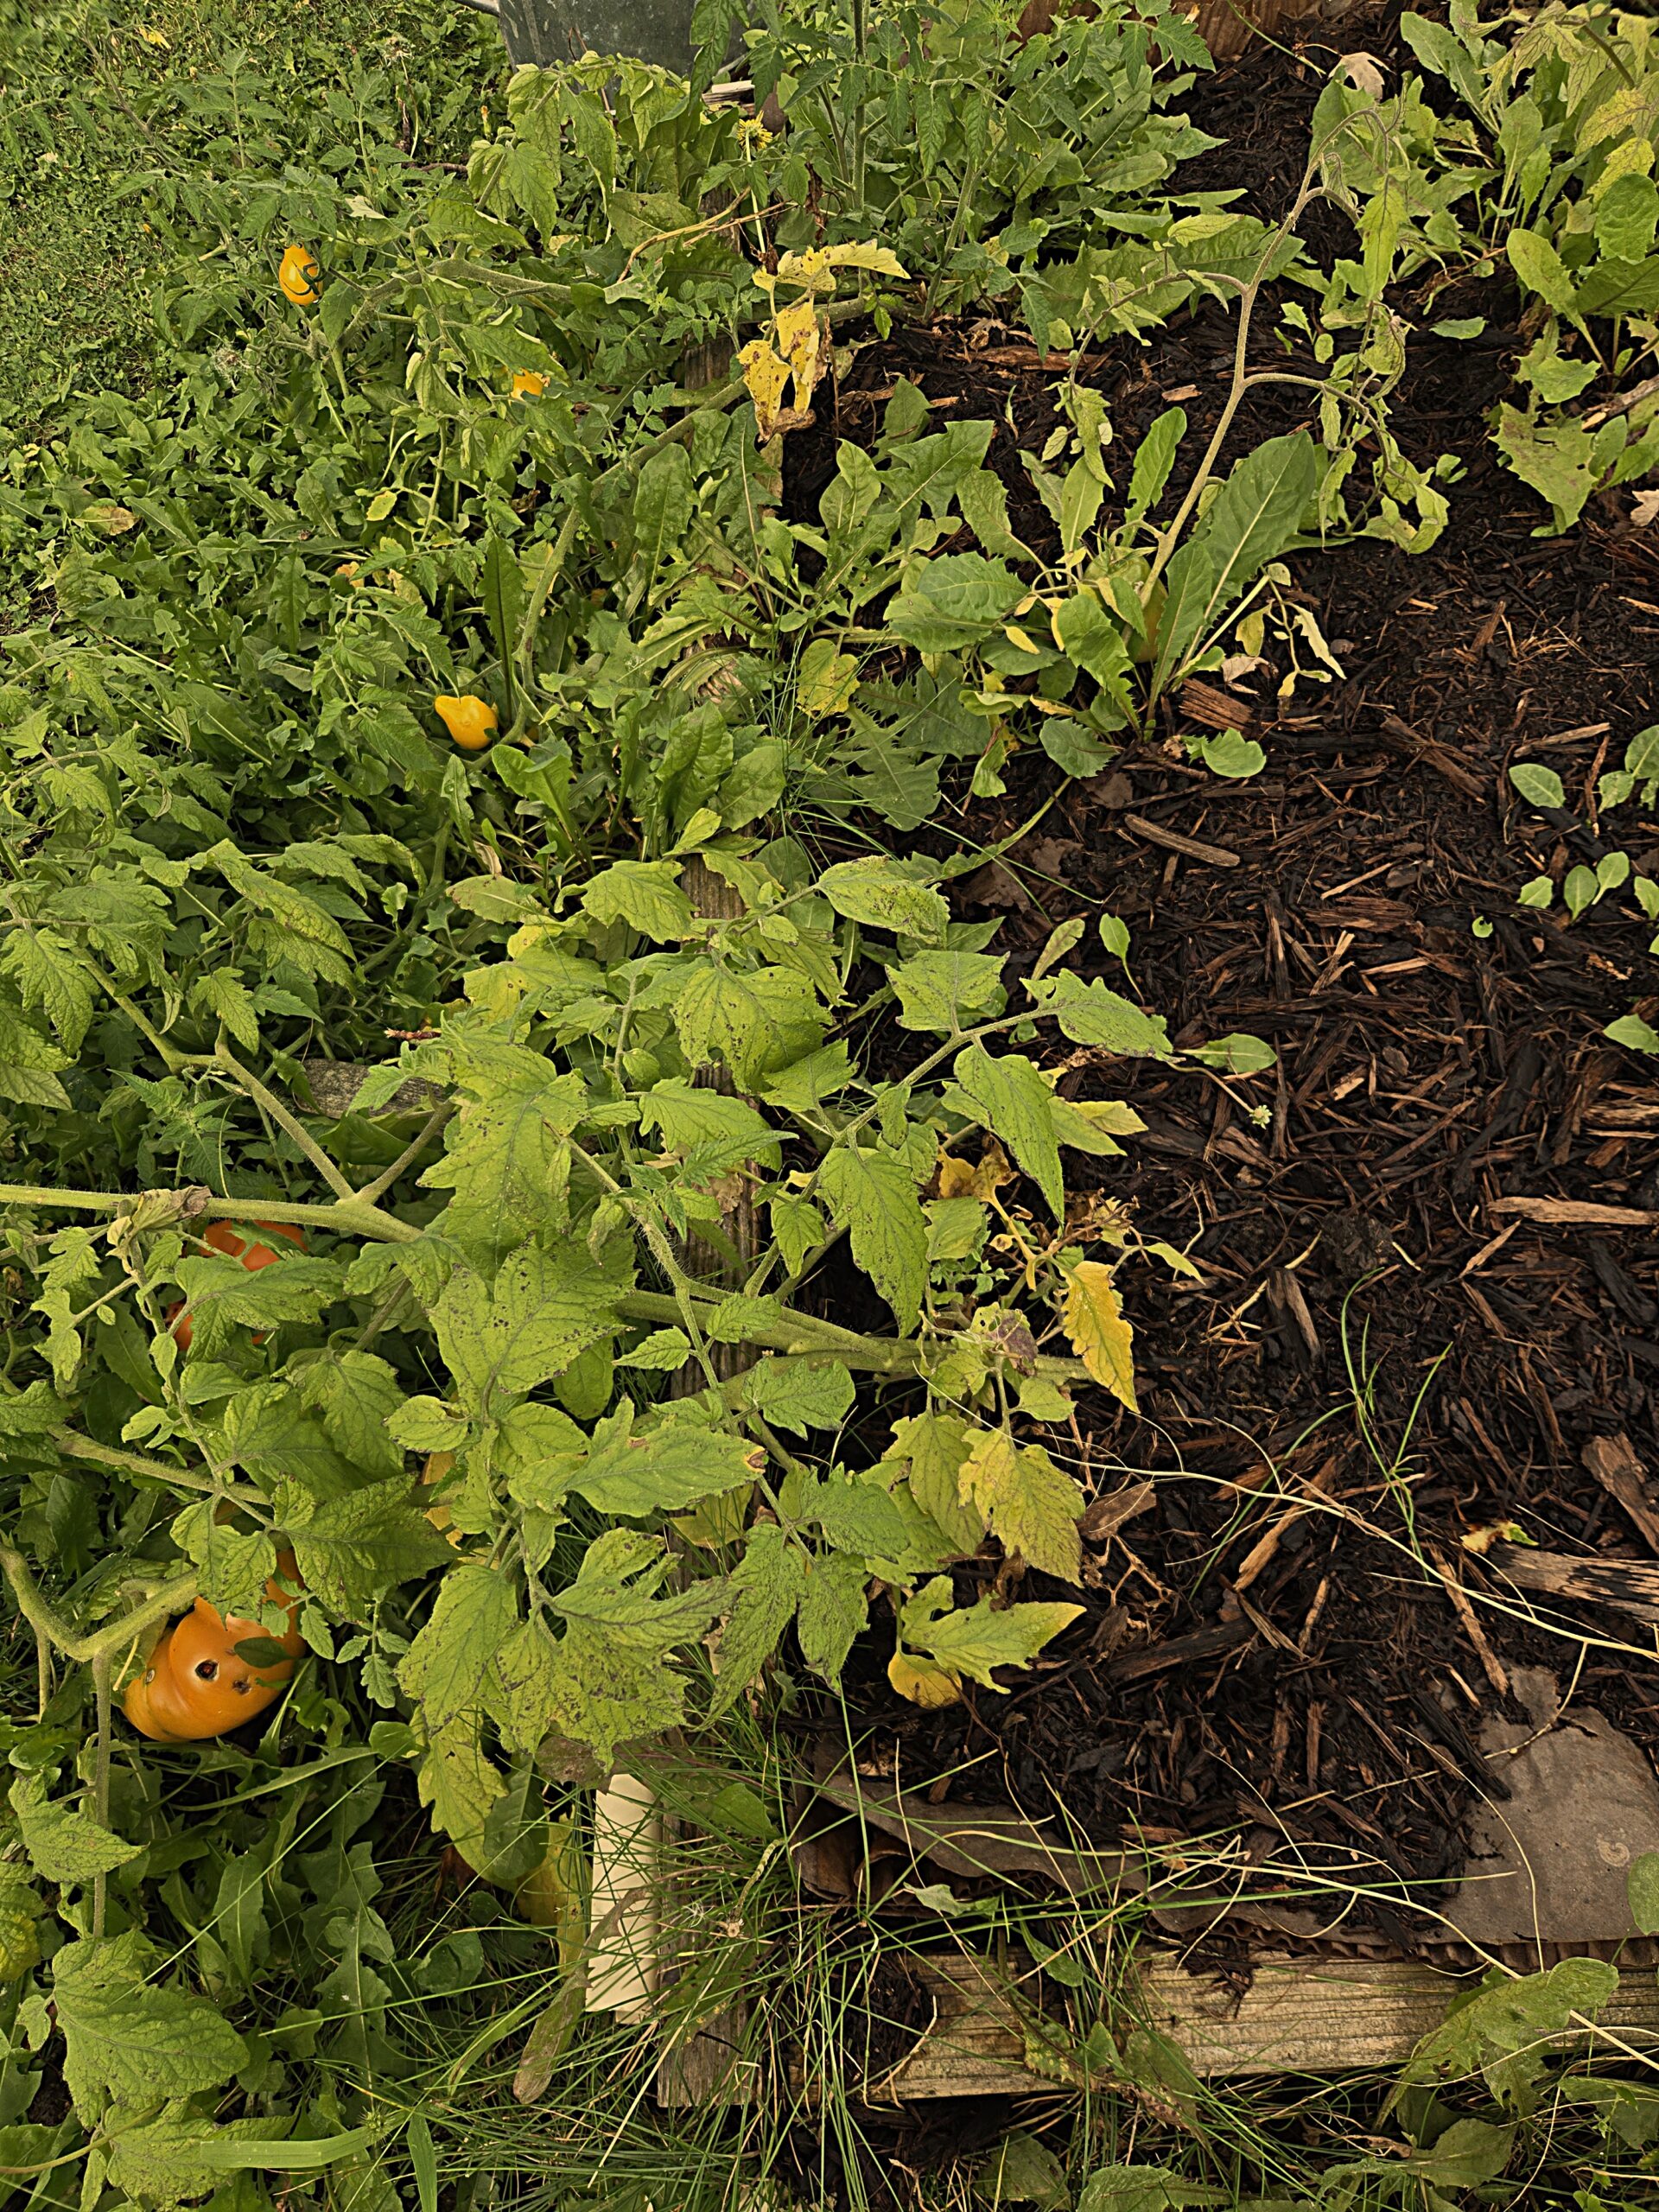
They weren’t babied. But they grew.
“They weren’t babied. But they rooted deep and did what tomatoes do — they grew.”
⚡ The Recap:
-
-
- Snip the suckers
- Root ‘em in sand
- Plant ‘em deep
- Let ‘em grow wild
-
It’s free propagation. It works. And it still feels like a little tomato miracle machine every time.
🌿 Come share your sucker stories
The Rooted are waiting. Let’s talk tomatoes, compost wins, and garden fails in the forum:
👉Enter the Sprouting Homestead Forum »
How to Grow Chamomile in a Pot (Beginner-Friendly, Tea-Ready)
How to Grow Chamomile in a Pot (Sip Calm Right from Your Porch) 🌼☕
🗒️Rooted Field Note: 26
Every time I see chamomile, I swear the plant is smiling at me 😌🌼. Tiny white petals, golden centers, and that apple-like scent that makes me stop and breathe deep. The best part? You don’t need a whole meadow. You can learn how to grow chamomile in a pot and have enough blooms for tea right on your porch, balcony, or even a sunny windowsill. One pot = endless calm. 🌱☕✨
Why Chamomile Deserves a Pot of Its Own 🪴
Chamomile is like the friend who doesn’t need much to be happy — give it sunshine, a drink now and then, and it’ll reward you with blossoms all summer long. Growing it in a container means you control the soil, dodge the weeds, and can scoot the pot around until it finds its happy place. Plus, when the blooms pop, your whole space smells like a calm summer afternoon. 🌞🌼
German vs. Roman Chamomile 🤔
Here’s the quick scoop: German chamomile (annual) shoots up tall and showers you with tons of blooms — perfect if you want tea on repeat. Roman chamomile (perennial) stays short, creeps along the pot edges, and returns each year like an old friend. I’ve grown both, but if you’re sipping tea at night like I do, German wins for pure flower power 🌸➡️☕. Roman? Cute and cozy, but a little bitter in tea.
The Pot & Soil Setup 🏺🌱
Grab a pot about 12 inches wide with drainage holes (no shortcuts — chamomile hates wet feet 🚫💦). I love terra cotta because it breathes, but a glazed ceramic pot works too. Fill it with a fluffy potting mix and stir in a handful of perlite or coarse sand for good drainage. Think light and airy, like a bed the roots can sink into without suffocating. 🌬️🌿
Planting Chamomile: Seeds or Starts 🌱✨
Chamomile seeds are tiny — like fairy dust 🧚♀️. Sprinkle them on top of damp soil, press gently (don’t bury — they need light 🌞), and mist until the surface glistens. In a week or two, little feathery sprouts will peek out like shy toddlers. If patience isn’t your thing, tuck a nursery start right into the center. Either way, give it a drink, whisper some encouragement (totally optional 😉), and let it settle in.
Light, Water & Feeding ☀️💧🍵
Chamomile loves 6–8 hours of sun. On my porch in Wisconsin, full sun makes it bloom like crazy. But when summer heat hits hard 🔥, I slide the pot where it catches morning light and afternoon shade. For watering, I do the finger test 👆 — when the top inch is dry, I water until it trickles out the bottom. Fertilizer? Rarely. Too much food makes chamomile lazy and floppy 😴. A little compost at planting is usually all it needs.
Troubleshooting the Drama 🎭
Chamomile is low-drama, but here’s the cast of characters you might meet:
- Leggy stems: Not enough sun 🌥️ — move it into the spotlight.
- Aphids: Tiny green freeloaders 🪲 — rinse them off with the hose like an eviction notice.
- Powdery mildew: Looks like powdered sugar ❄️ — trim bad leaves and give the plant more airflow.
- Flopping German stems: Use a twine corral or mini stake. Or just let it flop — tea still tastes the same. 😉
Harvesting Calm 🌼✂️➡️☕
Here’s the magic moment: when the petals are open and lying flat around the yellow cone, pinch or snip them off. I love doing this in the morning, basket in hand, while the dew dries. The more I harvest, the more chamomile offers back 🙌. Some weeks, I’m out there every other day, scooping up enough for tonight’s tea and tomorrow’s drying rack.
Drying & Storing for Tea 🍵🫙
I spread fresh blossoms on a mesh rack in a shady corner of the house. Within a week, they’re crisp, golden, and smell like summer. Into a glass jar they go — labeled, sealed, and tucked in a cupboard. On a cold winter night ❄️, a spoonful in hot water feels like opening a jar of sunshine. 🌞☕
Rooted Takeaway 🌱❤️
One pot. One packet of seed. A handful of sunlight and water. That’s all it takes to grow your own chamomile and sip calm you raised yourself. If you want to nerd out deeper, I’ll be linking this Field Note soon to my chamomile-from-seed deep dive and my herb-drying guide. For now, go grab that pot — your porch is ready to smell like peace. 🌼☕✨
Future posts: Chamomile from Seed · Drying Herbs the Easy Way · Porch-Friendly Tea Herbs
Related Rooted Field Notes: Best Organic Potting Mix Tweaks · Container Herb Companions
How to Grow Chamomile (and Why Every Zone 5 Gardener Should Start Here)
🌼 How to Grow Chamomile (and Why Every Zone 5 Gardener Should Start Here)
🗒️Rooted Field Note: 25
Why I Plant Chamomile Every Year 🌿🍵🐝
Chamomile is one of those plants that sneaks up on you. The seeds are so small they look like dust. Honestly, the first time I planted them, I thought I’d lost them. My son thought I spilled flour.
Fast forward a couple months, and there we were—standing in a patch of tiny white flowers. Bees buzzing, the smell of apples in the air. We filled a basket with what he calls “sun buttons” ☀️, and that night we made tea from our own backyard.
That’s when I decided chamomile had earned its spot here.
German vs. Roman (What I’ve Learned) 🌼🌿
I’ve tried both kinds.
– German chamomile grows tall and airy. It’s an annual but reseeds if you let it. It’s the one you want for tea.
– Roman chamomile creeps low, smells incredible, and comes back each spring in Zone 5 if you mulch it. Fewer flowers, but still worth it.
Now I grow German in the main bed for tea jars, and Roman along the edges so the bees have a runway. Works for us.
Starting From Seed in Zone 5 🌱
Here’s the truth: chamomile seeds are fussy because they’re tiny, not because they’re hard.
– I start mine indoors about 6–8 weeks before the last frost (late Feb or March).
– Sprinkle seeds on damp soil. Don’t bury them. Just press them in.
– Keep the tray moist. I mist or bottom-water. Too much water will wash them away.
– Germination takes a week or two. Sometimes longer. Don’t panic.
Once they’ve got their first true leaves, I thin them with scissors. Leaving the strongest. Before planting out, I harden them off—an hour outside, then two, then a full day.
👉 Side note: I’ve broken enough cheap seed trays to know better. The heavy-duty ones are worth it.
Moving Them Outdoors 🌞
In Zone 5, I plant them outside in May once frost danger has passed. The soil should be warming—55 to 60°F. (Yes, I actually check with a thermometer. My fingers lie.)
**Before planting outside learn how to harden off seedlings**
– Soil: Loose, drains well, a scoop of compost mixed in.
– Sun: Full sun makes them happiest. Afternoon shade is fine in the heat of July.
– Spacing: German chamomile about 6–8 inches apart. Roman 8–12 inches apart so it can spread. (Inches, not feet. I’ve seen people space them like tomatoes—nope. You’ll regret that.)
They also do well in pots, which I’ll cover in the next Rooted Field Note.
Water & Feeding 💧
Chamomile is tough once it’s settled.
– Keep soil moist while seedlings are young.
– Once established, let the top inch dry before watering again.
– Skip the fertilizer. Compost is plenty. Too much nitrogen just makes floppy plants.
Basically, don’t love it to death.
Pests & Problems 🐞🛡️
Most bugs leave chamomile alone. That smell? It’s strong. But here’s what I’ve seen:
– Aphids now and then. A blast of the hose takes care of them.
– Powdery mildew in muggy summers. Give them space, water at the base, and if you feel poetic, spray them with cooled chamomile tea. Works.
– Root rot only happens if you plant in soggy soil.
The upside? Chamomile attracts ladybugs, hoverflies, and bees. Free garden helpers.
Harvesting Sun Buttons ☀️🧺
Pick the flowers when the petals are open and starting to bend back. Pinch them off or snip them. The more you pick, the more you get.
Ten plants gave us enough tea to last through winter. My son thinks harvesting is fun. I think drinking the tea is better. Win-win.
Drying & Storing 🌞🍯
I lay the blossoms on a mesh rack in a dark, breezy spot. They dry in a few days. You can use a dehydrator on low if you’re impatient.
When they’re crisp, I store them in amber jars. Every time I open one in January, the smell takes me right back to June.
Brewing 🍵
Two teaspoons of dried chamomile. Hot water. Five minutes. That’s all it takes.
Add lemon balm and honey if you want. Or mint. Chamomile and lemon balm + mint is our bedtime blend.
Final Thought 🌻
Chamomile doesn’t need you to fuss. Plant it, pick it, dry it, drink it. It’s that simple.
If you’re new to herbs, start here. If you’ve been gardening for years, plant it anyway. Your tea jar—and your pollinators—will thank you.
Next Rooted Field Note → How to Grow Chamomile in Pots
🪴 Dig deeper into this Rooted Field Note and explore more tools from the homestead:
How to Make Lemon Balm Tea (and Why Every Tired Parent Should Try This Calming Ritual)
How to Make Lemon Balm Tea (and Why Every Tired Parent Should Try This Calming Ritual) 🍋🌿
🗒️Rooted Field Note: 24
Ever have one of those evenings where your kid’s energy goes ✈️ UP just as your energy falls flat? That was our house until we brewed our first lemon balm + chamomile “calm-down tea.” Now my son actually asks for his nighttime cup, and this dad finally gets to retire the bedtime referee whistle. 🍵✨
Why Lemon Balm Tea Works for Kiddos (and Exhausted Parents) 😴
- Gentle nervous-system calm: Lemon balm helps take the edge off restlessness without “knocking out” kids. Think mellow, not zonked.
- Sleep-friendly ritual: A warm, caffeine-free mug signals “slow down” to little bodies and brains.
- Stomach-soothing bonus: Post-dinner tummy feels better, bedtime battles shrink.
- Kid-approved flavor: Naturally lemony-sweet — a drizzle of honey is all we ever need. 🍯
Add in chamomile’s classic bedtime calm and you’ve got the dream-team blend. 🌼
How to Make Lemon Balm Tea (Fresh or Dried)
Here’s exactly how I brew it for our evening wind-down — simple, cozy, and kid-approved.
Method 1: Fresh Lemon Balm Leaves
- Harvest (5–10 leaves per cup): Pick clean, healthy leaves.💡 My confession: every time I harvest lemon balm (and chamomile), I hold those herbs right up to my face and breathe in deep. The smell is unreal — bright lemon with a hint of sunshine. My son copies me now; it’s part of our ritual and honestly we’re calmer before the kettle even boils. 🌿🍋
- Bruise the leaves: Rinse, pat dry, then tear or lightly crush to release the aromatic oils.
- Heat water: Bring to a boil; let sit 30 seconds off heat (protects delicate flavor).
- Steep: Pour over the leaves in a mug/teapot, cover, and steep 5–10 minutes. A fine-mesh tea infuser keeps floaties out of kid cups.
- Serve: Strain; sweeten with a touch of honey and a small squeeze of lemon if you like. Make sure it’s warm (not hot) for kiddos.
Sleepy boost: Add a chamomile tea bag during the steep for our “dream tea.”
Method 2: Dried Lemon Balm
- Measure: Use 1–2 teaspoons dried lemon balm per cup of water (heaping if you like it stronger).💡 Scent moment: jar-opening is my favorite part — earthy, lemony, a little sweet. I always pause and breathe it in. Dried chamomile smells like honey and summer fields. Instant slow-down.
- Load an infuser: Pop herbs into a tea ball, reusable filter, or even a French press (great for larger batches).
- Steep: Water just off the boil, then steep covered 5–8 minutes.
- Serve: Strain and sweeten to taste. Slightly deeper golden color than fresh.
Optional add-ins: a few fresh mint leaves (tummy-soothing), a slice of lemon, or a tiny pinch of lavender for parents.
Mini Guide: Drying & Storing Your Own Lemon Balm
- Harvest in the morning after dew dries for peak aroma.
- Bundle & hang small sprigs upside-down in a warm, airy spot, or use a mesh herb drying rack for bigger batches.
- Test for dryness: Leaves should crumble easily.
- Jar it: Store in airtight glass jars away from light/heat. Label with date.
Gear We Actually Use (Dad-Tested)
- ✅ Fine-mesh tea strainer/infuser — saves you from “green bits” in kid cups.
- ✅ Mesh herb drying rack — easy, compact drying.
- ✅ Glass storage jars (airtight) — preserve flavor and scent.
- ✅ Organic lemon balm seeds — start a patch right by the porch.
- ✅ Organic dried lemon balm — pantry backup for winter.
- ✅ Chamomile tea — our sleepy-sidekick.
Our Evening Ritual (Fast Calm, Big Connection)
We dim the lights, pour warm tea. Some nights he tells me about bugs and rocks; other nights we sit in content silence. The scent alone — lemon balm and chamomile — softens the whole house. What used to be hectic became connection. And I’ll be real: this calms me as much as him.
Quick Notes for Parents
- Honey caution: skip honey for children under 1 year old.
- Allergies: if your child has ragweed allergies, test chamomile cautiously.
- Medical note: this Field Note shares our experience, not medical advice. When in doubt, check with your pediatrician.
Future Rooted Field Notes (Link Spots)
- 🌱 Growing Lemon Balm (coming soon)
- 🍵 Herbal Tea Garden Basics (coming soon)
- 🌙 Kid-Calming Evening Routines (coming soon)
PS: If you try the lemon balm + chamomile blend, tell me how it goes. Bonus points if your kid does the “smell the leaves” ritual — it’s the cutest thing we do all day. 🌼🍋
our simple gear list,
more Field Notes, and
the community forum.